Building a File Cabinet
Router techniques for joinery and decoration
Synopsis: Pat Warner softened the lines of the file cabinet he built by adding a separate base with shaped legs and using a triangle theme. This piece makes a good learning project, requiring basic woodworking skills and router techniques. Warner used a router to cut the dovetailed rabbets, tongues and grooves, and sliding-dovetail joints. He used a technique called complementary template routing to make inlays in the drawers and top. A detailed drawing accompanies his explanation of how he built the carcase, made a frame-and-panel back, built the base, and made the drawers and top.
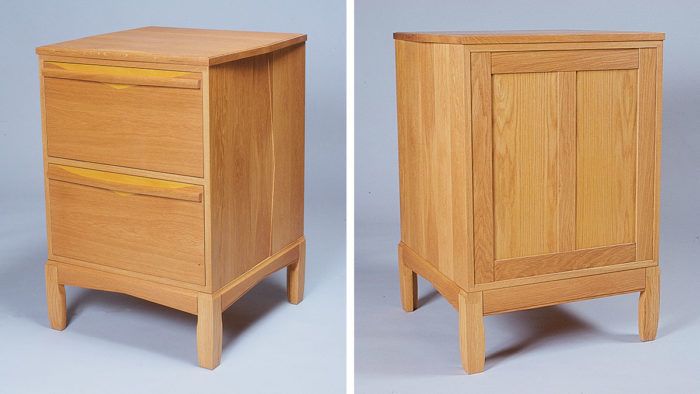
Most file cabinets look like department-store safes. My file cabinet started out as a chunky rectangular box, but I softened the lines and made it visually interesting by adding a separate base with shaped legs and by introducing a theme of triangles, which appear in many elements of the cabinet. The triangles first appear in the satinwood inlays in the drawer fronts and top, and the design is repeated in the shape of the top’s edge, in the drawer pulls and in the shapes cut from the aprons on the base. Rabbets routed into the aprons and top and recessed opposing-triangle accents routed into the sides create shadow lines that reinforce these triangular designs. This is one of those rare projects that I wouldn’t change if I were to build it again, but if you think it looks difficult, you could ignore most of the detail work, thereby simplifying construction, and still produce a good-looking, functional piece.
Building this file cabinet, shown in the top photo, is also a great learning project; it includes basic woodworking skills and is a tour de force of router techniques. The carcase is a simple white oak box that is joined with router-cut dovetailed rabbets, tongues and grooves, and sliding-dovetail joints. Designing the joints for the frame-and-panel back, shown in the bottom photo, was a challenge because each element is in a different plane. Although the back is unnecessarily complicated, it creates an extremely rigid carcase and makes the cabinet attractive enough to be used away from a wall. I decorated the drawers, which are joined with sliding dovetails, by routing a contrasting triangle of satinwood into each drawer front. Both drawer inlays and a satinwood triangle inlaid into the separate top were fitted by a process called complementary template routing: A router with a bushing or ball-bearing piloted bit is guided by a master template to simultaneously create complementary working templates. These templates then guide the router to create perfectly matching pieces that fit together snugly.
For maximum accuracy, I also used a template and a ball-bearing guided bit to shape many of the cabinet pieces, such as the overhanging sides and the front edge of the top and aprons. I usually assemble my own piloted bits by adding a bearing with an inside diameter matched to the shank of the router bit and an outside diameter suited to the job at hand. As a safety precaution, be sure that the cutting diameter of the bit is greater than the inside diameter of the bearing and that at least in. of the bit’s shank is chucked in the router’s collet. If the shank is long enough, I sometimes stack two bearings on the bit for greater depth of cut, to cover the shank on longer bits and to ensure solid contact with the template.
From Fine Woodworking #87
For the full article, download the PDF below:
Fine Woodworking Recommended Products

Circle Guide

Blackwing Pencils

Compass


Comments
OK so I built this last winter and it worked out fine. I used tongue and groove for the sides and fewer dovetails than the author. I also just used a flat 1/4" ply for the back, as mine sits against a wall. I added Green & Greene elements; the cloud lifts on the support between the legs and ebony plugs where the joints come together. I added G&G style drawer handles as found in Pert's books. I didn't make the sides as decorative either, preferring to let the grain speak.
Using white oak for the wood and applying a red mahogany stain, it looks like a G&G effort.
Log in or create an account to post a comment.
Sign up Log in