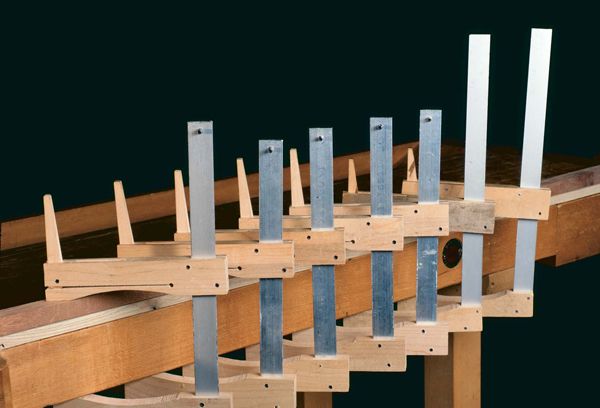
Synopsis: Steven Cook uses cam clamps for jigs and fixtures, for anchoring a workpiece to a bench for routing, and for laminating. Rather than using a screw to exert pressure, the clamps use a cam; the sliding jaw is kerfed, allowing the jaw to flex when the cam is rotated. These clamps can be made quickly and inexpensively from scrap material. A drawing shows precise measurements and dimensions.
A while back, I was hired to replace the veneer on a Steinway grand piano that had been damaged in a fire. Veneering the sides required more clamps than I owned or could afford. But I remembered facing just such a situation when I was an apprentice to a pipe-organ builder. Armed with a Swedish-made cam clamp as a prototype, we churned out a batch of 50 clamps before quitting time.
I was working alone, so it took longer to make the clamps I needed. But I used wood from the scrap bin and aluminum from the junkyard, so I spent next to nothing.
I use these clamps for jigs and fixtures, anchoring a workpiece to a bench for routing and laminating wood strips around a form. You just have to keep in mind that they don’t exert a lot of clamping pressure.
How the clamps work
These clamps are a variation of a standard screw-bar clamp. One jaw is pinned to the end of the bar, and a sliding jaw moves along the bar to adjust the clamp opening. Rather than using a screw to exert pressure, the clamps use a cam. The sliding jaw is kerfed, as shown in the drawing, allowing the jaw to flex when the cam is rotated. To use the clamp, simply squeeze the clamp jaws together with hand pressure, and rotate the cam.
How to make them
My standard cam clamps are made from scrap blocks of maple, oak or some other dense hardwood about 8 in. long by 11⁄2 in. wide by 3⁄4 in. thick. You can make the jaws longer or shorter to suit your needs.
The weak part of the clamp is the end grain at the tail of the jaws where the pins connect the jaws to the bar. The fixed jaws are pinned into the bar, and the sliding jaw has pins on either side of the bar. As pressure is applied, the pins want to split the end grain of the jaws. To prevent this, make sure the tail end of the jaws extend beyond the bar by at least 3⁄4 in. If they don’t, the clamp will fail.
I use 1⁄8-in. by 1-in. aluminum for the bar, which I get at a scrap dealer or from the local hardware store. To some people, this stock may seem light, but I’ve never bent one.
From Fine Woodworking #117
For the full article, download the PDF below:
Fine Woodworking Recommended Products

Veritas Micro-Adjust Wheel Marking Gauge

Double Sided Tape

Tite-Mark Marking Gauge


Log in or create an account to post a comment.
Sign up Log in