Clamping Panels the Easy Way
An inexpensive vertical press saves space and makes aligning boards a snap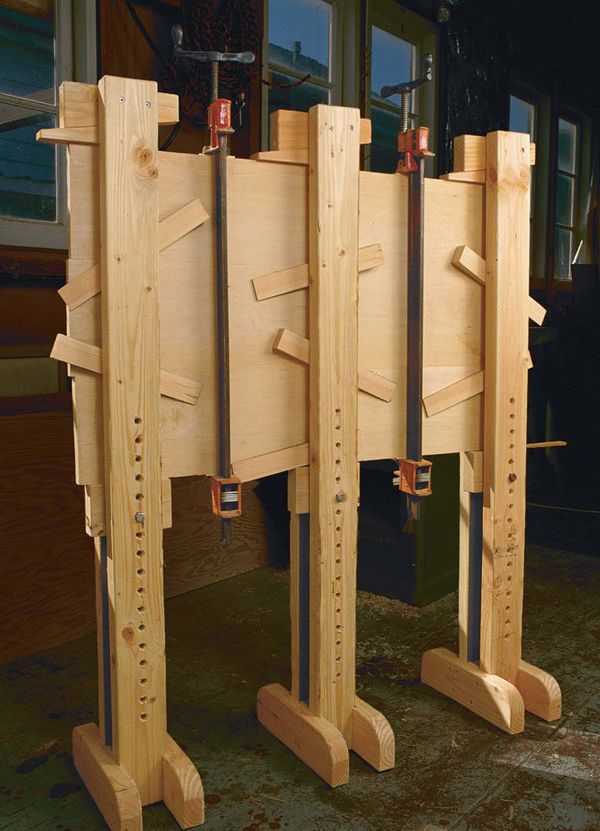
Synopsis: Jim Tolpin built a vertical press to hold large pieces during clamp-up to free his bench and prevent racking in the piece while it cures. The press is made from 2x4s and 2x6s and common hardware, and Tolpin explains how to build. He talks about how he uses it and how to ensure uniform clamping pressure. A small project plan clarifies how the press goes together and works.
When I need to glue up small panels, I just gather up a few pipe or bar clamps and work right on my bench. When I have everything clamped, I take the assembly and set it against a wall, taking care not to rack it when I set it down.
Large panels, like tabletops, and large glue-ups, like full-sized entry or interior doors, aren’t so easy. Moving heavy pieces like these can be more than a little unwieldy, making racking much more likely. And leaving the whole assembly on my bench until it dries isn’t a good solution either. That’s why I built a vertical press.
Awhile back, I saw a professionally made vertical press in an industrial cabinet shop and realized that the press was the solution to my problem. But the press cost a lot more than I was willing or able to spend. So I designed my own and made it from 2x4s and 2x6s and common hardware.
Besides keeping my bench free when I’m doing large glue-ups, the vertical press virtually ensures that the panels will be flat and correctly aligned. And because the press is made from 2x stock, it’s light, easily movable and priced right.
There are other advantages to my vertical press. Both sides of the assembly are readily accessible, making it easy to inspect the joints front and back and to remove any excess glue. Because the press is inexpensive, I can afford to build a number of them. And plastic laminate on the inside face of the back 2×4 of each upright keeps the boards I’m edge-gluing from becoming part of the press.
Using the press
To clamp up a panel or a flat assembly, such as a door, I start by measuring the overall width of the panel or assembly. Then I add a little space for a wedge at the top, maybe 2 in. or so. I bolt the lower stop block in place at this distance from the fixed top block.
Then I run the first board of the panel between the uprights and spread out the individual presses, spacing them from 12 in. to 16 in. apart. I tap a wedge or wedges (also faced with laminate to prevent them from adhering to the panel) between the face of the board and the front upright to hold the board in place. I apply glue to the edge of this first board as well as to the mating edge of the next board, which I then slide into the press.
From Fine Woodworking #112
For the full article, download the PDF below:
Fine Woodworking Recommended Products
Milescraft 4007 6in Bench Clamp

Estwing Dead-Blow Mallet
MicroJig Matchfit dovetail clamps




Log in or create an account to post a comment.
Sign up Log in