Safety Manual: Table Saw
If not used properly, the table saw can be very dangerous. Learn how to use it correctly!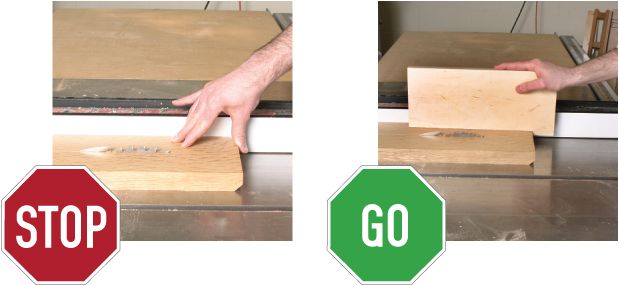
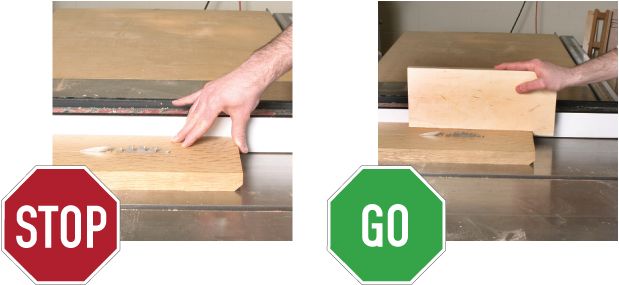
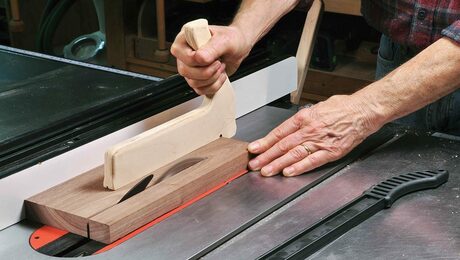
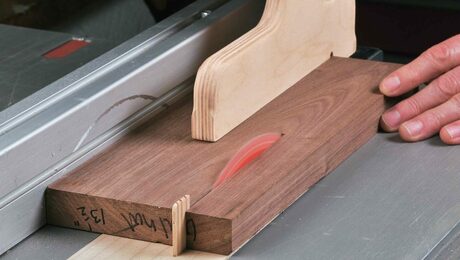
Wrong Way, Right Way: Use a push stick to keep your hands away from the blade, and a splitter or riving knife (visible just behind blade) to help prevent kickback.
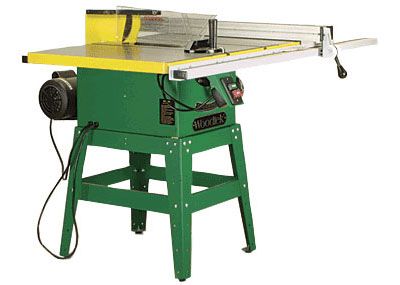
The table saw is the center of most woodworking shops. If set up correctly, this powerful machine can make a wide variety of clean and accurate cuts.
On its own, the table saw rips boards to width, cuts them to precise length, and makes a variety of angled cuts. With a bit of help, it can also cut joinery. Add a dado set (an adjustable stack of blades) and you can cut dadoes, rabbets, and box joints. Make or buy a tenoning jig for precise tenons of any size. Another popular jig is a crosscut sled, used for pieces that are too large for the table saw’s miter gauge.
If not used properly, the table saw can be very dangerous. We recommend using a splitter or riving knife whenever possible, to prevent violent kickback, and push sticks to keep hands away from the exposed blade. The following is a list of all the safety precautions for using a table saw.
Before you begin using a table saw:
1. Avoid loose-fitting clothing
2. Roll long sleeves up above elbows
3. Wear non-skid shoes
4. Keep shirt pockets free of items
5. Wear ear and eye protection.
6. Don’t operate while tired or under the influence
7. Do a visual check with the machine unplugged before using
8. Make sure portable table saws are securely fastened to a stand
9. Be sure the power switch is off before saw is plugged in
10. Check blade guard and anti-kickback pawls for proper operation, and check the alignment of the splitter.
11. Check blade for tightness
General rules for table saw use:
1. Keep a splitter or riving knife in place whenever possible, to prevent dangerous kickback.
2. The table saw blade height should be set so that the top of the teeth extend no more than 3/8 in. above the surface of the workpiece.
3. Use a table saw blade guard whenever possible.
4. Always have additional outfeed support in place at the back of the saw table.
5. Don’t stack workpieces when cutting.
6. Never position your hands or fingers in the path of the table saw blade.
7. Don’t reach behind the table saw blade and pull the stock.
8. Don’t release the workpiece until it is all the way past the back of the table saw blade.
9. Turn the table saw off and allow the blade to stop spinning before you pick up stock or scrap.
10. Unplug the saw when you are changing the blade.
11. Keep the table saw blade clean and sharp and the table saw well-tuned. This includes aligning the miter slots and the rip fence with the blade.
12. If the table saw motor slows down when cutting, slow the feed rate.
13. Never back a board out of a cut.
Crosscutting and Ripping:
1. Don’t use the miter gauge and the rip fence together.
2. Use the miter gauge or a sled for all crosscutting and the rip fence for ripping.
3. Don’t saw a piece freehand.
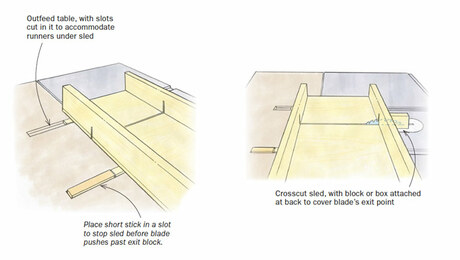
4. If crosscutting a long workpiece, use a long miter gauge fence or a sled and support the far end of the board hanging off the table.
5. Don’t use the miter gauge for wide workpieces that force the miter gauge off the front of the table. Use a sled instead.
6. Never rip wood that is twisted, warped or doesn’t have a straight edge. Joint at least one face and one edge. Run the flat face on the table and the straight edge against the rip fence.
7. When making rip cuts, stand to the left of the blade. UPDATE: This rule depends on the location of the blade. The key is to stand out of the way of the path of the blade and workpiece.
8. Use a push stick when making rip cuts narrower than 6 in.
9. When ripping, apply feed force to the workpiece between blade and fence.
10. When cutting a bevel, place the rip fence on the side opposite of the bevel cut.
Specialty Cuts:
1. Use a sled or jig to control the workpieces when the miter gauge or rip fence do not offer enough support, such as when cutting tenons or very small pieces.
2. To make a plunge cut, clamp down the workpiece and raise the blade. Don’t place the workpiece on top of a moving blade.
Do you have more table saw safety advice to share or a scary table saw story? Post a comment below and help your fellow woodworkers stay safe.
Fine Woodworking Recommended Products
Rockler Dust Right 1250 CFM
Ridgid R4331 Planer






Comments
Great stuff, thanks for posting this. Any thoughts out there on top models? My craftsman is done and I'm looking for a new on.
You can use the online Tool Guide to browse all the tablesaws we've reviewed in the magazine. Click on the "Tool Guide" link in the top navigation then navigate to the section on tablesaws. Whatever you buy, make sure it has a splitter or even better a riving knife!
I do have a question regarding blade height on a tablesaw. Being new to woodworking, I've read books, watched videos and received advice from experienced woodworkers and have received the same answer: "blade should be no more than 1/4 inch above workpiece and fence and blade set at 90 degrees. Here is the kicker:
While at my favorite woodworking supply shop, there were 3 or 4 representatives from a named blade mfg. I watched and they asked me if I had any questions. Well, that was the opening. I told them I was working on a project and was using red oak and was getting a lot of "burn" when I cut. They asked to show them on the saw they were using as a demo how I was making the cuts. I showed them and indicated I made sure the blade was set to 90 degrees. When I first lined up a piece to cut for them, I set the blade about 1/4 " above the workpiece. They indicated that was my first mistake. They said the blade should be raised as high as it could go! The reason being, the carbide tip blades get hot when not raised therefore expanding and causing burn. Secondly, they said to "off-set" the fence about 1/16 or so away at the end of the fence. Now, all of this is in direct contradiction with everything I've read or heard. I've tried raising the blade (only as far as I felt comfortable with as a spinning saw blade high enough to feel the wind from it makes you think twice) and it does stop the burn. And, they said most "Eurpoean" saws only have fences running just pass the blade. The reason for the offset was the blade is only cutting at the front, not the back. Thus reducing the cahnce of kickback, which I've been injured by.
Now, does anyone here have any comments on this? I've sent the question to FWW but have not received a response as of yet.
Any help would be appreciated.
Thanks,
Jerry
Set the blade height to about 3/8 in. above the workpiece. That happy medium will keep the blade cutting properly while not exposing too much of it to your precious fingers. As for offsetting the fence, don't do it. You are making the board travel in a crooked path over the blade, which is dangerous in my opinion. (Having a short fence that stops behind the blade, as the Europeans do, is a whole other story, and is fine.) Instead, be sure to keep the splitter in place. That will take care of kickback in almost all cases. Better yet, buy a saw with a riving knife. They hardly ever to come off the saw, even for angled cuts and cuts that don't go all the way through a board.
--Asa Christiana, editor, FWW
Lots of good advice here. Re: setting blade height, I learned to raise the blade so the gullets just clear the workpiece. This allows all the waste to clear the blade and helps prevent heating. I certainly would not have three inches of blade exposed while cutting a 3/4" board.
I have been in lots of shops and never seen anyone using a blade guard on a table saw. My Powermatic 66 came with one. But it interferes with the sight line to the cut, especially when the plastic gets scratched or dirty. It also has all this distracting extra motion so it is harder to see the work piece. So I have never used it after some initial tries.
The splitter is attached to the guard which is a problem until I recently made splitters attached to throat plates. I like that a lot. But not the guard.
I would be interested in some folks discussing the issue who have successfully used their guards and how they got past the issues that have stopped me.
Maybe Fine Woodworking can review guards. I would be interested in a survey of how many of us really use them.
"7. When making ripcuts, stand to the left of the blade."
That one surprises me. Regardless of which side of the fence you are using for the rip? Regardless of whether you are right or left-handed?
Like the first poster, I don't understand why one stands to the left of the blade when ripping. If that is the case then why is the power switch on the right side? In case of an emergency I would then have to cross directly behind the blade to shut down. Also, it seems to me that one's right arm will always be at risk unless the point of contact of the board is also on the right which I would think is a no-no since that could in principle cause the blade to bind.
Freud recommends that the blade be raised so that the bottom of the carbide tooth doesn't clear the cut. Who should you believe?
I would like to know who recommended raising the blade to full height. One word "idiot"
Seems that a lot of old timers were called idiot, and lived longer than those by some other name.
Case in point, when I was much younger one of my friends walked into a sawmill as the saw grabbed the flitch and removed his head from eyebrows up. Granted it was not a 10 inch blade that threw it, but the principle still applies if you don't want pieces of timber bouncing around the room, with or without riving knife and short or long fence. The cutting force of a high blade is nearly perpendicular to the direction of the travel, this makes it difficult to throw the timber but may lift the rear of the board.
If the contact area of the carbide on a shallow blade is compared with that of one set high, it is fairly obvious that the carbide contacts for a much shorter time, hence less heat build up. Unfortunately a rougher cut results as is to be expected.
On friendly timber, that behaves nicely, I keep the blade with bottom of gullet clear for waste clearance. On our dense hardwoods the blade goes to near full height unless it is under 3/4" thick using a 12" saw.
Every piece of timber is different, therefore no one position is right for all.
If you don't use saw a guard where ever possible, I recommend Russian roulette, you won't bleed as long that way, unless you have your U-Beaut saw stop.
Basically, the point is to stand out of the line of fire (which is the line between the blade and the fence. If your saw has the switch on the right, then move is to the left. Also put a paddle of some sort over the switch so you can hit the paddle with your foot or hip to turn off the saw--that way, you can keep your hands on the board or panel if it starts to shift and you want to turn off the saw. If you are mostly cutting solid stock for making small furniture for the fun of it, you actually don't need a table saw--but that's a whole 'nuther story!
My personal guiding principle is, "Be afraid. Be very afraid." We know what damage a sharp tool can do to a piece of wood, so one must always visualize soft tissue being substituted for hard wood. Now, I'm not referring to PARALYZING fear. I just pause long enough to think about what can go wrong, and then proceed accordingly. Where will the tool go if it slips? Don't put your bodypart there. Where will your hand go if it slips? Arrange your work in a different position. Where will a cutoff go? Don't go there yourself. Where's the blade's danger zone? Once you're certain, stay out of it. This works for me -- sixty years with only minor nicks and bruises.
One thing I always agree with is respect the tool.
Do not let your guard down for even one second.
Count your fingers before and after using the tool.
Hopefully 10 before and 10 after (the magic number)
Call be a idot but I have read and was recommended that the blade be raised as high as you can. This causes the cutting edges of the teeth to force the cutting force down instead of the front of the saw. Guard is always down in place and the splitter always in use.
Using the above, I have never (in 15 years) has a serious kickback.
Always fear this and any power tool.
For small cross cuts and ripping, I use my large Bandsaw that I feel is much safer to use (Always try to use the safest tool to do the job.)
I still have all 10 fingers.
I just turned 40 on Saturday. I have been woodworking since I was 14. In high school, I was good enough and enjoyed it enough I decided I needed to find a way to make a living doing it. So I became a shop teacher. Through all these years, I have never heard ANYONE tell me that the blade should be raised as high as possible. To have that much animal raised above the table is suicide. I will take a 200mph kickback to whole hand amputation ANYDAY. The irony is, that (knock on wood) I have all ten fingers and I have NEVER ONCE been hit by a kickback. I have taught hundreds of 14 to 18 year old students, who I teach to use the tablesaw independently (I don't hold their hands). Not once have I had a single injury involving the loss of blood on the tablesaw, and to memory I can only think of 1 student who was hit by a kickback (and he wasn't doing as he was taught). I teach my students that kickbacks WILL happen. The key is to not be standing where they will be hit by them. I still don't get many kickbacks by students anyway.
Well planned cuts, on properly adjusted equipment, is the BEST way to avoid a kickback.
Granted, I teach out of a full woodshop, so I probably have better and more equipment than the average hobbyist shop. I recommend to my students that if the piece is long enough, that they should leave 1/16 when they cut on the tablesaw so that they can run a pass on the jointer. This eliminates any burn (which we don't see much anyway) and it also provides a cleaner edge that requires less sanding.
The moral of this story? I teach my students that the blade should be set above the material to the depth of the shortest gullets.
Blade height needs to be set according to the task at hand. Period.
Blade guards really need to be in place for two reasons. 1. To keep safe. 2. To do proper dust collection. (Only a few saws come equiped with decent guards that do great dust collection and can be easily moved to make dadoes and tennons. I have the Excalibur, love it, but there are several other after market ones equally as good)
Most novice woodworkers despise the blade guard because, as one commenter noted, "I need to see where the cut is to be made." NOOOO, you don't need to see the blade have it do it's job. Use a measuring device. There are many on the market. Trust it. An inch or 2.65mm will be the same for the time it between setting up the fence / stop and making the cut.
There are some cuts that preclude using a blade guard but they are minimal and should be made with extra care (fear).
A lot of the work I do is training volunteers workers how to properly use power tools.
I like to make 'em think.
Before introducing the tool, and running through our safety list, I tell them there are two main principles that underscore all safety procedures;
1) don't do anything stupid (as we run through the safety list, I tell them what is 'stupid' and why)
2) For safety sake - take home 10 nails every day.
It takes a while for some to really 'get' #2, but when they do, they don't forget it!
Just recently had my first accident in the shop. Don't worry, fingers are all there. I was ripping 2x4 stock in half, all sides were planed evenly. I do not have a professional tablesaw, and use a very good contractor saw, but the deck is too small for a splitter, and the one that came with the saw will not allow for taller stock.
Anyway I was ripping 2 1/2" tall stock in half, I always use safety glasses, a good blade, feather boards and a push stick. I also stand to the side of the work just in case. Based upon how my push stick looks now, as I was completing the rip, my push stick (oak) met with the rip blade and kicked back. Not the wood I was working on, my push stick. Anyway, it hit me just below the wrist, left a few scraps, but bruised my arm pretty bad.
My lesson of the day, when you're doing very repetitive work, don't get lazy and take your eye off the work. My good safety precautions helped keep this from a severe injury, but my brain was at fault this time, leaving me with a memory that I won't do that again.
Dear 3pinner, Just love your sense of humor. The shear idea of taking Nails home is Genius.
These rules should be etched into the bed of every table saw. I broke about three of them when I ran my thumb through the blade of my table saw 10 years ago. The table saw can be one's best friend or worst enemy. Memorize and follow the rules. It will get less blood on your workpiece.
I am new to woodworking and wonder why it warns about pulling the stock through the blade. I have ripped several pieces and pulled on stock that was not very wide. I felt uncomfortable using a push stick that close to the blade.
BEST PIECE OF EQUIPMENT IVE EVER OWNED PERIOD
There is a "Table Saw Safety Guide" which lives on my table saw as the least expensive, most practical safety equipment which also allows you to cut an arrow straight line and eliminate a lot of sanding. I installed it on both my table saws in less than 15 minutes!! You can remove it to clear the entire table for ripping plywood or any large stock in about ten seconds! I will not use my table saws without this equipment installed and I will not let ANYONE use them either. I know it can save thousands of needless injuries each year and save millions of hours of sanding when everyone finally hears about it and gets one. The name of the company who manufactures it is Tech Advantage and I think you can now get them on Ebay.
Dont mess around with your limbs, find one and buy it and put it on your saw today. You, like me, will be glad you did.
Most people do like to use the saws with the guards off as they find them annoying, but my gripe is that guards in some saw models are so flawed in designed that its frustrating not to be able to use them.
And just like the article cautions, the removal of an arm or a finger is just as easy if you don't follow the list of precautions before you operate this thing! Best be very very careful when you work around saw blades and sharp objects mates!
Log in or create an account to post a comment.
Sign up Log in