Quick-to-Make Tool Cabinet
Attractive design stores all your tools in a small space
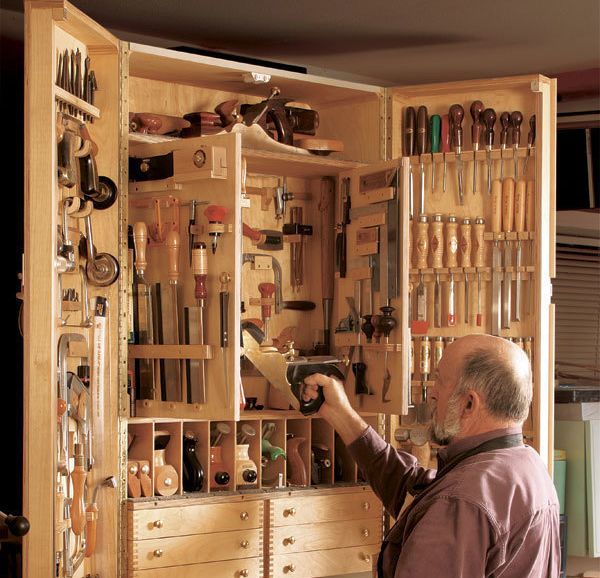
Synopsis: This hanging tool cabinet holds more than 300 tools, while covering only about 12 sq. ft. of wall. It does this through judicious use of space, with thin tools such as chisels and screwdrivers housed on the inside surfaces of the main doors, more tools hung on both sides of interior hinged panels, drawers and cubbyholes throughout, and storage space behind the cabinet for carpenter’s square and handsaws. The carcase is a simple birch plywood box connected with finger joints. The central gallery and drawers give the cabinet rigidity. Jan Zoltowski designed his cabinet to hold hand tools, but it could be adapted easily to hold smaller power tools as well.
After a career of 35 years I had collected a substantial number of woodworking tools and I finally decided that they deserved a proper home. I set out to create a cabinet capable of holding my tools in a relatively small but accessible area. The result is home to well over 300 tools, yet covers only about 12 sq. ft. of wall.
I deliberately dedicated this cabinet to hand tools to keep them apart from dusty power tools, but the design can be modified easily to accommodate small power tools as well. Think twice before making the cabinet smaller; even if your tool collection would look lost in a cabinet of this size, it’s nice to have space to grow into.
No wasted space
The inside surfaces of the main doors hold thin tools such as chisels and screw¬drivers. Inside the cabinet, working down from the top, the upper shelf seats larger handplanes; the middle section has a pair of internal doors that support tools on both sides (increasing the hanging area by 40%) and that open to reveal additional space for saws and marking tools. The lower area is divided into cubbyholes for smoothing planes and other specialty planes, while six small drawers in the bottom hold smaller tools such as block planes, drill bits, and router bits.
The cabinet hangs on upper and lower pairs of French cleats. Behind the cabinet, in the space between the cleats, is a place to hold a carpenter’s square on one side, and three panel saws, held securely by means of the friction of their teeth, on the other. The cabinet holds all these tools within easy reach, and every blade and tooth stays sharp and protected.
Construction starts with a single box
I built my cabinet out of Baltic-birch plywood. Not only is it more economical than solid lumber, but it eliminates problems such as stuck drawers from dimensional changes caused by the high humidity in the Northwest. The body of the cabinet starts out as one large box with the sides made from 3⁄4-in.-thick plywood. Join the corners with 1⁄2-in. finger or box joints (for more on this method, see “A Lesson in Box Joints,” FWW #181, p. 84, or “Box Joints on the Tablesaw,” FWW #148, pp. 60-63).
Rout a 1⁄2-in.-deep by 3⁄8-in.-wide rabbet around the inside front and back edges to accept panels of 1⁄2-in.-thick plywood. The front of the cabinet is attached with glue and nails, but the back is attached with screws only to allow access during later construction.
Next, cut off approximately the front third of the box to form what will become the main doors.
From Fine Woodworking #188
For the full article, download the PDF below:
Fine Woodworking Recommended Products

Woodriver Rechargeable Desiccant Bag

WoodRiver Router Bit Storage Case

Get the Plan
CAD-drawn plans and a cutlist for this project are available in the Fine Woodworking store.


Log in or create an account to post a comment.
Sign up Log in