Convertible Clamping Workstation
Assembly table keeps clamps close at hand, adjusts to different heights and tasks
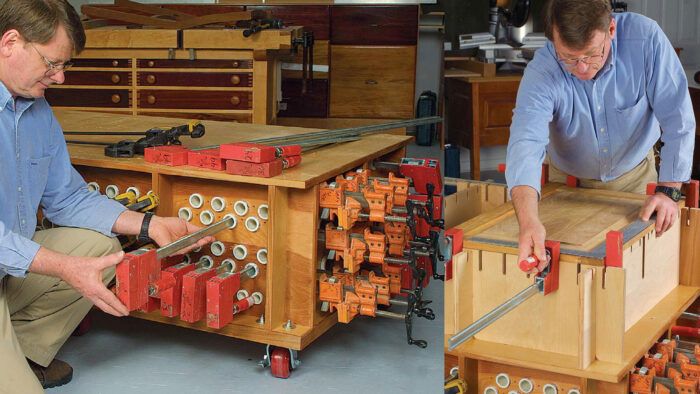
Synopsis: This low-level work station serves a number of needs: it’s a place to assemble large projects, a convenient cart to store clamps, and a level surface to support long clamps when gluing up furniture parts. The lower portion of the work station is a tall torsion box made up of a grid of panels; clamps are stored inside PVC pipes of various diameters, which are inserted through holes in the grid. The upper section is made up of tall plywood panels connected by crosslap joints. These panels can be reconfigured for different clamping arrangements.
After working for months on my knees building a large bookcase, I decided I needed a low table in my shop for assembling large projects. Although my newly built shop is spacious at 1,040 sq. ft., I didn’t want to take up room with a low table that would find only parttime use. It needed to do more. So I designed a workstation that also fulfilled a number of other shop needs, including a place to store my clamps, and a level surface to support long clamps when gluing up cumbersome furniture parts such as tabletops and frame-and-panel doors. The workstation is built in two sections and can be reconfigured to accommodate its various uses.
A twist on the torsion box
The lower portion of the workstation consists of five plywood panels running widthwise and three panels running lengthwise (see the drawing at right). The panels are sandwiched between a top and base of 3 ⁄4-in.-thick plywood. Built into the lower torsion box is a web of PVC pipes that hold clamps up to 6 ft. long.
Build it from the bottom up— Begin by cutting the crosslap joints in the plywood panels with a 3 ⁄4-in. plywood router bit. This specialty bit, available from most home centers or catalog retailers, is slightly undersize to account for the actual thickness of plywood. Using this bit will make the crosslap joints fit tightly.
Next, plan and lay out the PVC pipes. I chose to use several different-diameter pipes to hold the assortment of clamps I own. Those spanning the width can be accessed from either side of the table, while those running the length can by accessed only from one end. This setup maximized the number of long clamps I could store.
The pipes extend through the torsion box’s interior grid, and holes must be drilled in each plywood panel in the same location so that the pipes can feed through properly. I created a template to locate and drill pilot holes in each of the interior panels, and then bored each hole with an appropriately sized hole saw.
After the plywood panels have been prepared, begin assembling the torsion box. It must be constructed on a flat surface and upside down. Fit together the plywood grid and attach the bottom with glue and 21 ⁄2-in.-long drywall screws.
From Fine Woodworking #174
For the full article, download the PDF below:
Fine Woodworking Recommended Products

Veritas Wheel Marking Gauge

Starrett 4" Double Square

Starrett 12-in. combination square


Comments
This is a great design for an assembly table. I had the pleasure of using the table in the photos to glue up a 9’6” x 46” table. It was made of 2 bookend s slabs of Claro walnut. Gary’s table made it quite pleasurable and a cinch to clamp up. Works like a charm. Gary’s clamping workstation is definitely a valuable tool for the shop. I’ll be building one someday for myself! Good job Gary, and thanks!!
Log in or create an account to post a comment.
Sign up Log in