A serving tray
How to use up waste veneers and please the family as well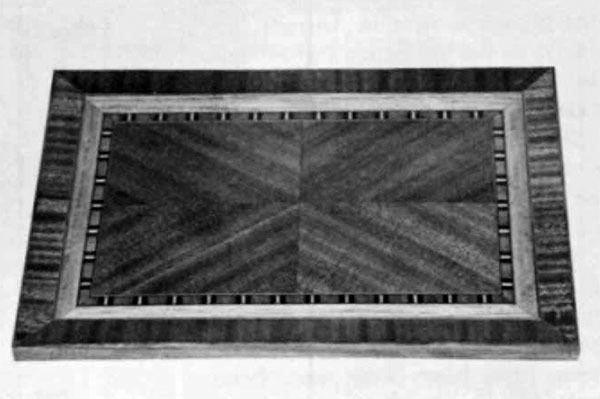
Synopsis: Lionel Kay chose an X pattern to use up a quantity of narrow mahogany veneer cutoffs left over from another project to make a serving tray with a strip of inlay as a border and satinwood as an additional margin. This quick article shows his design, a photo of the completed tray, and includes directions for making the piece.
It is always a pleasure to find a way to use up what might be called “waste” materials around the shop. My wife had asked for a new serving tray, so I was able to fill her wish with this project and have a lot of fun for myself at the same time.
A classic pattern for laying veneers is known as the “X” design. It is a variation of the diamond pattern. I chose the “X” to use up a quantity of narrow mahogany veneer cutoffs left over from some previous project.
The narrow strips are trued up with edges planed and parallel. Ends are cut at an angle of 55 degrees, though this is optional. Different effects will result with different angles. Strips are then arranged to form rhomboids, whose dimensions conform to the size of tray desired.
The rhomboids (four are needed) are then cut and reassembled to form rectangles. These, in turn, are trimmed and taped together as one large surface ready for laying. For a diamond pattern, the right and left rectangles would be interchanged.
I had a strip of inlay to attach as a border and then added four strips of satinwood as an additional margin. Corners mitered and the whole taped together, the top was ready.
The tray core was a piece of 1/4-inch luan plywood. The bottom can be plain or fancy, as you wish. The top, core and bottom were laid at one time and were ready for finishing.
The molding was cut from a piece of 3/4-inch pine. The bevel is approximately six degrees, though again, it is a matter of taste. Top and bottom were veneered with very straight-grained sepele. The inside edge was made from glued up avodire/walnut/avodire, and the outside edge was a thin strip of zebrano that was just lying around waiting for this job. The rabbet was cut for a snug fit with the tray surface and the work on the molding was done.
I recommend finishing (according to your own preferred schedule) before assembly.
From Fine Woodworking #1
For the full article, download the PDF below:
Fine Woodworking Recommended Products


Stanley Powerlock 16-ft. tape measure
Circle Guide








Log in or create an account to post a comment.
Sign up Log in