Shaker Round Stand
Three legs are dovetailed to turned pedestal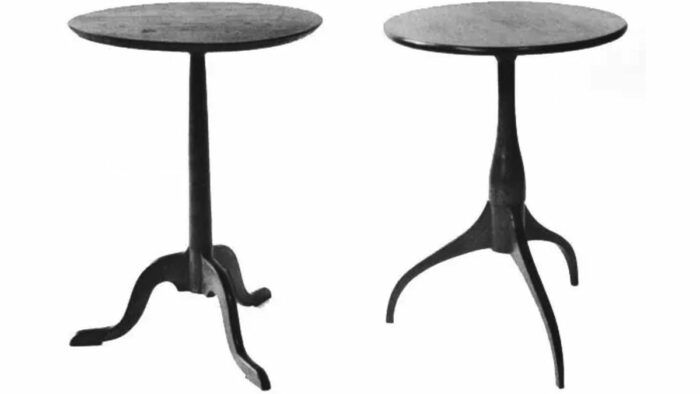
Synopsis: The stands shown in John Kassay’s article were all made in the first half of the 19th century, when the Shaker sect was at its peak. To duplicate one, you’ll need about 7 board feet of cherry. Detailed drawings show dimensions, and the author describes each step of building the stand; he uses hand tools to build it but offers information along the way on where machines can do the trick.
Round stand is a name given by Shakers to the pedestal , tripod candle stand. These stands were derived from the English Queen Anne and Sheraton styles. American cabinetmakers made them less ornate and Shaker cabinetmakers further simplified the stands in line and form, in accordance with their religious doctrines.
The stands shown here were all made in the first half of the 19th century, when the Shaker sect was at its peak. They were used to furnish the retiring rooms of the Shaker’s communal dwellings, which often housed 100 or more people. Today, these graceful stands make lovely accent tables. To duplicate the one shown, you need about 7 board feet of cherry.
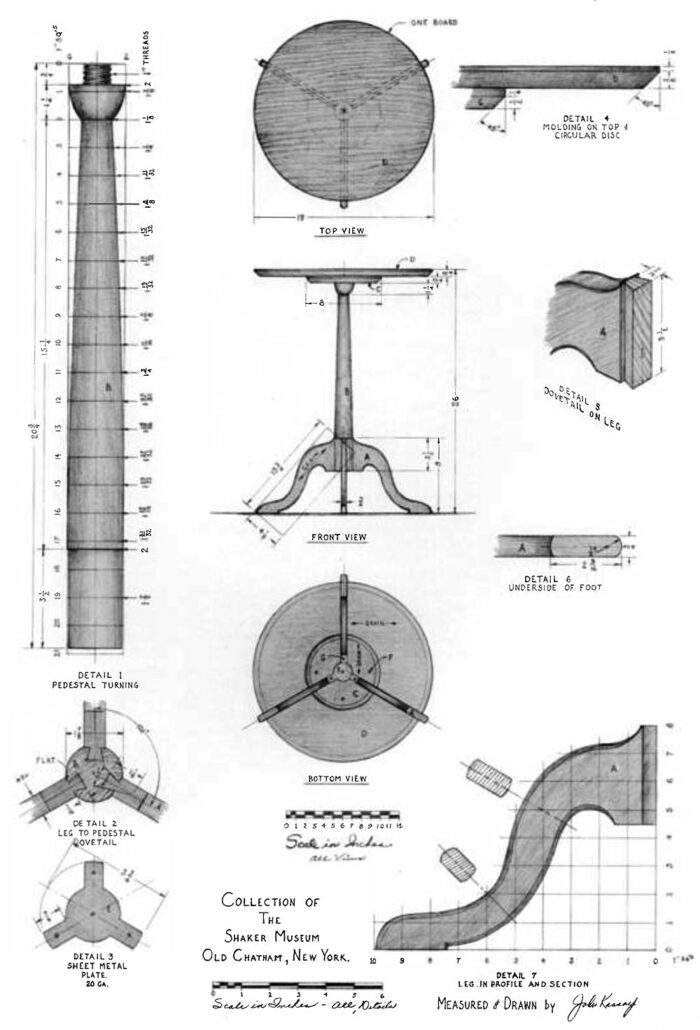 Construction of the stand should start with the legs (A in measured drawing). Draw a full-size pattern of the leg, including the dovetail pin, on a piece of thin cardboard and carefully cut it out. Mill the stock for the legs to the required 3/4-in. thickness and position the pattern on the wood with the grain of the leg in the longest direction, as in the front-view drawing. Trace the pattern three times and then separate the legs with rough cuts; make no attempt to cut to size. The ends of the blank that will form the dovetail and the bottom of the foot are now cut precisely to length and perpendicular to each other. Sandwich the legs together and firmly nail two scrap pieces of 1/4-in. plywood on these end surfaces. This assembly is now sawn to final shape and sanded as a single unit. Separate the legs, lay out the dovetail pins very precisely and cut the shoulders and sides with a dovetail saw. Of course they can be cut on the table saw, but that makes the operation less personal. Clean up with a chisel.
To make the pedestal (B), turn a piece of cherry, 2-1/8 in. square and 20-3/4 in. long, to a 2 -in. cylinder. Lay out the pedestal with its upper end at the tailstock. To make an exact reproduction of the original stand, mark pencil lines along the cylinder at 1-in. intervals to locate parting tool cuts at the diameters shown. The experienced turner, like the craftsman who made the original, will find it sufficient to part the smallest and largest diameters. Remove the excess wood with a gouge. Then the pedestal is rough and medium-sanded.
A tenon, 1 in. in diameter and 11/16 in. long, is established on the upper end of the pedestal to hold the disc (C). On the original table, wood threads fasten the pedestal to the disc. If you have a 1-in. wood threading tap-and-die set, by all means use it. Otherwise, the tenon is simply glued into a hole in the disc. At the lower end of the pedestal, turn an absolutely straight cylinder, 1-7/8 in. in diameter and 3-1/2 in. long. This is where the legs will be dovetailed to the pedestal. Finish sanding the pedestal while it is in the lathe. Be sure to dampen the wood to raise the grain, and sand along the pedestal with the lathe turned off in order to remove any circular scratches.
Choose the most attractive grain pattern on the pedestal and locate one leg here. The other legs will be located 120° right and left from this point (detail 2). Index the legs to the pedestal with pairs of identification marks. Lines establishing the center of each leg are drawn on the bottom of the pedestal and extend along the sides. Then parallel lines 3/8 in. from these center lines are drawn on each side. To enable the legs to seat properly against the pedestal, absolutely flat surfaces must be cut within these outer lines. Cut a series of kerfs with a backsaw and pare away the excess wood with a sharp chisel. Redraw the center lines on these flat surfaces, using the center lines on the bottom as a guide. Draw lines 3/16 in. on each side of these center lines to indicate the thickness of the dovetail pins, 3/8 in., at their shoulders. Hold each leg in position against the bottom of the pedestal, and trace the outline of each dovetail pin (three lines for each) on the bottom of the pedestal. These three lines, along with the two parallel lines on the flats, determine the material to be removed to produce the dovetail sockets. With a brace and a 5/16 auger bit, bore a series of holes along the center line of one leg . Count the number of brace revolutions to gauge the depth. The waste wood is removed with wood chisels. Patience along with much trial fitting is now necessary. Make certain right from the start that the leg is being committed perfectly straight; do not force the leg in place. These dovetail sockets may be produced using a router, a dovetail bit and a home-designed jig for supporting the router while the piece is still in the lathe. On the other hand, by the time you have tooled up, you could be gluing up. After the legs are fitted to the pedestal, they are disassembled and a spokeshave and abrasive paper are used to form the curves on the upper and lower edges, as shown in section in detail 7.
Plane stock for the circular disc (C) to the finished 3/4-in. thickness. Mount it on a lathe faceplate and turn to the indicated diameter and chamfer. Finish-sand while the disc is on the lathe and bore a 1-in. hole on center for the dowel end of the pedestal. The disc may instead be bandsawn as described below. Bore and countersink four equally spaced holes for flathead wood screws (F), which fasten the disc to the top.
Fabricate the top (D) from three or four narrow boards that have compatible grain patterns. The circular shape and undercut chamfer can be turned outboard on a lathe, made with a hand router or a homemade circle-cutting jig on the band saw, or cut by hand with a bowsaw or a sabre saw.
Before assembly, the parts of the stand should be rough, then medium-sanded. Make a jig of plywood to hold the legs and pedestal in an upright position while the glue hardens. Apply glue to both pins and sockets.
The disc is first screwed to the top with its grain 90° to the grain of the top and then glued or threaded to the pedestal.
Shakers often used a thin, sheet-iron plate (E) to reinforce and cover the dovetail joint. If your dovetails have been well made, the plate is not necessary.
To finish the stand, raise the grain and fine-sand. Carefully dust and apply a coat of clear furniture varnish. If a stain coat is desired, it should be of a brown shade and is applied before the first varnish coat. Three or four varnish coats are necessary. The final coat is hand-rubbed with fine (4F) pumice or rottenstone lubricated with lemon oil, and waxed.
 From Fine Woodworking #9
To view the entire article, please click the View PDF button below:
Fine Woodworking Recommended Products
Drafting Tools


Stanley Powerlock 16-ft. tape measure


Log in or create an account to post a comment.
Sign up Log in