 by John D. Alexander, Jr.
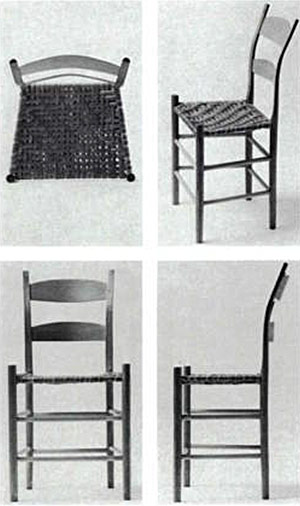
EDITOR’S NOTE: The post-and-rung chair at right is one of the basic seats that for centuries has kept Western man off the ground. It is light, rugged and beautiful. The vertical posts are white oak, the horizontal rungs and the back slats are hickory, and the seat is woven from the supple inner bark of the hickory tree. The chair is not hard to make, when you know how. It is explained in a book, Make a Chair from a Tree: An Introduction to Working Green Wood, by John D. Alexander, Jr. (The Taunton Press, Inc.)
The key to making a post-and-rung chair is working the wood green, as it comes off the tree. Green wood is relatively easy to cut, bore, shave and shape. As it dries, it hardens and shrinks. In chairmaking, the posts are shaped green, dried a little, then mortised to accept the rungs, which also are shaped green. But the rungs are well dried, then tenoned a hair oversize. When the tenons are driven home, they take on moisture from the post wood, expand tightly in their mortises, and then the whole joint dries to equilibrium with the atmosphere. It shrinks tightly together. A few further subtleties—the post mortises interlock, the tenons are shouldered, notched and flattened for a dovetail effect and the grain direction of all the parts is carefully orchestrated-make a joint that just won’t come apart.
Alexander, 47, is a Baltimore lawyer who has spent the last dozen years investigating old tools and chairs and figuring out how they were used and made. This article is taken from his chapter on working surfaces and holding devices. For more on splitting green wood into usable pieces, see “Cleaving Wood,” of this issue.
A chopping block is necessary. In the woods, use the stump of the tree you are harvesting. The stump, cut off immediately above the roots, makes a good block for the shop. Its flared, curved wood is not good for much else. Tall and short blocks, side by side, make it easy to hew out long back posts, because they can be shifted from one block to the other. A white oak, elm, locust or catalpa block will last outdoors for a long while, but use whatever is available. Work in a cleared area, with no one in the plane of travel of the hatchet head.
You need a low workbench and a shaving horse, although the shaving horse can be modified to serve as both. I’ll describe the low bench first. The standard cabinetmaker’s bench is not as useful for chairmaking as a bench that is low, narrow and heavy-a bench that can be moved, sat upon and battered.
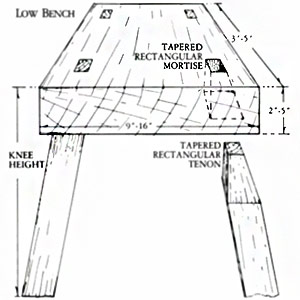
The body of a low bench is a heavy slab. Split a slab between three and five feet long out of heavy hardwood. White oak is best both for weight and for resistance to weathering. Work while the wood is still wet. Make the slab anywhere between two and five inches thick and between nine and sixteen inches wide. The bench should be low enough and narrow enough to be straddled comfortably, either standing or sitting. When you sit astride the bench, your legs should be comfortable. Fixed dimensions are not important-make the bench fit yourself and your task. You will spend a lot of time at this bench, so design it carefully. The important thing is a flat top. If no logs are available, use heavy planks or 2x4s glued face-to-face.
The bench posts taper up into the bench surface. It is easier to cut and adjust them if the posts come right through the slab. If you don’t have a tapered reamer for making conical mortises in the slab, tapered rectilineal mortises and tenons chopped out of the green wood with a heavy chisel will also do a good job. Don’t permanently secure the posts in the slab because they will swell and shrink throughout the life of the bench. If the movement of the wood makes the posts project above the slab, trim them off. If they become loose, drive a wedge alongside them.
Make the posts from wood that isn’t good enough for chairs. Taper them to fit the tapered mortises. Drive them home. Building the bench is a good introduction to wet woodworking in general and to post and slab construction in particular. You will learn how to hew, chisel and bore wet wood. Almost no mistake is fatal with this bench. The harder you pound on it, the tighter it will become. When moving the bench, be careful that one of the heavy posts doesn’t fall out and smash your foot. I wasn’t. I have never taken the time to put in stretchers.
What you have made is the ancestor of the common Windsor chair. Your bench (also called mare, horse, buck or trestle) allows you to align your body with your work. The bench puts the work at your waist rather than at your chest. You can sit down at and on your work, which is a big help. Once you are sitting on the bench or standing astride it, locking it between your knees, you, the work and the bench become one mechanical system-if you can secure the work to the slab.
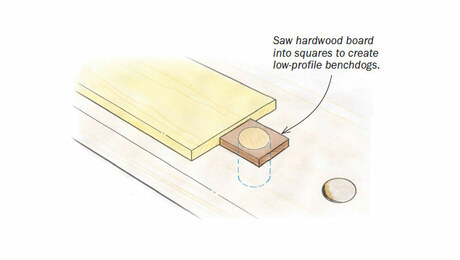
To secure work for boring or mortising, drive three or four square tapered pegs into round holes in the bench. Lay sticks between the pegs and lock them in place with a wooden wedge or wedges. Space the holes and pegs so that posts can be held down singly and in matching pairs. The simplicity of this holding system was hard to accept until I tried it. It was the last method I tried.
You can also use screws as holding devices. Wooden screws of 7/8-in. or 1-in. diameter are more than strong enough. Because permanent handles get in the way, make the screws with large heads and drill holes through them. You’ll always have rung rejects (factory seconds) lying around to put into the holes for handles.
Hold-down yokes are fastened to the bench top by boring a hole through the middle of the slab to accept the wooden screw bolt. I don’t tap vertical holes in the bench, but use a wooden screw bolt from above the slab and a wooden lever nut from below. A deep-engagement pipe clamp also works, with the pipe running through a hole in the bench and the screw beneath the bench. Run the pipe up through a hole in the hold-down yoke and screw a threaded pipe flange or sleeve on the top end. Protect your tools by covering with wood any metal projecting above the bench so metal doesn’t strike metal.
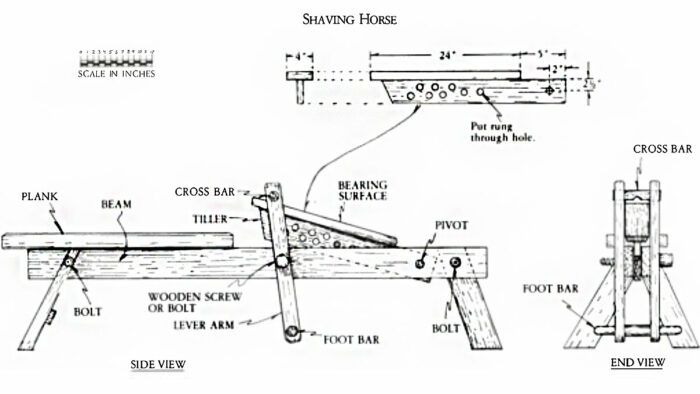
I use the English style of shaving horse, also called a badger’s bench, cooper’s shaving bench or shaving brake. It holds posts, rungs and slats for draw-knifing and shaving. The crossbar on the horse securely locks the workpiece in place. The shaving horse is a perfect holding device: The harder you pull the tool toward you, the harder your feet push the lever arms away from you. The crossbar is thus forced down on the workpiece.
The horse design I use allows more adjustment than some versions, and it makes the horse adaptable for various tasks. My horse has two horizontal parallel beams, like a lathe, rather than a solid slab. The work surface is nailed (with deeply countersunk nails) to a tiller that fits between the beams. Pegs driven through the sides of the beams and the tiller adjust the surface to any angle or height. I made my shaving horse from scrap hardwood lumber. White oak is excellent, but almost any wood will do. Of course you can split the parts out of green wood.
The shaving horse crossbar is square in cross section. Its round ends friction-fit into the side lever bars. Thus the crossbar can rotate and will always seat squarely on the work. One surface of the bar is notched to hold square-sectioned sticks corner up.
Shaving-horse dimensions depend on the worker. The height and size of the bench should allow the worker’s heels to rest on the ground while his toes touch the lever foot bar.
To make a shaving horse double as a low bench, mount a heavy plank on the beams. You’ll find a separate low bench a help, but you can get starred without one. If you make both a horse and a bench, or two benches, make them the same height, so they can double as sawhorses or be used to hold larger pieces of work laid across them.
Because the work surface is adjustable, the shaving horse has a variety of other uses. I hold sharpening stones or tools with it: both my hands are free to control sharpening pressure and angle.
Take time to make a tool box or rack. Tools get lost easily, and edges become nicked and ruined in the mess. The rack must be easy to move from one work area or bench to another. I have a rack made of sticks with tapered ends (conical tenons) jammed into mortises that are bored and taper-reamed through post-wood rejects. The rack is bound together by a toggle rope. A rwist or rwo on the rope adjusts for dimension and design changes. Now we are ready to make a chair.
From Fine Woodworking #12
To view the entire article, please click the View PDF button below:





Log in or create an account to post a comment.
Sign up Log in