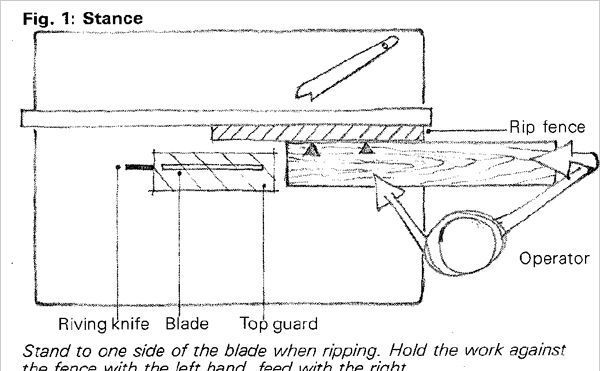
Synopsis: Ian J. Kirby describes how versatile the tablesaw can be — it’s not just for ripping stock. So in the interest of safety, he outlines the basics of the machine and how to use it to do various tasks. He covers safety issues such as guards and starting and stopping the saw wisely, noise protection, advice on stances, and basic step-by-step instructions on ripping, crosscutting, and mitering. His introduction covers troubleshooting situations such as how to cut a cupped board, how to avoid pinching the blade, and using push sticks. Side information talks about how to choose a blade.
Ripping is the tablesaw’s forte, but it’s a versatile machine, used for dimensioning wood as well as for cutting joints. The tablesaw is so simple and universal that it is frequently used without the operator’s ever having taken the time to learn its common-sense fundamentals. In most small shops the tablesaw usually has improper guards and an inadequate rip fence. In the interest of keeping fingers attached to hands, a review of tablesaw basics may be of value.
The ordinary tablesaw is nothing more than a steel table with a circular blade projecting through its surface. The blade projection is adjustable for cutting wood of varying thicknesses. The blade can be fixed perpendicular to the table, or it can be tilted for cutting wood at an angle.
For safety’s sake, tablesaws need a blade guard, though even the best guard can’t keep fingers out of the blade. A guard should serve as a visual reference to the blade’s location, warning the sawyer of the danger zone—any point within 9 in. of the blade. The best guard is mounted on an arm suspended above the blade. The guard should not be attached to the riving knife or splitter, and it should be adjustable, set as close as possible over the stock being sawn. There are several variations of this mounting method and any guard is better than no guard.
The machine’s electrical power switch should be easy to reach, mounted on the saw cabinet just under the table or on a nearby wall or post. When switching on, place one finger on the start button and a second on the stop button. This allows for a quick shutoff if something goes wrong. A foot-activated switch allows the sawyer to control the wood with both hands while operating the switch. Many saws have mechanical or electrical brakes that stop the blade quickly when the switch is turned off. In the absence of a brake, use two push sticks— one rubbing each side of the blade—to stop its coasting. When changing rip-fence settings never stick a tape or rule between a moving blade and the fence. Wait until the blade has completely stopped. The saw depth of cut should be set so the blade protrudes about in. out of the workpiece. Carbide-tipped blades should be adjusted so the entire tooth projects above the wood during the cut. A 10-in. saw should be operated at 3,000 to 3,500 RPM at the arbor, or at a speed that runs the blade’s periphery at 10,000 feet per minute.
Noise can be a major barrier to safe machine operation. The racket muddles thought and can force the operator to adopt timid and unsafe working practices. So ear protection—as well as goggles—should always be worn when using the saw. To concentrate without the distraction, the novice woodworker can develop safe habits by practicing moving wood past the blade with the machine switched off.
From Fine Woodworking #34
For the full article, download the PDF below:
Fine Woodworking Recommended Products
Festool Cleantec CT 26 E HEPA Dust Extractor
Ridgid EB4424 Oscillating Spindle/Belt Sander
Makita SP6000J1 Track Saw




Log in or create an account to post a comment.
Sign up Log in