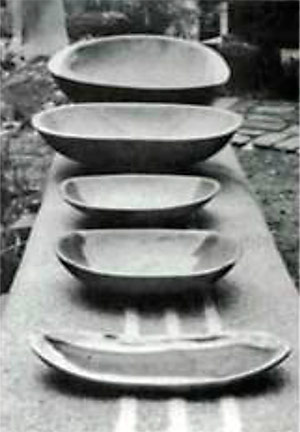
Though the handmade wooden bowl has an ancient and honorable past, it has become rare in modern times as people have turned to mass-produced substitutes. One form of wooden bowl, however, is still in demand—at least here in the South. This is the so-called dough tray—a large wooden bowl, sometimes round but more commonly oblong, that is traditionally used for the mixing, kneading and “rising” of bread dough. The dough tray has appeal for its charm, and it remains practical for making bread. The form, however, is not limited to this use. It can be large or small, and it can function as a salad bowl, a serving tray, a nut bowl, and so on. I have been making wooden bowls for several years, and here are some of the things I’ve learned.
The dough tray was an everyday item in the lives of our ancestors. Much of the tradition for it and other forms of wooden bowl came from Europe with the early settlers, but the tradition also owes much to the native American, who shared his knowledge of many crafts with his immigrant neighbors. Before the Europeans arrived, the first Americans used fire to help craft their bowls and worked with tools of stone and bone. Beavers’ teeth were used for gouges. After trade with the settlers was established, metal tools were available to the native Americans, and bowls became an important item of barter. The Cherokees of North Carolina still carve and trade very fine wooden bowls.

Choosing the wood- In the Southern Highlands forest and in the East, the choice of wood for bowls is large. Tulip poplar, river birch, wild cherry, black walnut, maple, basswood, buckeye, and apple are all commonly used. Out West I made bowls from quaking aspen, and in the far north on the Yukon River, I used paper birch and northern poplar (cottonwood). Many other woods might also be chosen, so long as a few points are kept in mind. The grain should be smooth and closed. The wood should split straight and smell sweet, or at least not impart strong or bad flavors to food. And to make bowls, you need sound, whole logs several inches larger in diameter than the bowl you want to make, and of sufficient length to allow for cutting off checked ends.
There are several reasons I prefer to make bowls from green wood or from wood left as a whole log until I’m ready to carve. Green wood is much easier to carve than dry wood, and it splits cleanly into bolts of suitable size. When a bowl is properly made and finished from green wood, it will season nicely, retaining colors that kiln-drying destroys. If the grain is straight and free of large knots, warping (which can be a problem when using green wood) will be minimal. The hollow of the bowl lets the wood shrink and change shape slightly without cracking as it dries.
You can make a bowl from dry wood: It will be more uniform in texture and color than one made from green wood, and more stable. But it will also be much harder to carve. If you must postpone carving the green wood, or prefer to carve it dry, it is wise to season a piece quite a bit larger than the final blank desired. Crosscut the log about 6 in. or 8 in. longer at each end, to allow for checking. Then split the log in half with wedges or maul, and coat the ends with paraffin or beeswax, to minimize checking. To ensure that the ends of the rim will be strong, cut away the pith of the wood and the first four or five growth rings. Then remove the bark. Some longitudinal cracking in the sapwood of the blank is to be expected. This can be minimized by cutting off some of the sapwood where the bottom of the bowl will be, thereby relieving pressure on the sides.
Dory or spalted wood is often used for contemporary bowls because of the beauty it reveals when carved. If you choose to carve spalted wood, be sure your tools are extra sharp, as the wood tends to flake and is difficult to finish smoothly. I would not recommend it for very thin bowls, but it’s fine for large, thick, decorative bowls, though you sacrifice some strength and durability with it as compared to green or properly seasoned wood.
A slight bulge in the side of a log can hide a flaw-a dead limb, for example, overgrown by sound wood. This can mean a hole in the wall of your bowl; on the other hand it can mean a handsome burl figure. Twisted grain or an offset heart with crowded growth rings to one side of the log means the finished product will twist as it dries. If you like freeform bowls, this can be an advantage. I like symmetrical bowls, and thus prefer a straight round log with the heartwood well centered.
Whatever your choice of wood, be sure to cut off all end-checks before starting to carve your bowl, and cut out all radial cracks in the heart of the wood. Don’t forget that a check extends a little beyond the point where you can see it. If you leave any part of a check in your bowl, it will spread when the bowl dries. For a full-size bread bowl—big enough for making four or five loaves of bread—you need a piece of wood that is free of defects, 20 in. to 24 in. long, 18 in. to 20 in. wide, and thick enough to allow 3 in. or 6 in. of depth in the finished product.
Roughing out the bowl- When you are starting with a fresh cut from a log, you first have to peel the bark (a step already taken with seasoned wood). Next split the log in half. Some judgment is necessary to choose the diameter for your split, as seldom is a log perfectly round. Good clean wood can be split with a solid stroke of an ax. Sometimes a maul and wedges are needed. If you lack confidence in your aim with an ax, you can use a froe to start the split square across the log. For twisted and knotty wood, you might need to saw the wood lengthwise with a chainsaw or a crosscut saw. However you go about it, your purpose is to halve the wood. Usually each half will make a bowl.
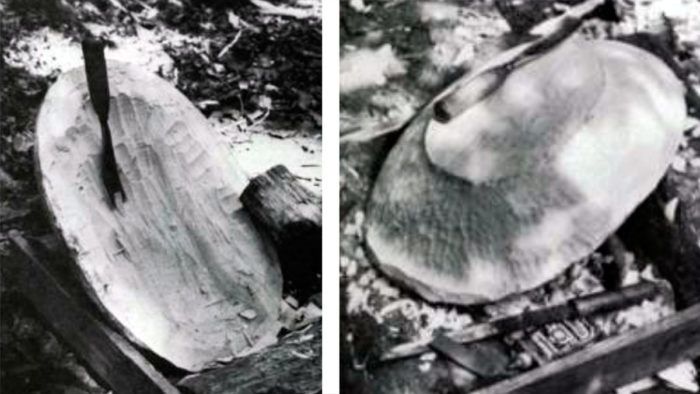
Once I have chosen and split a blank of wood, I stand it on a good solid chopping block and proceed to hew down the outside of the bowl. My tool for this job is a small hatchet with a gently rounded bevel on both faces. A hatchet beveled on only one face is right for hewing flat surfaces, but makes carving a round shape difficult. Ingenuity, balance and rhythm play a part in this operation, which with a large bowl may take several hours to accomplish. The ends must be rounded down to roughly the curve you want, and the bottom flattened so that the top is made level. Now and then you want to rest your bowl on something flat and stand back and look to see if it is coming out evenly. If you are striving for symmetry, you want to work from end to end, side to side, and around and around, taking off a little here and a little there to balance your bowl.
The shape you are working toward is a matter of design and personal taste. I like to leave a well-defined, undercut foot on the bottom of my bowls. This not only looks nice, it also allows the sides of the bowl to be cut to a more uniform thickness without sacrificing the strength and surface area of the bottom. A broad, flat bottom is traditional and makes for strength and stability. A shallow undercut, however, eliminates high spots upon which dough bowls are wont to rock and shift. For handles, I usually just flare the ends. Some people prefer protruding handles, and others, finger grooves for gripping the bowl.
Once the outside is roughed out, I proceed immediately to the inside. I use a long, bent sweep gouge and a wooden maul for this work; others use an adze. The trickiest problem is holding the bowl still while you work on it. The best solution I have found is a cradle made of two halves of a log just far enough apart to cradle the bowl, and fastened to a large thick board. It’s quick to make, and gets more versatile with use; and if you find that it doesn’t accommodate itself to the size blank you want to work, it’s easy to make another holder. With this rig I sit on a low stool in front of the cradle, and the blows of the maul force the bowl securely down into the cradle against the opposing log rather than propelling it all over the yard.
There is an alternative: you could carve the inside first. Dirk Rosse, who carves bowls for a living (FWW #32), roughs Out the inside of a sawn blank first, which has the advantage of leaving the outside a regular rectangular shape that is easy to hold steady against an L-shaped stop on his workstump. I prefer carving the outside first, however. The flaws in the wood are more easily discovered and taken care of; the work goes quickly and the final shape is easier to visualize, making symmetry simpler to achieve. The solid block of wood, roughed down on the outside, is a stronger structure to work on and seems less liable to check than the hollowed log you have if you shape the inside first. Once the outside is roughed to the desired shape and you have determined that the wood is sound, you can position the bowl right side up while carving the sides to the desired thickness-it’s easy to run a hand along the rim of the work and feel its thickness. A quick glance tells you the relation of the outside to the inside. If the bowl is upside down, it must be turned over often, and you just can’t tell thick and thin spots as readily.
Perhaps some of the advantages I find in this order of work have to do with the tools I prefer. Hollowing out a large bowl takes time, and though there is the temptation to think of shortcuts, I work entirely with hand tools. Some people use a chainsaw and make a series of lateral cutS with the end of the blade in what is to be the inside of the bowl. The resulting blocks are easily knocked out with a hatchet, an adze or a gouge. I find this solution unpleasantly noisy, and the possibility for major error is great. Yet some people are real artists with a chainsaw, and you can’t argue with success. I prefer the hand work because it keeps me in touch with the wood, and the shape evolves more pleasantly to the eye and mind.
Taking the slow approach, however, is tiring, especially for the arms and back. But anyone who has carved green wood can tell you what will happen if you stop very long while there is still too much wood on the inside of your bowl, or even on the outside. Cracking in the heart, checking on the ends and longitudinal cracks in the sapwood are likely if you don’t get your blank well roughed out before leaving it for more than a few hours. When you do have your bowl roughed out, leave it in a shady, cool place, perhaps under a tarp, or sealed in a plastic bag.
Finishing the bowl- Once your bowl has been roughed out to the desired shape and to a fairly even thickness overall, you are ready for the finishing work. I use a long, bent, Swiss No. 7 sweep gouge for most of this process. A long, bent sweep of shallower profile about a No. 2-is handy for smoothing out the deep cuts made by the No. 7 gouge. I also use the shallow gouge for all my final cuts, as it more nearly matches the curve of the bowl. I find that a small carving knife comes in handy for the bowl’s top edge.
As a general rule, the outside is refined first, allowing more control over the final shape of the bowl. The thickness of the sides is determined by the final cuts on the inside. Of course, as you put the finishing touches on your bowl, you will be going around and around it inside and out, chipping away a little here and a little there until you finally decide you have done enough.
To shape the outside, I start with the foot and cut smoothly toward the top. I leave a ridge of wood at the rim of the bowl; from this I make either handles or a graceful flare for gripping. It is important to work toward even thickness in the bowl sides; this will minimize the chance of warping and checking in the finished product.
For the final cuts on the inside, I hold the bowl in my lap and work the gouge in a rocking motion toward my body, using the maul only when necessary to remove thick high spots. The maul-driven gouge leaves a ridged surface; to smooth these ridges, you pull the gouge by hand. I start the inside finishing cuts at the rim, working around and then down to the bottom of the bowl, keeping a smooth working face, as on the outside. During this finishing work, you should stand back often and look carefully at your work. The true measure of your craftsmanship will be revealed at the inside bottom of the bowl. From both ends, both sides and all four “cheeks, ” your gouge cuts must come out smoothly and evenly to the same level. The final cuts need to be made across the grain, to avoid riving or tearing the long grain. This calls for a keen edge and steady hand. The best gouge for this work has a shallow sweep in its end profile and a bend along its length, so that the handle will not bump into the rim of the bowl as you work. A bevel on the outside of the gouge and a little extra upturn at its end is best, so that the tool draws itself back out of the wood. Most spoon gouges are simply too steeply bent to be useful here.
Final touches and care- Wait a few days before leveling the foot, for as the bowl dries it will twist and change shape slightly. If the relative humidity is low, you can wrap the bowl in cloth or paper to slow drying, but allow it some air, or mildew may result. After a few days, most wood has stabilized enough to proceed. In leveling the bottom of the bowl, a piece of lightly greased, flat glass can be rubbed over it to show the high spots. A small plane is useful in this final leveling, though I often simply use a shallow gouge.
Sometimes, in spite of all your efforts, you will end up with a few seasoning checks or small radial cracks in the heart at the ends of the bowl; sometimes a hidden knothole will be revealed in the surface of the bowl. These are to be tolerated good-naturedly, though a little epoxy or glue mixed with sawdust will sometimes help.
The sap will continue to bleed out of green wood as it dries, and this will temporarily darken the wood and obscure the figure. After drying a few days, the bowl will be ready to sand, which will remove the stain left by the oxidation of the sap. I like to sand my bowls smooth enough so that the grain and figure of the wood show rather than the gouge marks. This smooth finish makes cleaning the bowl easy, and it takes oil well. A fairly fine sandpaper, l 20-grit or finer, cuts green hardwood as well as a coarser grit would, without scratching the wood so badly.
I have found oil-animal or vegetable, applied when the sanding is finished- to be the best finish for dough bowls. Animal fat, properly rendered, makes an excellent finish that will penetrate better and last longer than vegetable oil. I’ve used groundhog, beaver and bear grease to good effect, as these are liquid at room temperature. Hog lard and beef suet are not as good, for they solidify and tend to get rancid. Of course, vegetable oils are more generally available to the modern craftsman and housekeeper than animal fat. I recommend olive or safflower oil, as these penetrate better than corn, peanut or soybean oil. The bowl should be oiled often, especially after it is washed. For best results the oil should be rubbed in thoroughly with bare hands or a soft cloth. The heat from the hands and the friction from rubbing helps the oil penetrate the wood. Excess oil should be wiped off with a cloth.
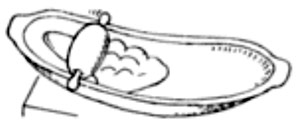
I’ve heard from several sources that past generations used a small cloth bag containing salt to apply the oil. Perhaps the salt was believed to draw moisture from the wood, though I really don ‘ t know the reason for this interesting practice. At any rate, I have seen many old dough trays in antique stores and at auctions, and I believe a well-made one, if oiled and cared for, should easily last a generation, even with constant use.

The dough tray was once an important household item, likely to be installed in the kitchen when a couple first set up housekeeping, along with the cookstove, frying pan and cooking pot. It was a piece of family history—maybe an uncle crafted it for his niece, a grandmother passed it to a granddaughter, or a newlywed husband carved it for his wife. Today the wooden dough tray has become a luxury instead of the household necessity it once was. Plastic, steel and mass-produced crockery bowls have replaced it. Bread is not made in the average home in the quantities it once was; and when it is made, the breadmaker will use an inexpensive enamel dishpan for mixing it and will knead it on a Formica counter. Yet this has not spelled the end of the dough tray. What is there that can grace the table so beautifully at Thanksgiving as a great wooden bowl full of bread, fruit or salad? Nostalgia is a strong force, and the wooden bowl represents a heritage and a fine old tradition. Whenever people recognize this, that tradition lives on.
Delbert Greear lives in Sautee, Ga., employing himself in country woodcraft. Drawings by Clay Johnston.


Log in or create an account to post a comment.
Sign up Log in