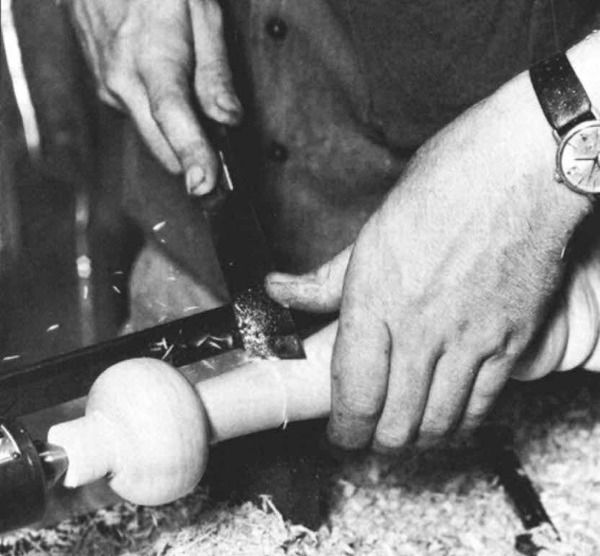
Synopsis: No tool in a turner’s kit has greater potential for efficiency than the skew chisel — it planes surfaces smooth, cuts balls and beads, defines fillers and even makes coves, working with a precise, responsive touch. Yet the skew has a reputation for being the most unforgiving and unpredictable turning tool. Here, Mike Darlow explains its geometry and how to sharpen it. He also explains which materials are best for making skew chisels, how to handle them, and how to lay out cuts including V-cuts, rolling cuts, long-point cuts, and more. Detailed photos show how to use the skew chisel safely.
For each piece of wood, an efficient turner employs the minimum number of tools, each, if possible, only once. This means being able to use each tool for a variety of cuts. No tool in a turner’s kit has greater potential for this than the skew chisel—it planes surfaces smooth, cuts balls and beads, defines fillets and even makes coves, working all the while with a precise, responsive touch—yet the skew has a reputation for being the most unforgiving and unpredictable turning tool. It requires large, confident movements to slice its thin shavings, but a single small movement in the wrong direction can cause the tool to dig in and ruin the work. Indeed, the Fine Woodworking Design Books confirm, to my eye, that many turners deliberately avoid cuts requiring the skew, compromising on the preferred design in order to be able to use a gouge or scraper. If you slice with a skew instead of scraping, you will cut cleaner and produce finished work faster. We can create confidence in the skew by understanding the tool’s geometry and practicing the various cuts.
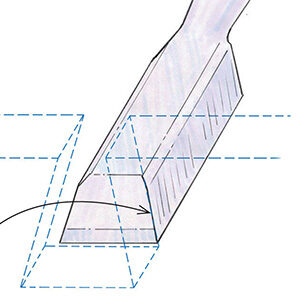
Tool geometry—The skew is a long, straight-bladed chisel with its cutting edge ground at an angle to produce two very different points—an acute one called the long point, and an obtuse one called the short point (figure 1). There are two bevels, usually equal, ground on the sides of the tool to form the cutting edge. Perpendicular to the sides are two edges: one leading to the long point, called the long edge, and one leading to the short point, called the short edge.
For consistency, it is essential that the skew’s sides are truly parallel, so that the cutting edge can be parallel to both of them, and that the long and short edges are at 90° to the sides. The width of the sides defines the nominal size of the skew, and sizes vary between 1/4-in. and 2 in. Most general turning is done using a 3/4-in. or 1-in. skew. This is a compromise between a long cutting edge (an advantage in planing) and narrow sides (which allow work in tight places). If a constricted space dictates using a smaller tool for part of the work, a production turner must decide whether to use a small skew for the whole job, or to pick up two or more different skews. If there is a large proportion of planing in the work, the turner will probably use two. Where a skew with sides narrower than 1/4-in. is required, it is preferable to grind the long edge down at the end to make a shorter cutting edge in order to preserve reasonable stiffness. The minimum thickness of a skew should be 1/4-in., or else the tool will be flexible and hence dangerous.
From Fine Woodworking #36
For the full article, download the PDF below:
Fine Woodworking Recommended Products
Double Sided Tape
Veritas Wheel Marking Gauge

Veritas Precision Square






Log in or create an account to post a comment.
Sign up Log in