Starting Out: Edge-Joining for the Beginner
The first of four articles to help beginning woodworkers get going with the craft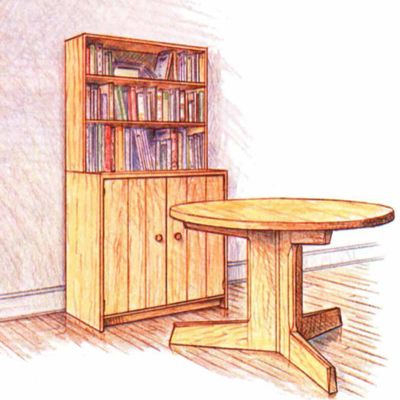
Synopsis: Roger Holmes has written a series of articles to help beginning woodworkers get going with the craft. In this article, the first of four, he addresses edge-joining, which he admits isn’t very romantic. But without boards, it’s tough to make tables and cabinets. He uses a table and bookcase made of solid wood as examplary pieces. He explains how to buy wood and flatten it, how to select a plane and use it, how to thickness, edge-joint, and glue up. Side information offers instruction on getting a close shave with a plane.
A friend of mine took a beginners’ woodworking course not too long ago. She was surprised, and a little disappointed, to discover that the first two sessions were devoted not to the construction of a coffee table or a dovetailed box but to the making of a simple, ordinary boardtwo flat, parallel faces, and square to them, two straight edges.
Board-making is not exactly the stuff of woodworking romance. But without boards it’s tough to make tables and cabinets. In this article I’ll tackle boardmaking; in subsequent articles, I’ll cover other basics—cutting bridle joints, rabbets, and so on. My methods aren’t definitive, but I hope they’ll get you going.
Making sample joints isn’t much fun, so if you don’t have your own projects to practice on, you can cobble up the table and bookcase shown above as you go along. I built these pieces after my wife and I moved our meager possessions into a seven-room apartment and needed to fill up the empty spaces. The results are hardly masterpieces of design or construction, but you can generate a lot of simple furniture from them. Chests of drawers, after all, are just little boxes housed in a big box; tables, merely slabs of wood perched at various heights above the floor.
Wood— I decided to build the table and bookcase of solid wood, even though using plywood would have eliminated gluing up wide boards. I enjoy working solid wood. Curling a long shaving out of my plane gives me a great deal of satisfaction—planing plywood produces grit and dust.
There is solid wood and solid wood, however. Some woods, such as rosewood and walnut, seem to demand elegant designs. But what I wanted was utility, economy, and something easy and pleasing to work. Pine filled the bill on all counts, and I discovered a small lumberyard up the road selling it for $.30 to $1.00 a board foot.
I strongly recommend that beginners work with pine or a similarly soft, evenly grained wood such as basswood or certain varieties of fir. Mistakes are inevitable and instructive, so you might as well make them cheaply. In lumberman’s lingo, you’ll need 4/4 (1-in.) boards for the boxes and 8/4 (2-in.) boards for the table.
If you can, buy roughsawn (unplaned) boards. If not, buy the planed, or surfaced, boards sold at most lumberyards. The most common variety of surfaced board is designated S4S, which stands for “surfaced four sides,” meaning that the boards have been surfaced on both faces and both edges. No. 2 Common pine boards are fine. They’re relatively cheap, and the knots in them will add character to your furniture (that’s as good a rationalization as any for penny-pinching.) Because the boards have been surfaced, they will not be the full nominal thickness. For example, if you want boards between in. and 1 in. thick after you’ve flattened them, start with 5/4 S4S stock.
From Fine Woodworking #48
For the full article, download the PDF below:
Fine Woodworking Recommended Products

Starrett 12-in. combination square

Veritas Precision Square
Grout float







Log in or create an account to post a comment.
Sign up Log in