Synopsis: The process of accurately dimensioning lumber lacks the romance of cutting beautiful joints, but it is fundamental to quality woodworking. Roger Holmes suggests laying out and cutting pieces to the rough width and length your project requires. Holmes offers tips on flattening one face of each on the jointer — how to be safe, how to tackle cupping and bowing, and how to deal with grain changes. He offers more tips and ideas as he talks you through planing the stock and edge jointing it. Larry Montgomery offers side information on how to cut your stock straight.
The process of accurately dimensioning lumber lacks the romance of cutting beautiful joints, but is fundamental to quality woodworking. If you want precise joinery, easy assembly and a good finish, you must begin every job by making your cupped, twisted and bowed boards flat, straight and square—the accuracy of all future operations depends on straight, square stock. Before the advent of stationary power tools like the jointer, planer and tablesaw, woodworkers prepared their stock by hand. Today it’s possible to sidestep all that handwork and rely on the speed and, to some extent, the built-in accuracy of power tools.
You can check for cup and bow by sight or straightedge, looking across the width for cup and along the length for bow. When placed on a flat surface, a twisted board will rock on the low corners. Sighting over winding sticks (identically dimensioned lengths of wood) placed across both ends of the board will also indicate twist.
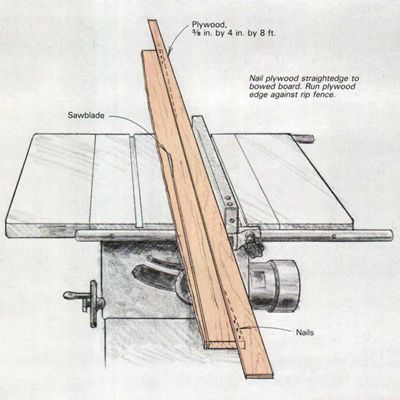
Before doing any flattening or thicknessing, it pays to lay out and cut pieces to the rough width and length your project requires. Smaller pieces are easier to handle and less wasteful. A badly bowed 12-ft. board, for example, may make three relatively straight 4-ft. pieces, and the same logic applies for reducing width, as shown in figure 2 on the facing page. You can start with thinner rough stock because you’ll need to remove less wood to flatten it. Of course, if you need four 2-in.-wide pieces, it may make more sense to dimension, then rip a 9-in. -wide board, and so on. If you’d rather not lay out the pieces before finding what’s hidden beneath the rough surface, skim both faces in the planer before you cut it up.
Regardless of the size of the pieces, you must start by flattening one face of each on the jointer. Resist the temptation to skip this step and go right to the planer. A planer can’t remove twist, bow or cup because the machine’s rollers will flatten the board before it reaches the cutterhead. The board will lose its roughsawn exterior, but the defect will spring back as the board leaves the planer.
From Fine Woodworking #55
For the full article, download the PDF below:
Fine Woodworking Recommended Products

Ridgid EB4424 Oscillating Spindle/Belt Sander

Veritas Precision Square

Starrett 12-in. combination square


Log in or create an account to post a comment.
Sign up Log in