Tip-and-Turn Tables
Philadelphia detailing produced the masterpieces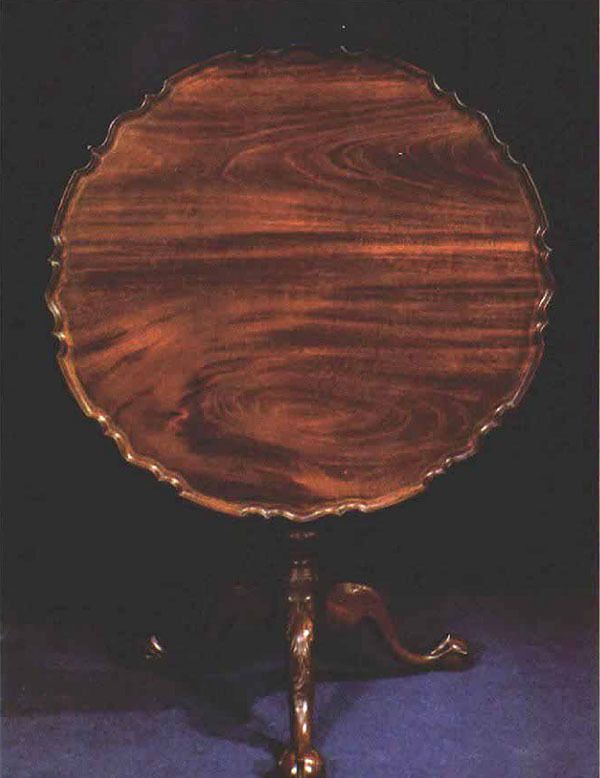
Synopsis: David Ray Pine explains how he built a tripod piecrust table, a tip-and-turn style that apparently was popular only in the Pennsylvania region. The main article focuses on building the table, not on the carving or turning. He starts with basic details on making the legs, reinforcing the bottom of the shafts with a three-legged iron “spider,” and battening the tabletop. Side information by Eugene E. Landon covers the basics of turning and carving a piecrust top, with extensive, step-by-step photos.
Of the many tripod tea tables made in America in the 18th century, those built in the Philadelphia area are considered by many experts to be the most desirable. The basic design and proportions are very successful when left unadorned (“in the Quaker taste”), but these tables lend themselves equally well to the highly embellished forms that are more often associated with Philadelphia Chippendale furniture.
The tripod table that I built and will describe here is often called a piecrust table, in reference to its scalloped molded top. Tables of this type—regardless their top’s shape—are often called “tip-and-turn” tables, since the top of such tables can be swung to a vertical position and/or rotated on its “birdcage” support, much like a lazy Susan (see details in figure 2). The birdcage seems to have been popular only in the Pennsylvania region. New England and Southern tripod tables often tip, but seldom do they turn.
Figure 1 shows the dimensions of my table. If this project tempts you but seems too ambitious, there are many ways in which the design can be simplified. In Fine Points of Furniture ($12.95 from Crown Publishers, 34 Engelhard Ave., Avenel, NJ. 07001), Albert Sack shows some two dozen variations on the tripod table. Many have pad feet and plain turned tops with slightly raised rims, and there’s at least one with a simple flat top with a halfround edge. Still others have fixed tops that neither tilt nor turn.
I won’t concern myself much with turning or carving in this article, but will describe the general order of how to make a tripod table, including important considerations that might not be too evident if you haven’t made one before.
Construction begins with turning the shaft. Take special care in turning the area of the shaft where the legs will join. This section must be perfectly cylindrical -any taper will affect the stance of the legs. Turn both ends of the shaft and the ledge where the birdcage will rest flat and square to the axis of the shaft. Wait until the legs are fitted to the shaft before doing any carving or fluting. This will decrease the likelihood of damaging fine details while driving legs into and out of their sockets.
Choosing stock for the legs is next. Note that while each leg requires 3-in.-thick stock for the ball and claw foot, the leg is only 2 in. thick where it enters the shaft. With pad feet, you can get away with 2-in.-thick stock. After sawing the legs to shape, plane the end for the dovetail square to both the foot and the sides. I have a set of flat bits for my tablesaw’s molding cutterhead that are ground to 14°, and I use them for cutting sliding dovetail pins. The pins can be cut with a crosscut blade on the tablesaw instead.
From Fine Woodworking #67
For the full article, download the PDF below:
Fine Woodworking Recommended Products
Drafting Tools
Bessey K-Body Parallel-Jaw Clamp




Log in or create an account to post a comment.
Sign up Log in