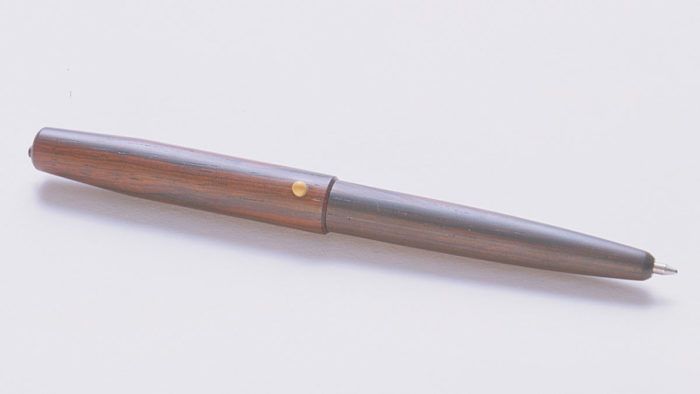
Synopsis: After one too many pen collapses, Richard Elderton decided to clothe his naked Parker pen refill with a suit of wood. It’s just a wooden cap and barrel, shaped on the lathe and bored out for the refill and the trigger mechanism. After he rips blanks for the barrels, triggers, and pins, he crosscuts the cap and barrel blanks. Last, he cuts off the trigger and pin blanks after they’ve been shaped. He explains the turning techniques he uses, how he calculates part sizes, and how he routs grooves. Detailed drawings show all the parts involved. A side article by Eric C. Kimball and Cynthia A. Kimball explains how to make a mechanical pencil.
After my second ballpoint pen broke in half, I noticed the flimsy plastic joint between the metal top and the plastic bottom. The thin plastic joint doomed the pen to a short life. To avoid this fate, I decided to clothe my two naked Parker refills with suits of wood.
The design is simple and functional—a wooden cap and barrel, shaped on the lathe and bored out for the refill and the trigger mechanism that advances the pen point for writing. The cap slides onto a sleeve turned on the barrel, and the two pieces are held together by a pin in the cap, which twists and locks in an L-shaped groove routed in the barrel. So far, I’ve resisted suggestions to add inlays or other adornment, partly out of laziness and partly to retain the basic quality of the rosewood and other exotics I use.
The first step is to rip blanks about -in. square for barrels, -in. square for triggers and -in. square for pins, then crosscut the cap and barrel blanks as shown in the drawing, or to fit your refill, plus an extra in. I don’t cut off the trigger and pin blanks until after these tiny pieces are shaped.
Turning techniques
I use a 3-jaw chuck for the turning and boring operations. By inserting the blank deeply into the chuck and gripping it tightly, I can do all the boring and end-grain shaping without the piece vibrating or whipping. First, I turn the -in. blanks to cylinders that can be gripped in the 3-jaw chuck without being damaged. After chucking each cylinder in the 3-jaw, I square both ends with a skew chisel.
The cap and barrel must be bored in stages. I mount a Jacobs chuck in the tailstock to advance different-diameter bits into the spinning cylinders. To hollow the cap, I begin with a -in. bradpoint bit to bore the main hole to about in. from the top of the piece, then complete the bore with a -in. sleeve drill. The sleeve drill, which centers the second hole in the first, is made Tired of plastic pens breaking, the author made a two-piece rosewood housing for his ballpoint refills. The tiny trigger on the top makes the pen retractable. A boxwood pin fit into the top locks into a groove in the barrel to hold the pieces together. by Richard Elderton with a drill rod and twist drill. I bore a deep axial hole in the center of the drill rod, again using the 3-jaw and Jacobs chucks, and epoxy in the twist drill.
From Fine Woodworking #69
For the full article, download the PDF below:
Fine Woodworking Recommended Products
CrushGrind Pepper Mill Mechanism
Drafting Tools

Blackwing Pencils






Log in or create an account to post a comment.
Sign up Log in