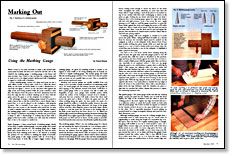
Synopsis: Frank Klausz explains how to use, and why to use, a marking gauge. It’s the fastest and most accurate way he knows to lay out lines for cutting joints and to mark stock to be edged, jointed, thicknessed with a handplane, or ripped to width with a handsaw. There are several types of marking gauges, including a regular marking gauge, a mortise gauge, and a panel gauge. He explains each one’s purpose and how to use them, and then offers advice on how to mark without a gauge. Side information by Fred Palmer discusses shopmade marking gauges, and Percy Blandford talks about how to mark up large-scale layouts.
When I want to cut some dovetails or make a few mortise-andtenon joints by hand, the first tool I reach for isn’t the saw or the chisel-it’s the marking gauge. A marking gauge is the fastest and most accurate way I know to lay out lines for cutting joints and to mark stock to be edged, jointed, thicknessed with a handplane or ripped to width with a handsaw.
A basic marking gauge consists of a sharp steel point set into a stick called a beam. A block with a hole in it, called the fence, slides on the beam and locks firmly to it with a thumbscrew or cam lock (see figure 1 above). In use, the fence rides against the edge of the stock being marked while the point scratches a thin line. The distance from the point to the fence determines how far from the edge the line is scribed. Marking can be done with the grain, across the grain or on the endgrain of a workpiece.
The advantage of using a marking gauge instead of a pencil to mark a layout line is that the scribed line is much thinner than a pencil line, so it can be placed on the workpiece with pinpoint accuracy. This is essential if you want to cut precise joinery. When you saw or pare to the relatively wide pencil line, it’s easy to make a mistake and produce a loose or too-tight joint. Further, the marking gauge scribes a consistently thin line, whereas a pencil line changes in thickness depending on whether the pencil point is sharp or dull. A disadvantage to scribing layout lines with a gauge is that if you make a mistake, you can’t, erase the etched-in line—it has to be scraped or sanded out.
Types of gauges—I keep several kinds of marking gauges handy in my shop: a regular marking gauge, a mortise gauge and a panel gauge. Each has a specific use. The marking gauge has a single point and a beam that’s 8 in. to 12 in. long. It’s used for many layout jobs, from marking stock that’s to be dressed to locating the position of a row of holes to marking the depth of dovetails. The panel gauge is also single pointed, with an 18-in.-long to 24-in.-long beam. It looks like a longer, bigger version of the marking gauge. It’s great for marking boards or panels to be ripped to exact width or for doing marking jobs on boards too wide for a regular marking gauge. The mortise gauge also looks like the marking gauge and has a 8-in. beam, but it has two points and can mark out two parallel lines at once. This is essential for good mortise-and-tenon joints.
From Fine Woodworking #70
For the full article, download the PDF below:
Fine Woodworking Recommended Products

Veritas Precision Square
Bessey EKH Trigger Clamps

Stanley Powerlock 16-ft. tape measure




Log in or create an account to post a comment.
Sign up Log in