Segmented Turning
Swirling patterns by cutting and reassembling a single board
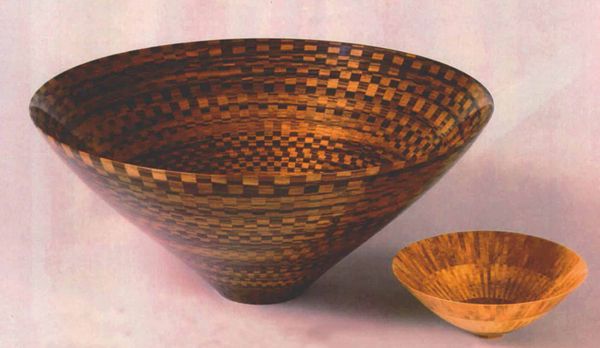
Synopsis: Michael Shuler wanted to segment a single kind of wood in a bowl. He figured out a way to create a striking look in a turned vessel that didn’t require the use of several colored woods to achieve pattern and contrast. When finished, his bowls looks like they’ve been tediously glued up from hundreds of separate pieces. His process involves cutting thinly tapered wedged that are glued into discs. The wedges are glued into half-discs and then bandsawn apart into concentric half rings. Then matching pairs of half rings are glued together, stacked and glued into a cone-shaped bowl blank. Then he turns the vessel to final form and finish it on the lathe.
I’ve always been fascinated with turned forms, even before I knew what a lathe was. When I was 14 years old, I made miniatures on a makeshift lathe from birch dowels. A pocketknife was my only tool, but I was turning wood, and that was all that mattered. Later, in high school, I turned candlesticks, then chair legs, lamps and other creations, searching for a way to make the lathe a tool for artistic expression. Then one winter, sick in bed with a cold. I read some back issues of a woodworking magazine a friend had given me and discovered the work of turning greats like Frank Knox and Ed Moulthrop, as well as the wealth of different things the lathe could do, including segmented turning.
Segmented work and the design possibilities it offered met my needs for artistic expression, but most segmented vessels tended toward strong contrasts, with some makers using half a dozen or more different woods in a single piece to achieve a colorful effect. I wanted to see what could be done by segmenting a single kind of wood in a bowl. After experimenting with different geometric patterns and methods of gluing up segments, I discovered a way to create a striking look in a turned vessel that didn’t require the use of several colored woods to achieve pattern and contrast.
I start with a single board, take it apart, reorganize the figure and put it back together in the form of a bowl. The pattern that’s formed by the grain of the reassembled board flows almost continuously through the bowl from top to bottom. The segments grow proportionally smaller; all the way from the rim down to the base. Inside, the bowl, the wedge-shape segments meet at their points, forming a radial geometric pattern. The combination of the decreasing size of segments and the grain of the wood makes looking into some of these bowls feel like you’re someplace in the sky looking down at a hurricane or looking into the iris of an eye. Before going through the specific steps involved in making bowls like the ones pictured above, I’ll generally discuss how this segmentation method works and how the designs develop.
Segmentation strategy—When finished, one of the large bowls looks as if it’s been tediously glued up from hundreds of separate pieces, but these pieces aren’t cut and glued up individually. The process revolves around the cutting of thinly tapered wedges that are glued up into discs: a large one for the body of the bowl and a smaller one for the base. For the larger disc, wedges are first glued up into two half discs, which are bandsawn apart into concentric half rings. Then the matching pairs of half rings are glued together; these rings are stacked atop the base disc and glued into a cone-shape bowl blank. The vessel is then turned to final form and finished.
From Fine Woodworking #76
For the full article, download the PDF below:
Fine Woodworking Recommended Products

Sketchup Class

CrushGrind Pepper Mill Mechanism

Drafting Tools


Log in or create an account to post a comment.
Sign up Log in