Synopsis: Whether you own an 8-in. hobbyist’s saw or a 12-in. production model, to get maximum accuracy and efficiency, you must tune it. In this article, Mark Duginske addresses safety, because accidents are often caused by poor saw setup. Tune-ups are simple, he says, and they don’t require special tools. He explains how tablesaws are built, how to adjust the tilt mechanism, square the blade, adjust the miter gauge, and align the blade to the miter slots. He closes with rip-fence alignment information before explaining how to perform accuracy checks. Many photos and illustrations help guide beginners through the article.
Of all the machine tools in a woodworking shop, the tablesaw is the workhorse. But whether you own an 8-in. hobbyist’s saw or a 12-in. production model, you won’t get maximum accuracy and efficiency from your saw unless it’s tuned up. This means that its working parts, including the trunnions, bevel stops, miter gauge and rip fence, must be properly adjusted and aligned. Safety is also a major concern; many woodworking accidents, especially those caused by kickback, can often be traced directly to poor saw setup.
Fortunately, tuning up your saw is fairly simple. It doesn’t take any special tools or require either esoteric knowledge or brute strength. Even a cheap saw can be tuned to perform admirably. And the small amount of time that must be invested in a tune-up is more than repaid in workpieces that are cut accurately the first time. In this article, I’ll show you a simple step-by-step procedure for testing and tuning up your tablesaw, including how to adjust the tilt mechanism, the miter gauge and rip fence; how to square the blade to the table; and how to align the blade parallel to the miter slots. But before we delve into the tune-up, let’s get better acquainted with the different internal parts of a tablesaw.
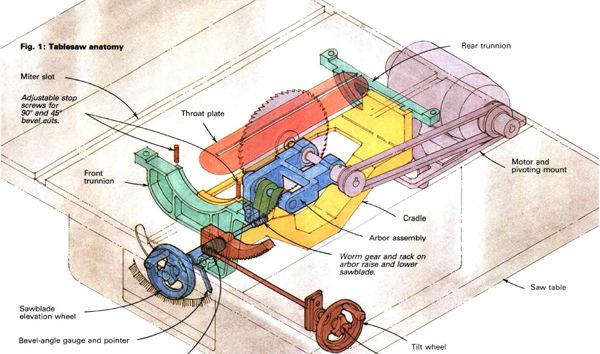
Tablesaw anatomy—Figure 1 above illustrates the internal components of a typical tablesaw; this example is similar to saws made by Delta, Powermatic, Sears and Taiwanese manufacturers. Bolted to the underside of the saw table is the saw cradle (or carriage) and trunnion assembly. The cradle supports the saw arbor, which is basically a shaft held by either sleeve or ball bearings. The arbor has a sheave on one end for the V-belt, and the sawblade is secured by a flange and nut on the other end There are two trunnions, one at each end of the assembly, that support and align the cradle, as well as the motor on most saws. Because the trunnions are semicircular, they make it possible for the cradle to be tilted for bevel cuts. The tilt mechanism itself generally has a worm gear that engages a semicircular rack on the front trunnion; when the saw’s tilt wheel is rotated, the angle of the cradle, and in turn the angle of the blade, changes. Two adjustable screw stops set the limits of trunnion travel, usually at 90°- and 45°-blade positions. Another wheel-driven system similar to the tilt mechanism pivots the arbor to raise and lower the blade.
From Fine Woodworking #78
For the full article, download the PDF below:
Fine Woodworking Recommended Products

Starrett 12-in. combination square
Ridgid EB4424 Oscillating Spindle/Belt Sander
Grizzly G0495X Industrial Helical Cutterhead 8-in. Jointer




Log in or create an account to post a comment.
Sign up Log in