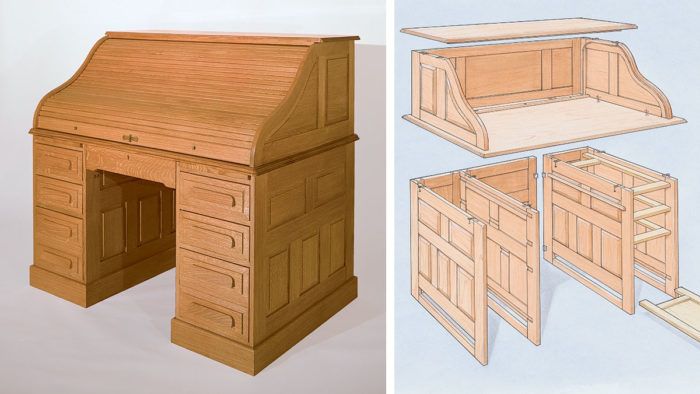
Synopsis: The roots of the roll-top desk go back more than 200 years. Over time, desk variations merged to include tambour doors and pigeonhole compartments. Kenneth Baumert, a woodworker and mechanical engineer, came up with a design that eliminates the cloth backing on tambour doors by using an elongated ball-and-socket joint. He discusses the basic construction of the desk (the frames, panels, drawers and locks), and then details how he shapes the tambours. He closes with information on making the pigeonholes. This richly illustrated article shows every aspect of the construction process.
I can recall my first encounter with a roll-top desk. My parents and I were visiting my uncle’s home and were impressed with all the compartments and little drawers in his desk. Many years have passed since that visit, and I now realize that the greatest asset of a roll-top desk is not all the storage areas provided by the drawers and pigeon holes, but the tambour curtain that can be drawn over the working area to transform a cluttered utility desk into an elegant piece of furniture.
Before building my roll-top desk, I did a little research to determine what would be a typical design. The roots of the roll-top stretch back more than two centuries to the “bureau à cylindre” or cylinder desk, which was built in France in the 1700s. The curved solid cover, called a cylinder fall, “disappeared” as it was rotated into a large housing chamber within the desk. Another French cousin of the roll-top was the “secrétaire à abattant,” which had a hinged, solid wood cover. This desk contained the small drawers and pigeon holes now found in the roll-top. Finally, a third relative of the roll-top, the tambour desk, came into prominence in England and America during the Hepplewhite and Sheraton periods of the late 1700s. It featured horizontal tambour doors that generally did not cover the writing surface. It wasn’t until 1850 that Abner Cutler, owner of the Cutler Desk Co. in Buffalo, N.Y., combined elements from these desks and patented a desk with all the features we associate with roll-tops today: A curving tambour curtain that pulls down from above to completely enclose the pigeon holes and writing surface.
Although there have been many variations on the basic roll-top desk through the years, the most common method for constructing the tambour has always been to glue the slats to a canvas backing. This somewhat awkward process requires a special clamping board large enough to hold all the slats tightly together while the cloth backing is glued onto them. I used this method on my first roll-top, simply butting the slats together edge to edge. This may work on smaller tambours, but on my 4-ft.-wide roll-top, the slats at the convex part of the S-curve gradually separated from each other.
From Fine Woodworking #79
For the full article, download the PDF below:
Fine Woodworking Recommended Products
Circle Guide

Sketchup Class

Dividers




Comments
This article leaves a lot to be desired.
What were you expecting? Full-blown construction plans?
Log in or create an account to post a comment.
Sign up Log in