Building a Chest-on-Chest
A simple method for framing carcases with solid sides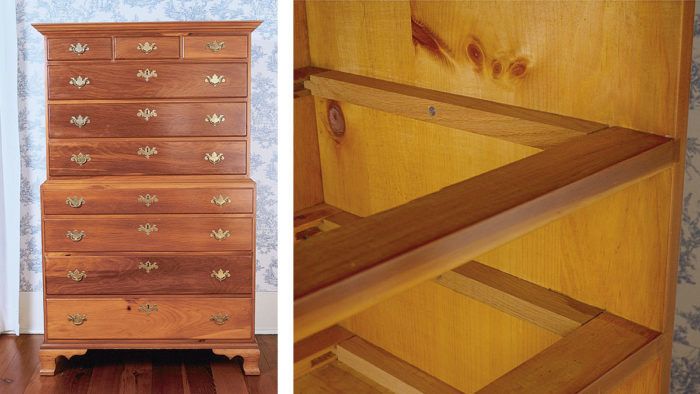
Synopsis: Carlyle Lynch explains how to build a friendly, unthreateningly scaled chest-on-chest with bracket feet. He starts with the base chest with double tenons and talks about how to make and install the moldings and feet. He dimensions the upper chest from the frame formed by the base’s top molding. He covers drawers and hardware and how to install the guides.
With its modest proportions and uncluttered design, the chest-on-chest in the top photo at right can easily find a place in most of today’s homes. Standing only 1 in. over 5 ft. tall, the chest has a friendly, unthreatening scale unlike many of its 7-ft. tall period counterparts that nearly graze contemporary ceilings and dominate an entire room. Judging by the clean lines, the good proportions and the shape of the bracket feet, this double chest was probably based on designs made by Thomas Elfe, whose work delighted the people of Charleston, S.C., during the mid-18th century.
This chest was built to the plan on the opposite page 40 years ago by furnituremakers at Virginia Craftsmen, of Harrisonburg, Va., who have built reproduction furniture for many historical restorations. To avoid the problem of split sides, a common ailment of antique furniture, the designers at Virginia Craftsmen came up with a simple way to build carcase frames that allows the sides to expand and contract freely. To accomplish this, the rails that run side to side between the drawers are tenoned and glued into mortises in the sides, while the runners and center guides that run front to back within the case are tenoned, but not glued into the rails. These “dry” joints allow the sides to expand with increased humidity. In addition, the runners and guides are cut in. short to leave a -in. gap at each end, as shown in the bottom photo at right. These gaps provide space for the sides to shrink in drier conditions. Each runner is screwed to the center of the case side with a single 1 -in.-long, #8 flat-head screw to keep the runners from ever sagging and to resist any tendency for the sides to cup or bow.
Building the base chest
Begin construction by gluing up the base unit sides and cutting them to size as shown in the plan. Then, run a -in. by -in. rabbet on the inside rear edges for the backing. Next, make the front and back rails, drawer runners and center guides that make up the carcase framework. As you can see by the detail in the lower left on the plan, the top and bottom rails, both front and back, are dovetailed into the sides, while the other six rails that run between the drawers are mortised into the sides with double tenons. Bandsaw the dovetails on the ends of the top and bottom rails and mark the sockets from the rails onto the top and bottom edges of the sides. Saw and chisel out the sockets by hand.
From Fine Woodworking #81
For the full article, download the PDF below:
Fine Woodworking Recommended Products

Circle Guide
Bessey K-Body Parallel-Jaw Clamp




Log in or create an account to post a comment.
Sign up Log in