Production Chairmaking
Jigs and loose tenons simplify angled joinery
Synopsis: Terry Moore decided to build chairs when he realized his clients were buying someone else’s chairs to go with his tables and desks. He simplified the joinery by basing it on loose tenons. He makes full-size drawings and a step-by-step construction plan, and then uses patterns and jigs to shape his stock. This article covers angled tenons and straight mortises, chair backs and crest rails, back slat tenons and mortises, assembly and when to rump test. Side information by Moore discusses his approach to chair design.
Chairmaking seems to intimidate many an accomplished craftsman. I must admit, I shied away from all that angled joinery for years. However, my fears subsided when I eventually realized that people were buying someone else’s chairs to go with my tables and desks and there was a risk that those chairs might detract from the beauty of my work. My other consideration was financial: 1 was losing money by letting all the chairmaking work go to other craftsmen.
Fussing with the angled joints in a typical chair can be a costly chore for many builders, but I simplified the process by basing the joinery on loose tenons, as shown in figure 1 on the facing page. After the parts are shaped, I cut mortises in both halves of each joint, and then join the two pieces with a loose tenon. Angled mortises are easily and accurately cut on the slot mortiser, once it’s fitted with a wedge-like fixture, as shown in the top photo on p. 42; the loose tenon stock is ripped out on the tablesaw and the edges rounded over with a router bit. The joints are strong and don’t require a lot of hand-fitting. However, the real beauty of this system is that it doesn’t constrain my design creativity. Since even the most complicated angled joints can be easily made, my hand is free to design the form most appealing to my eye.
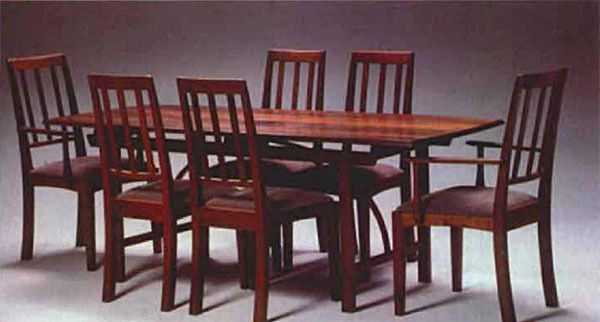
Writing a plan—Before beginning construction, I make mil-size drawings of my chair and mentally formulate a preliminary stepThe curved lines of this trestle table are complemented by the walnut chairs that Moore built with a series of jigs. by-step construction plan (see the sidebar on p. 45). I outline each step, including preparing the stock, cutting parts to length, mortising, milling tenon stock and assembling the piece, trying to anticipate any possible construction problems. I further refine my plan and modify procedures as needed when I build a prototype of the design. Once I’m actually ready to manufacture the set of chairs, most of the thinking work is finished and nearly all dimensions and angles can be picked up from the full-size drawing without using a ruler.
I begin production by planing, jointing and ripping stock for all the legs, seat rails and backs, as shown in figure 1. Extras of each part are prepared to avoid having to reset machines to remake damaged or defective pieces. Except for the profile shape of the back legs, I leave all parts square and parallel until the joints have been machined.
From Fine Woodworking #81
For the full article, download the PDF below:
Fine Woodworking Recommended Products

Festool DF 500 Q-Set Domino Joiner

Veritas Standard Wheel Marking Gauge


Log in or create an account to post a comment.
Sign up Log in