Making a Frame-and-Panel Bed
Subtle details enhance a basic bedstead
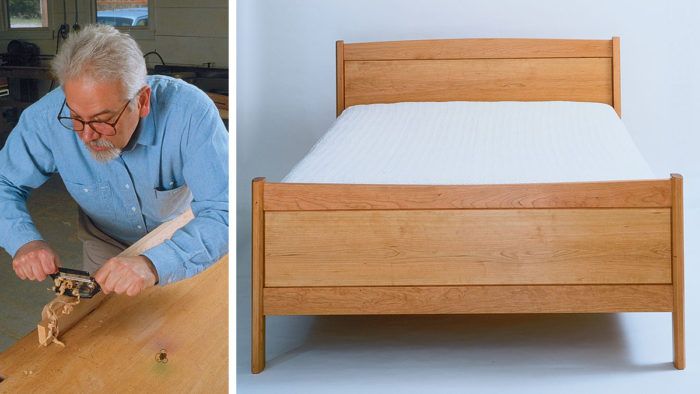
Synopsis: On John McAlevey’s frame-and-panel bed, a convex curve on both the headboard and footboard provides a linear contrast. Chamfered posts add interest. McAlevey explains how to mill and join the bed pieces and where to find the fasteners. He explains his chamfering technique and other finishing touches. The box spring and mattress are supported by ledger strips attached to the side rails with plate-joinery biscuits, screws, and glue.
Recently I was asked to design a headboard that could be attached to a standard, adjustable steel bed frame. These bed frames are practical and fairly attractive when fitted with a nice headboard, but to me, they just don’t compare with a wooden bedstead, complete with headboard and footboard As the clients and I conferred on possible designs, I urged them to go with an all-wood bedstead, and they eventually agreed and decided to use solid cherry.
I began making sketches, exploring ways to take advantage of this beautifully figured wood in the large headboard and footboard, which had to be at least 60 in. wide to accommodate a queen-size mattress. I had recently designed and made a couch with frame-andpanel ends, which the clients had seen and liked when they visited my shop. As I sketched my ideas, I decided to develop a similar frame-and-panel system, as shown in the top photo on the facing page. Basically, the bed posts serve as stiles for the panels in the headboard and footboard, and the crossmembers, which set the width of the bed, complete the frames that hold the panels. The bed rails that run the length of the mattress can be joined to the posts with standard knock-down bed hardware or with T-nuts, bolts and decorative caps.
Having decided on the type of construction, I continued sketching and experimenting with the shape of the top crossmembers on the headboard and footboard. A straight horizontal line across the top of the headboard lacked interest. So I drew concave and convex lines, and eventually decided that a convex curve on the headboard and a concave curve on the footboard would provide a linear contrast that would give the piece the look I was after. I also decided to chamfer the posts heavily to make them more interesting and appealing.
As is my usual practice, I rendered a final drawing that incorporated all of the design details and submitted it to the clients for approval. At this time, if the clients have any suggestions or changes to propose, we discuss them and make adjustments accordingly. In this case, the design was approved and I gave the clients an estimated delivery date. I also usually tell my customers when I intend to begin work on their project because sometimes they like to see the work in progress. I encourage this, although not to the point of them hovering over my shoulder during the whole job.
From Fine Woodworking #84
For the full article, download the PDF below:
Fine Woodworking Recommended Products

Circle Guide

Stanley Powerlock 16-ft. tape measure

Dubuque Clamp Works Bar Clamps - 4 pack


Log in or create an account to post a comment.
Sign up Log in