A Cherry Clothes Tree
A simple project to hang your hat on
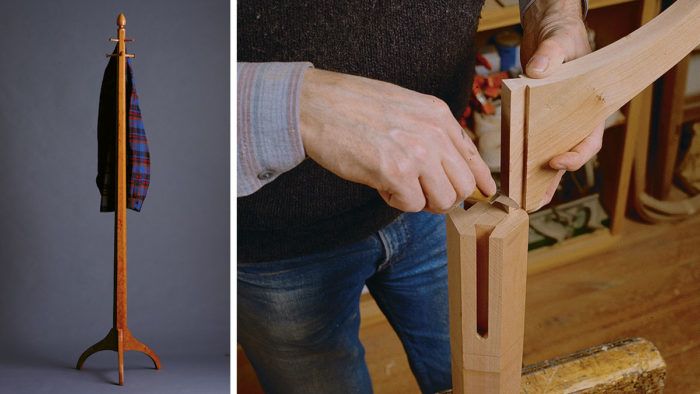
Synopsis: Christian H. Becksvoort was challenged to build a clothes tree to match a pencil-post bed he’d made, but the idea just wouldn’t work on paper. He came up with a hexagonal tapered post with three cyrna legs, secured with sliding dovetails. Becksvoort explains how he ripped the stock into a hexagon with 1-1/2-in facets and how he cut the bevels. He details how to shape and dovetail the legs using either a router or hand tools, and how to make and install the pegs and finial. A detailed drawing accompanies this project article.
Recently I was commissioned to build a bedroom clothes tree to complement a cherry pencil-post bed I had already made. My initial reaction was to copy the bed’s eight-sided posts. An eight-sided clothes-tree post with four legs seemed logical, but no matter what kind of legs I drew, none looked right. I even considered gluing up a lathe-turned flattened cone for a base, but this was too heavy visually.
To lighten the appearance and conform to the simple lines of the bed, I decided on a tapered hexagonal post with three legs secured with sliding dovetails. I made full-size cardboard cutouts so I could determine the best shape for the legs, and settled on the cyma legs, one of my favorite styles, taken from a Shaker round stand. Shaker pegs were a logical choice for hangers. I used three 3-in.-long pegs on the same facets as the legs and three 2-in.-long pegs higher up on the remaining three facets. To top off the post, I used the same modified acorn finial as the one on the pencil-post bed. This finial design was originally used to top off the back legs on chairs by Robert Wagan of the Mt. Lebanon Shaker community in New York.
Making the post
To build the clothes tree, I started by first ripping the post stock into a hexagon with in.-wide facets and then tapering it on my jointer. To prepare the stock, crosscut a in.-wide piece of cherry to in. long. Joint the wide face of the stock flat and plane it to in. thick. The in.-wide facets at the base of the post predetermine the measurements: in. from face to face and in. from point to point. To lay out the hexagon, I divided the thickness of the stock in half and scribed a centerline across the bottom. Using a sliding T-bevel set at 120°, I drew the lines shown in figure 4 to define the first two cuts.
Before ripping the bevels on the tablesaw, move the fence to the side of the blade opposite the direction the blade tilts, raise the blade about in. and then set it to 30°. Adjust the fence, as shown in figure 4, so the blade cuts on the waste side of the layout line and the cut-off scrap is not trapped between the fence and the blade. After making the first cut, I flipped the stock end for end, keeping the same edge against the fence, and ripped the second facet. Since I didn’t change the fence position, both cuts met at the center line.
From Fine Woodworking #85
For the full article, download the PDF below:
Fine Woodworking Recommended Products

Drafting Tools

Blackwing Pencils

Compass


Log in or create an account to post a comment.
Sign up Log in