Variations on a Four-Drawer Chest
Divergent details make all the difference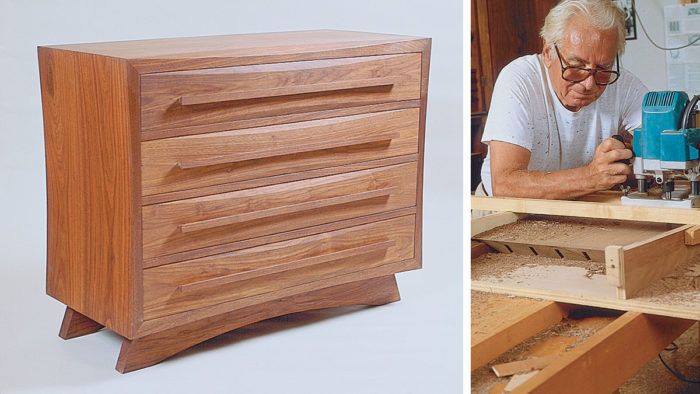
Synopsis: Tage Frid advises woodworkers not to underestimate the power of details. To demonstrate how these little touches can change and enhance a piece, he made two identical chests of drawers but gave each a distinct personality. Both have concave sides, a sweeping, curved bevel on the fronts of their flat tops and bottoms, dovetailed drawers, and curved pediments; one chest has a concave front and concave drawer fronts, whil the other has a straight front with convex drawer fronts. Frid explains how to make the carcases, how to rout the spline mortises and shape the carcase top and sides, and how to assemble the piece – both dry-run and final. He details the drawers and finishing. When inspected closely, the two chests appear to be different designs. A project plan and a bill of materials accompany the article.
Too often, furniture is overly decorated with contrasting colors or shapes that fight each other and shout at you from across the room. I prefer furniture that is more subtle and beckons to you with clean, quiet lines and well-thought-out details. Don’t underestimate the power of details. To demonstrate how these little touches can change and enhance a piece, I made two identical chests of drawers, but gave each a distinct personality by experimenting with different drawer fronts. Both carcases have concave sides; a sweeping, curved bevel on the fronts of their flat tops and bottoms; dovetailed drawers; and curved pediments. But one chest has a concave front and concave drawer fronts, and the other is straight with convex drawer fronts. From across the room, their differences look slight; up dose, the chests appear to be two different designs.
After building the two carcases, using simple tablesaw and router setups, I mocked up miniature fronts first to see what kind of effects I could get and then weeded out the designs I didn’t like. For instance, to simulate a veneered convex front, I colored the surface with white chalk. From this I could see that any color would make the chest look like a parakeet, and I wouldn’t want a creature like that squawking at me when I wake up in the morning. If a mock-up looked good, I made it full size so I could visualize it on a completed carcase. Eventually, I decided on the shaped fronts shown on the chests above. Here I’ll concentrate on making the chest with convex drawer fronts, but I’ll also give you enough information to make the chest with a concave front, if you prefer that design. Making the carcase-Gather stock with similar figure and color, and cut all the parts following the dimensions in the bill of materials on p. 85. Joint the edges of the -in.-thick pieces for the carcase sides, top and bottom, and after matching them for figure, glue and clamp them. Since my planer is too narrow for 17-in.-wide panels, I carefully aligned the long butt joints during glue-up so that I only had to lightly belt-sand the surfaces when the glue dried.
Next, rip the carcase sides, top and bottom to width and miter them to length according to the dimensions in the bill of materials. Because of the width of the workpieces, the best way to cut the miter is to set the blade at precisely 45° and guide the work on a sliding table or crosscutting jig. To test the angle, cut across a piece of scrap, put the cut ends together at a right angle and check the assembly with a square. Adjust the blade until the fit is accurate.
From Fine Woodworking #86
For the full article, download the PDF below:
Fine Woodworking Recommended Products

Stanley Powerlock 16-ft. tape measure

Blackwing Pencils

Dividers




Log in or create an account to post a comment.
Sign up Log in