Making Salad Servers
Curved laminates for lifting the lettuce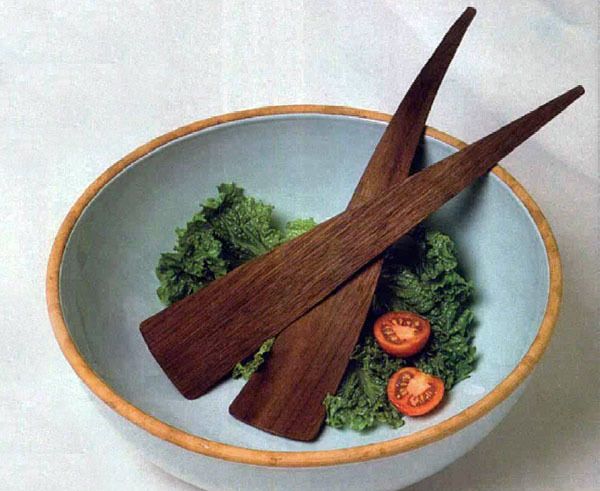
Synopsis: Tage Frid designed a pair of museum-quality S-shaped salad servers. Their shape prevents them from falling into the bowl, they’re light, and strong. He made them by laminating two thin pieces of walnut in a simple jig and shaped them with basic shop tools. The bending jig is made by bandsawing a block to fit the S-curve. He finished the salad servers with a scraper and belt sander, and gives you some nontoxic finish options for eating utensils. He also offers tips on how to make a fork from the servers if that shape is preferred.
Most of us serve salad with a large spoon and fork, and sometimes both are connected like a pincer. But I think a fork is unnecessary and a pincer is apt to squeeze the juice from tomatoes before you can get them to your mouth. The pair of S-shaped spoons shown here lets you toss and serve salad without mashing it, and their top curves prevent them from sliding into the salad and getting covered with salad oil. I made the servers by laminating two thin pieces of walnut in a simple jig and by shaping them with basic shop tools. Here’s how.
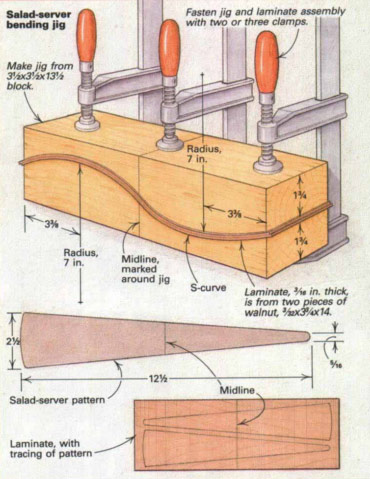
Both spoons are curved identically and are made from a single laminate of two pieces of walnut veneer. You can use multiple layers of any species of veneer, but hardwood is best because it’s more durable. The bending jig is easy to make. Start with a block of wood Lay out the S-curve with two 7-in. radii, and mark a midline around the block 6 in. from its end, as shown in the drawing. Then bandsaw the block at the S-curve.
Assemble the veneers with non-toxic adhesive, like yellow glue, and make sure their edges are aligned. Now, place the assembly between the jig halves and loosely secure the jig with one clamp in the center. Tap the jig to align its midlines, realign the veneer edges if necessary, and add damps at each end and tighten them. After you wipe off excess glue, let the assembly dry for 24 hours. If you’re neat, you shouldn’t have to protect the jig from glue by shellacking and waxing it or by putting newspaper between it and the laminate.
Before removing the clamps, transfer the jig’s midline to the laminate and, after removing it from the jig, mark the line across one face of the laminate. Next, make a cardboard pattern of the servers and draw a midline across it, as shown, Mark out each server on the laminate by laying the pattern first in one direction and then the other, aligning the midlines. Now bandsaw each server.
I smoothed each server’s straight edges, rounded it’s back and radiused the corners on it’s end with a belt sander, which I clamped upside down in my workbench vise. If you shape the server with files and sandpaper, clamp it in a vise, but be sure to fill the servers concavity with scrapwood, or the vise pressure may break it.
Finally, smooth the surfaces with a scraper blade and lightly sand them before finishing. Don’t use a finish with driers on eating utensils, because the dried film can be toxic. Instead you can use a salad-bowl finish or you can seal the servers with edible salad oil. Remember not to soak the servers in the dishwater because they might delaminate. If you try the servers and decide you’d rather have one as a fork, cut three tines by drilling two 1/8-in.-dia. holes an inch or so from the end and bandsawing to each hole with two cuts. I like a wide space between tines so the fork is easy to clean.
From Fine Woodworking #88
For the full article, download the PDF below these links:
 |
Hot-Pipe Steam-Bending: Free Form Bending |
 |
Food-Safe Finishes |
 |
Making Wooden Spoons |
Fine Woodworking Recommended Products

Suizan Japanese Pull Saw




Log in or create an account to post a comment.
Sign up Log in