Spiral-Routing on the Lathe
A shopmade setup for putting a twist on turnings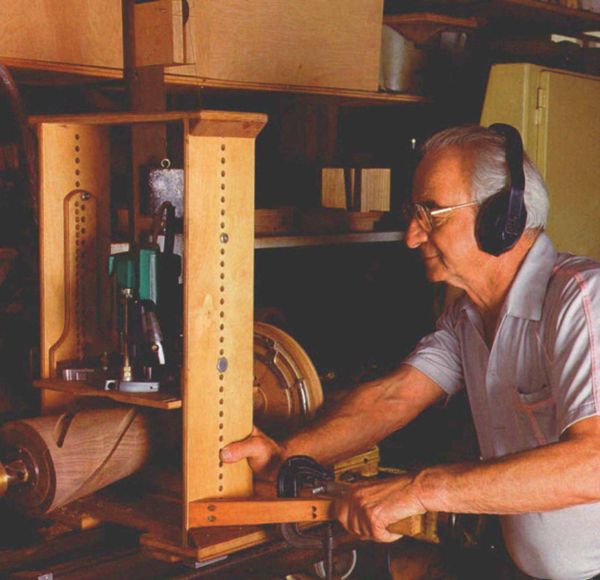
Synopsis: Norman Zentil built his own spiral-routing system on a sliding carriage that pulls along the lathe bed. A system of pulleys and weights, connected to the carriage by a cable, rotates the turning blank synchronously with the travel of the router, creating grooves, flutes, or reeds on the turning. Spiral routing is done with the lathe off, he notes, and he explains how his system works and how to build the jig. A detailed drawing helps show all its parts. Zentil also disscusses spiral-routing variations, such as using core-box, veining or V-bits for different decorative effects. Photos show off the impressive results of this technique.
Spiral shapes have always appealed to me. So when I turned a wooden plant stand a couple of years ago, I decided to decorate it by routing an accelerating spiral pattern into its tapered column. I built my own spiral-routing system, shown in the large photo on the facing page and figure 2 on p. 89. The system employs a router mounted in a sliding carriage, which the operator pulls along the lathe bed. A system of pulleys and weights, connected to the carriage by a cable, rotates the turning blank synchronously with the travel of the router, hence creating grooves, flutes or reeds on the turning.
Although my setup may look complicated, it’s actually not all that difficult to build, once you understand how it operates. And although nine years of experience making tools and jigs gave me the skill to fabricate many of the parts from metal, you can just as easily substitute plywood and plastic for some of the parts.
Because spiral-routing is done with the lathe off, most of the system’s components don’t have to withstand the force of a spinning lathe. My system is adaptable to just about any lathe with dual ways—wood- or metal-turning—and is flexible enough to allow dozens of different spiral patterns to be routed. The setup isn’t limited to just routing cylindrical turnings. By offsetting the axis of the turning, I can rout spirals on the surface of a tapered turning, such as the column on my lamp base shown in the small, top photo on the facing page. And my system is capable of creating even more complex forms, like the column on my plant stand shown in the bottom photo on the facing page.
It would take pages of drawings to show you every dimension of every part of my lathe system, and then it probably wouldn’t fit your lathe. Therefore, I’ll concentrate on explaining the construction, features and critical elements of each part so that you can build your own spiral-routing system. But first, here’s a rundown of all the components and how they function together.
From Fine Woodworking #90
For the full article, download the PDF below:
Fine Woodworking Recommended Products

Olfa Knife

Dividers
Double Sided Tape






Log in or create an account to post a comment.
Sign up Log in