Machine-Cut Dovetails
The look of hand-cut joints from the tablesaw and bandsaw
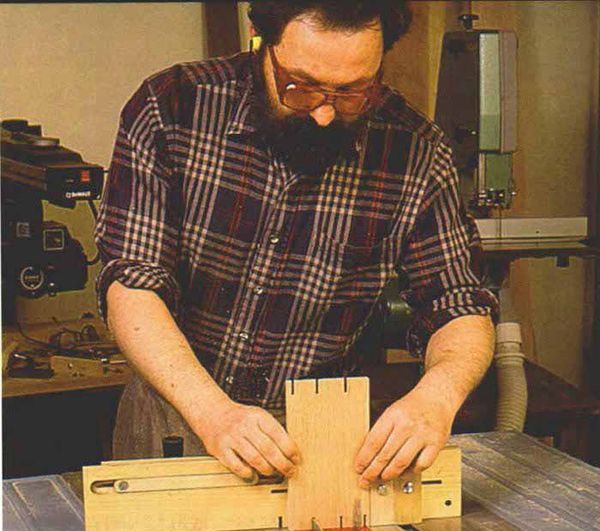
Synopsis: Mark Duginske’s method for cutting through dovetails combines hand-tool flexibility with machine-tool speed and accuracy. It’s fast, simple, doesn’t cost much, and offers flexible design options. He uses the tablesaw, a bandsaw, and a shopmade jig that he mounts to the tablesaw’s miter gauge to hold the workpiece on edge, so that he can cut both pins and tails with a standard sawblade. He explains how he designs the joints and cuts the spacer blocks, how to make the tablesaw jig, and what the limitations are to his system. Side information includes a detailed drawing of the jig and step-by-step photos and instructions on cutting the dovetails with his method.
The dovetail is a classic joint that many craftsmen consider to be the hallmark of quality joinery. But the traditional method of cutting dovetails by hand requires skill and patience, and unless you’re in practice and up to speed, all that sawing and chiseling is slow work. Making dovetails with a router and jig is one alternative, but the monotonous look of most router-cut dovetails leaves something to be desired.
I have always felt that there was a missing link between the tedium of hand-cutting and the limitations of router jigs. After years of experimentation, I developed a method for cutting through dovetails, which combines hand-tool flexibility with machine-tool speed and accuracy. It’s a great system for the small-shop because it is fast, simple to use, costs next to nothing and allows you to design the size and layout of dovetails to suit most applications.
How the system works
In a nutshell, the system employs two machine tools: the tablesaw and the bandsaw. A simple shopmade jig shown in figure 1 on the facing page mounted to the tablesaw’s miter gauge supports the workpiece on edge for cutting both pins and tails with a standard sawblade. The blade is tilted for cutting the tails; for the pins, the miter gauge and jig are angled. While the jig maintains the angle of cut, a set of spacer blocks mounted to the jig spaces the sawcuts to produce a perfectly fitting joint without the need to mark the boards individually. After the tablesaw cuts are made, the waste is removed with a -in.-wide blade on the bandsaw using the saw’s regular rip fence as a guide. The narrow bandsaw blade slides into the kerfs left by the tablesaw blade and cleans up the sharp corners between tails and pins almost perfectly. Shims, used along with the blocks, allow fine-tuning the joint’s fit. Depending on the width of the spacer blocks and the setup of the jig, you can vary the angle, width and spacing of the pins and tails for practically any aesthetic effect.
Although my system is straightforward, it involves quite a few steps that must be performed in order. The procedure is better illustrated with photographs and sketches than with a written description alone; therefore, I’ve included a step-by-step account in the sidebar on p. 68 of how to cut a typical through dovetail joint. Before you begin cutting, there are a few preparatory tasks including making the tablesaw jig, designing the layout of the desired dovetail joint and cutting out the spacer blocks.
From Fine Woodworking #96
For the full article, download the PDF below:
Fine Woodworking Recommended Products

Olfa Knife

Festool DF 500 Q-Set Domino Joiner

Sawstop Miter Gauge


Comments
If tail and pin boards have to be the same thickness, not much use for drawers.
Log in or create an account to post a comment.
Sign up Log in