Build a Better Sawhorse
Useful shop fixture offers good layout and joinery exercise
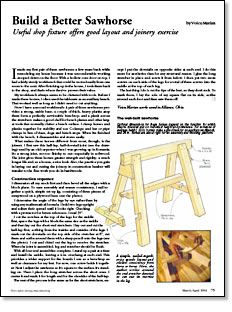
Synopsis: Voicu Marian’s workbench is always cluttered with tools. In this concise article, he explains how he uses a couple of sturdy sawhorses to support a serviceable benchtop, with a plank across the stretchers that holds bench planes and larger tools. These sawhorses have half-lap, half-dovetail joints to give them greater strength and rigidity, longer life, and a nice look. Marian explains his construction sequence, and a plan drawing shows how the parts fit together.
I made my first pair of these sawhorses a few years back while remodeling my house because it was uncomfortable working stooped down on the floor. With a hollow core door on top, I had a fairly sturdy workbench that could be moved easily from one room to the next. After finishing up in the house, I took them back to the shop, and that’s where they’ve proven their value.
My workbench always seems to be cluttered with tools. Before I made these horses, I often used the tablesaw as an auxiliary bench. That worked well as long as I didn’t need to cut anything.
Now I have a second workbench: A pair of these sawhorses provides a strong, stable base; a couple of thick, heavy planks atop them form a perfectly serviceable benchtop; and a plank across the stretchers makes a good shelf for bench planes and other larger tools that normally clutter a bench surface. I clamp horses and planks together for stability and use C-clamps and bar or pipe clamps in lieu of vises, dogs and bench stops. When I’m finished with the bench, it disassembles and stores easily.
What makes these horses different from most, though, is the joinery. I first saw this half-lap, half-dovetail joint (see the drawing) used by an old carpenter when I was growing up in Romania. It’s a strong joint, not too finicky to cut—especially in softwood. The joint gives these horses greater strength and rigidity, a much longer life and, as a bonus, a nice look. Also, the practice you gain in laying out and cutting the joinery in construction lumber will transfer to the fine work you do in hardwoods.
Construction sequence
I dimension all my stock first and then bevel all the edges with a block plane. To ease assembly and ensure consistency, I nail together a quick, simple set-up jig, consisting of three pieces of scrapwood on a plywood base (see the photo).
From Fine Woodworking #105
Fine Woodworking Recommended Products

WoodRiver Router Bit Storage Case

Woodriver Rechargeable Desiccant Bag


Log in or create an account to post a comment.
Sign up Log in