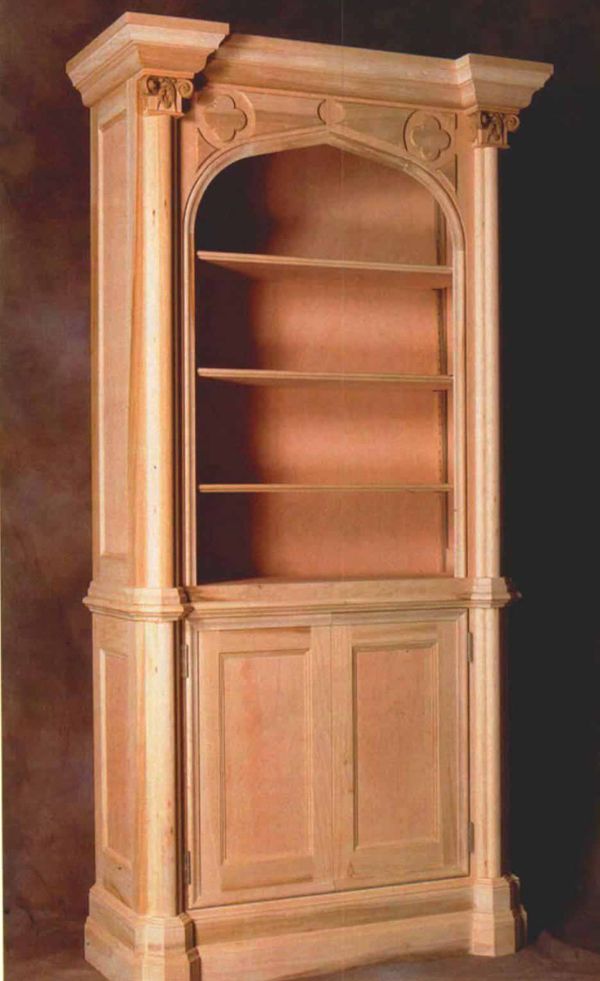
Synopsis: Philip Lowe added a few easy elements to basic boxes that make a simple cabinet/bookcase look like detailed Gothic furniture. He explains how to build the piece using adjustable shelving pins, how to add the Gothic arch, join the top and bottom, and how to apply the base moldings. He talks about defining the waist (which is composed of a lower cove, central torus and an upper ogee), and how to top the piece off with a cornice. He joined the capitals and columns with glue and screws from inside, and he applied quatrefoils, panels, and shaped molding. A side article discusses precast ornaments and how they save time, effort, and money. A detailed project plan identifies each element.
Easily applied elements can dramatically alter a cabinet’s appearance. I added clustered columns, an octagonal base, waist moldings and a blocked cornice along with a quatrefoil and arched surround to a simple frame-and-panel base cabinet and an open bookshelf top unit. The result was Gothic detailing that would blend into my client’s home. These elements also create a dramatic play of light and shadow, particularly in a piece to be painted. And, ironically, the most complicated detail I added, the intricately carved cornice block, is the easiest to use. It is a precast piece that simply glues in place (see the story on p. 46).
Building the cabinets
The basic forms started with two rectangular boxes, as shown in the drawing on p. 47. The tops and bottoms, arched surround and backs were made up of -in.- thick, lumber-core birch plywood. The sides and doors were poplar frames with -in.-thick birch plywood panels. Ogee moldings glued and nailed around the inside edges of the door and side frames add more detailing and shadow lines. Before assembling the boxes, holes were drilled into the stiles of the case sides for adjustable shelving pins. The cases were glued and screwed together with the screws located so the cornice, base and waist moldings would cover the screw heads.
Joining top to bottom
Before assembling the two cases, filler pieces were applied around the bottom of the upper case, as shown in the drawing. These filler pieces help position the top and provide screw blocks for securing the top to the bottom. The top case was then positioned on the lower case and the cases temporarily screwed together. The cases can be separated for moving, but I wanted the top and bottom units screwed together when applying the waist molding that hides the joint between the two units.
Applying base moldings
To provide a platform for the clustered columns, two half-octagonal blocks were glued to the face of the base cabinet, as shown in the drawing. Two different base moldings were mitered to wrap around the corners and the octagonal blocks and then glued and nailed in position.
From Fine Woodworking #108
For the full article, download the PDF below:
Fine Woodworking Recommended Products

Estwing Dead-Blow Mallet

Bessey EKH Trigger Clamps


Log in or create an account to post a comment.
Sign up Log in