Basics of Vacuum-Bag Veneering
Tips and tricks to make even your first project a success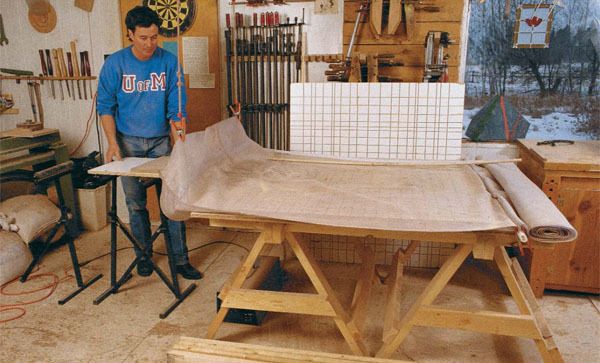
Synopsis: Although vacuum veneering is not a complicated process, there are several procedures and techniques that David Shath Square has learned along the way. He offers those tips, from shop and equipment setup to suggestions about what to try and what to avoid, in this article for vacuum veneering beginners. He shares lessons of his first project, a small table, and talks about how to join veneers and what adhesives are best. He also discusses veneering solid wood and curves. In a side article, Wayne Locke talks about how to make your own vacuum system.
Until recently, I was an advocate of the solid hardwood approach to furniture construction as taught by the cabinetmaker I apprenticed with in the early 1970s. But as it became increasingly difficult to find that perfectly figured roostertail walnut, quilted maple or swirl cherry in solid wood, I became more attracted to the exquisite veneers that are readily available. However, I continued to shy away from veneer because of my prejudicial training. Besides, the mechanical veneer presses I had encountered reminded me of unwieldy instruments of torture.
But then I read an article about vacuum veneering by Gordon Merrick (FWW #84, pp. 68-70). Although skeptical, I was fascinated by the simplicity, flexibility and effectiveness of this system. After some preliminary investigation, I gave into the appeal of veneering and bought a system (see FWW #99, pp. 72-75 for a review of various systems).
Although vacuum veneering is not a complicated process, there are several procedures and techniques that I’ve learned along the way. These tips, from shop and equipment setup to helpful suggestions about what to try and what to avoid, will help any beginner get off to a smooth start.
Shop layout and equipment setup
I work in a small, one-man shop, and setting up a 4-ft. by 8-ft. table that would handle all my veneering needs was out of the question So I designed an adjustable platform system that could be shortened or lengthened to suit various jobs. I generally keep the platform and base in a 4-ft. by 4-ft. mode, as shown in the photo on the facing page, because this handles most veneering needs. The base is constructed of three heavily built sawhorses that have dadoes cut into their top members. A pair of 2×4 stringers rest on edge in these dadoes. They form a joist-like structure to support the melamine sheet that makes up the platform on which the bag and platen rest. To increase the size of the base, I pull the sawhorses farther apart, replace the stringers with longer 2x4s and add another section of melamine.
Whether you are veneering a flat surface or forming a curved panel, a platen is required inside the bag to help draw out all the air and to support the workpiece. I used a 3 ⁄4-in.-thick melamine panel with a grid of 1 ⁄8-in.-wide grooves that are approximately 1⁄4 in. deep and ripped 2 in. apart on the tablesaw. A series of platens can be adjusted along with the platform to suit the size of the work. For most of my work, I use just one section. The setup is easier, and it takes up less of my precious shop space. However, if I’m veneering a large, flat surface, I add more sections side by side in the bag as needed. I also use the smaller platens when pressing a curved panel to allow more room for the bag to envelope the form (see the photo on p. 65).
From Fine Woodworking #109
For the full article, download the PDF below:
Fine Woodworking Recommended Products

Bahco 6-Inch Card Scraper
Whiteside 9500 Solid Brass Router Inlay Router Bit Set





Log in or create an account to post a comment.
Sign up Log in