Strategies for Clamping
Work on a flat surface, and test-fit everything first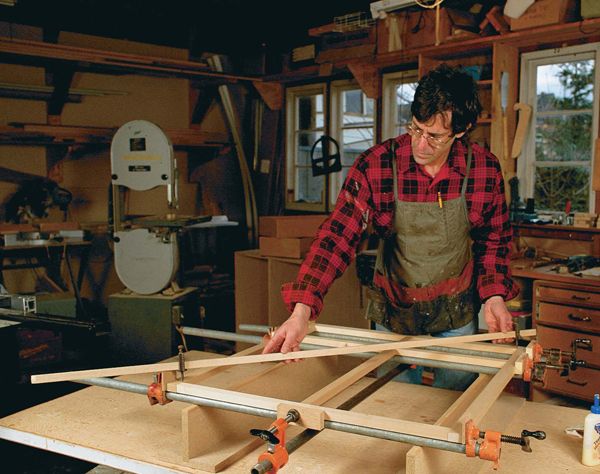
Synopsis: Jim Tolpin learned the hard way — in the middle of making a spiral staircase with two laminations – that it’s important to have all the necessary materials on hand before getting started. He talks about the benefits of having a flat assembly table and the right glue. He explains how to dry-assemble before glue-up and offers tips on frame assemblies. Side information includes illustrations on how to clamp a frame and how to correct an out-of-square frame. Tolpin also shares procedures for clamping boxes and carcases.
My partner and I weren’t expecting much trouble when we set out to clamp up our first spiral staircase. Each of the two laminations making up the staircase consisted of six layers of 1 ⁄2-in. red oak. We were well into gluing the oak strips and clamping them to the bending form when I realized that we were using a lot of clamps. To make matters worse, portions of stringer we’d already clamped were opening up. We needed more clamps—and fast. I kept gluing and clamping while my partner jumped into his truck and hit up every boat shop, cabinet shop and contractor in town for clamps.
The stair did go together, but the experience proved to me that it’s best to have all the necessary materials on hand before getting started. It’s also important to make a dry run to see if any problems crop up, whether you’re assembling a simple project or a complex staircase.
A flat assembly table and the right glue
To ensure successful glue-ups, I use dry, stable stock and keep my shop reasonably warm and dry. I also set up a clamping station that is level and flat. I cobbled together a worktable from particleboard and strips of softwood lumber and put a couple of T-stands on it. Clamps tighten freely when they’re resting on T-stands. And because the clamps (and assembly) don’t have to be lifted off the table to tighten the clamps, T-stands also help prevent an assembly from becoming distorted. The worktable doesn’t have to be anything fancy. As long as you level the surface by shimming wherever necessary, you can get by with a couple of straight 2x4s on edge across two sawhorses.
The right type of glue also is crucial to a successful glue-up. In most cases, yellow glue (aliphatic resin) is fine. If the structure is complex and threatens to take more than five minutes to assemble, I’ll use a urea-formaldehyde glue (such as Weld-wood plastic resin glue), because it has an open time of about an hour. Certain oily tropical woods (teak, for example) may require epoxy or one of the newer polyurethane glues, such as Gorilla Glue or Excel. Experiment with various adhesives and woods on sample glue-ups. Don’t use a glue for the first time on a real project.
From Fine Woodworking #113
For the full article, download the PDF below:
Fine Woodworking Recommended Products

Jorgensen 6 inch Bar Clamp Set, 4 Pack
Incra Miter 1000HD
Dubuque Clamp Works Bar Clamps - 4 pack






Log in or create an account to post a comment.
Sign up Log in