Shaker Sewing Stand Remains Stylish, Practical
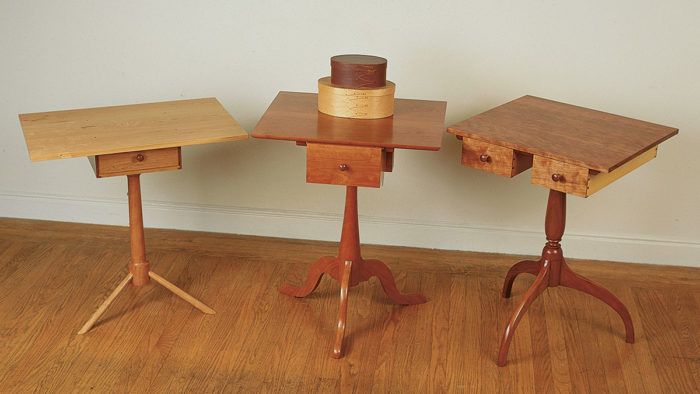
A two-way drawer hangs beneath a rectangular top
Synopsis: Robert Treanor doesn’t sew, but he loves Shaker sewing stands. The one featured in this article has three cabriole legs and an underslung, two-way drawer, making it useful as a nightstand. The yoke unites the top, the drawer, and the pedestal, and detailed project plans show how it all fits together. The drawer is suspended and guided by two hangers, and another illustration details the drawer construction. Side information show how Shaker stands changed over the years.
Shaker sewing stands have a simplicity and a charm that few other pieces of furniture can match. Although I don’t sew, and have buttonless shirts to prove it, I am drawn to these small stands. And that’s not just because I like Shaker furniture. The stand’s convenient size and two-way drawer make it useful for any household— as an end table, a night stand or especially as a hall table. Because the table is small, it will fit in almost any entryway, providing a place to drop the mail and your keys.
Most of us are familiar with the Shaker candle stands that have round tops. In Shaker communities, round stands were great for candles, but their tops didn’t hold much else. Shaker craftsmen sometimes substituted rectangular tops for the round ones and suspended a drawer or two under the top to provide additional storage. These tripod stands usually are called sewing stands, although their main purpose is debatable.
Several versions of sewing stands with under-slung drawers evolved. The style I like best has a single drawer and cabriole-style (snake) legs, as shown in the photo above. I built this stand mostly from cherry, with a few pine parts. Similar stands are attributed to the Hancock Shaker community in western Massachusetts and are, arguably, the most elegant. The height usually is about 26 in.
The legs on the original stand, on which my piece is based, are tenoned into the turned pedestal (a common feature of Hancock stands). The legs on my stand are joined to the pedestal by sliding dovetails. This joinery adds strength to the piece. Some original stands were built this way, and to further strengthen the connection, a metal plate (known as a spider) was secured to the bottom of the pedestal. I omitted the spider on my stand. The bottom drawing at right shows the patterns for the legs and the pedestal. I cut the leg dovetails on a router table. For the pedestal grooves, I use a jig and a hand-held router with the pedestal still mounted on the lathe, as shown in the bottom photo on the facing page.
From Fine Woodworking #116
For the full article, download the PDF below:
Fine Woodworking Recommended Products

Dividers

Drafting Tools

Stanley Powerlock 16-ft. tape measure


Log in or create an account to post a comment.
Sign up Log in