Low Assembly Bench
Versatile platform puts your work at the right height
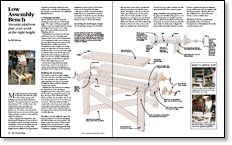
Synopsis: Amateur woodworker Bill Nyberg built a low platform bench that suits his sore back and the way he works. His bench is made for clamping; the edges overhang, and there’s a gap down the middle. He explains how to build the benchtops, from how the pipes run through the tops to assembling the double-pipe clamps. He advises keeping the ends flush when gluing, too. A detailed project plan shows how each element relates to the others.
My father learned woodworking in Sweden, and when he came to this country, he got a job building reproduction Early American furniture. The shop had been in operation since the late 1700s, and like those who worked before him, my father was assigned a huge bench with many drawers. He stored his tools and ate his lunch at the bench, but much of his actual work took place nearby on a low table he called “the platform.”
When I inherited his big bench, I also found myself doing most of my work at a low platform improvised from sawhorses and planks. I have bad shoulders and the occasional sore back, so using a fullheight bench is difficult and unproductive. I needed a bench that suited the way I really work, so I built a low platform that incorporates some features of a traditional full-sized bench.
A clamping machine
My low platform bench is made for clamping (see the photos on the facing page). The edges overhang enough for clamps to get a good grip anywhere along the length of the bench. A 4-in.-wide space down the middle increases the clamping options.
This platform bench has four tail vises made from Pony No. 53 double-pipe clamps, which can be used by themselves or in combination with a row of dogs on the centerline between the screws, as the drawing shows. Unlike most bench arrangements, with a single row of dogs along one edge, this one doesn’t twist or buckle the piece. I can use each vise singly or with the others because the pipes are pinned into the benchtops at each end with 1⁄4-in. by 2-in. roll pins. Without the pins, the pipes would slide through the bench when tightening one end.
Rather than using traditional square bench dogs, I bored 3⁄4-in. holes for a variety of manufactured dog fixtures or shopmade dowel dogs (see the drawing).
Building the benchtops
The bench is made from eight straight, clear 8-ft. 2x4s that I had kept in the shop for a few months to dry. I jointed the edges and then ran each of the boards through the planer until the radiused corners were square.
Building the legs and base according to the dimensions on the drawing is straightforward. The only point to note is the dovetail connecting the beams to the legs. Because of the orientation of the beams and legs, the dovetail is only 11⁄2 in. at its widest point, but it’s 31⁄2 in. from top to bottom. I tilted the tablesaw blade to cut the tails on the beam and cut the pins on the legs in the bandsaw.
From Fine Woodworking #118
For the full article, download the PDF below:
Fine Woodworking Recommended Products

Drafting Tools

Blackwing Pencils

Woodriver Rechargeable Desiccant Bag


Log in or create an account to post a comment.
Sign up Log in