Turned Ornaments
Three-piece decorations shaped and polished on the lathe
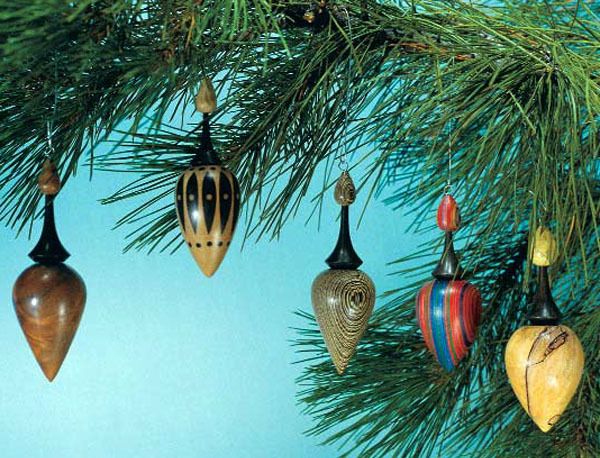
Synopsis: Ornaments turned in three parts save small pieces of figured wood from the scrap bin and help embellish a tree or window. Michael Sage explains how to make them, beginning with making a bell from a scrap 2-in.-sq. by 3 to 4 in. long. Then he adds a stem, and tops it with a finial crown. He polishes the ornaments while they’re still on the lathe or by holding them on a buffing wheel. He drills a tiny eyelet in the top of the finial for hanging them.
I turn wood for a living, and I sell just about everything I make. But there are a few things I like to turn just for family and friends. Wooden ornaments, turned from brightly colored or highly figured woods, are my favorites. They’re great for stocking stuffers or for dressing up a home during the holidays. These ornaments don’t take long to make, and they’re a great way to use up odd scraps of wood.
I make them in three parts: a bell, a stem and a finial. Each part is turned separately. Glued together, the parts make a simple, bold form that really shows off a beautiful piece of wood. I have used clear, solid woods as well as spalted, segmented, inlaid, dyed and bleached woods. I have even used Colorwood, which is a dyed plywood made of 1⁄16-in. maple veneers.
Start by making the bell
The bell begins as a 2-in.-sq. blank of wood 3 in. to 4 in. long. It’s chucked between centers on the lathe and turned to a cylinder with a 1-in.-dia. by 1⁄2-in.-long tenon on one end.
I remount this piece on the lathe for final turning with a glue chuck, which is nothing more than a scrap block, with a hole drilled in it, screwed to the faceplate (see “making the glue chuck” on the facing page). The tenon in the end of the bell piece is glued into the hole in the glue chuck. After the glue has dried, I snug up the tailstock and turn the outside of the blank to roughly the shape of the bell.
Hollowing out the bell of the ornament gives it a more delicate feel. To make an access hole for hollowing, I slide the tailstock out of the way and drill a 1⁄2-in.-dia. hole in the end of the bell about 2 in. deep.
I find that a hook tool is the best thing for hollowing. I made mine from a length of 3⁄16-in. drill rod. I bent the rod into a hook shape, sharpened it and added a wooden handle. When hollowing, I leave a 1⁄4-in. shoulder so I can glue on the stem. After hollowing, I move the tailstock back in place, turn the bell shape the rest of the way and then sand it. I use a skew to part the bell from the lathe. The end has to be hand-sanded.
The stem adds form to the middle
For the stem, I start with a blank of wood 1 in. sq. by 3 in. long. I often use a wood that contrasts with the bell and the finial. I mount the blank between centers (a minidrive works well at the headstock) and turn the blank into a cylinder.
From Fine Woodworking #120
For the full article, download the PDF below:
Fine Woodworking Recommended Products

CrushGrind Pepper Mill Mechanism

Suizan Japanese Pull Saw


Log in or create an account to post a comment.
Sign up Log in