Mortising with a Router
Auxiliary fences, fixtures and templates help ensure quick, consistent results
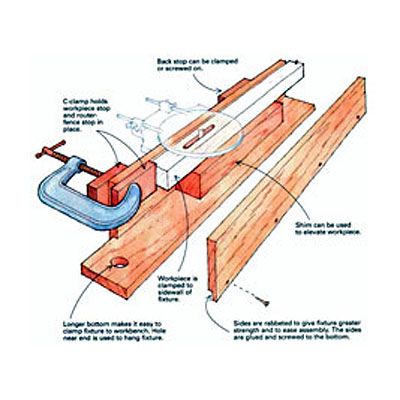
Synopsis: Gary Rogowski chopped his first mortise in red oak by hand, learning a lot along the way and sharpening his chisel frequently. Then he bought a router. Here, he explains how to choose the right bit and how to cut a mortise using a fixed-base router, a router table, and a plunge router. This detailed article shows a variety of methods he uses to cut mortises, and it includes a how-to on building a template and guide, as well as a U-shaped mortising fixture.
I cut my first set of mortises by hand. It was a fabulous learning experience. I found that chopping through red oak was like digging postholes in dry clay. I had to resharpen my chisel after each mortise, but I learned. I also bought a router.
A router is the quickest and most accurate tool for cutting mortises. Its versatility and speed is unmatched, and it can be used in a variety of setups, both upright and upside down in a router table. In minutes, a router cuts mortises that would take hours by hand. And you can reproduce your results with a minimum of hassle or setup time. When I have mortises to cut these days, the router is my first choice. Either a fixed-base or a plunge router can produce excellent results.
Choosing the right bit
There are a variety of bit sizes and types that can be used for mortising (for more on router bits, see FWW #116, pp. 44-48). Two shank sizes are commonly available: in. and in. Either will work, but bits with in. shanks flex less under load, give a better cut and are less likely to break.
I don’t bother with high-speed steel (HSS) bits because they need to be sharpened too often. Carbide-tipped bits cost two to three times more but they last much longer. Solid-carbide bits are great, too, but they’re even more expensive.
Straight bits come in two flavors: single flute for quick removal of material and double flute for a smooth finish. Because you’ll find double-fluted bits in most tool catalogs, you’ll get more size options.
The flutes of a spiral bit twist around the shank. This gives a shearing cut that is even smoother than one from a double-fluted straight bit. Spiral bits are available both in solid carbide and carbide-tipped steel. They spiral up or down.
An up-cut spiral bit cuts quickly while pulling most of the chips out of the mortise. However, it also will tend to pull the workpiece up if it’s not securely fastened. The up-cut spiral also can leave a slightly ragged edge at the top of the mortise where wood fibers are unsupported. Because the edges of a mortise are usually covered by the shoulders of a tenon, this kind of tearout generally isn’t a problem.
A down-cut spiral bit pushes the work and the chips down. The result is a cleaner mortise but one that can become clogged with debris. I have used mostly double-fluted straight bits and a carbide-tipped up-cut spiral bit. Recently, though, I bought a solid-carbide up-cut spiral, which cuts even better.
From Fine Woodworking #121
For the full article, download the PDF below:
Fine Woodworking Recommended Products

Festool DF 500 Q-Set Domino Joiner

Stanley Powerlock 16-ft. tape measure

Jorgensen 6 inch Bar Clamp Set, 4 Pack


Log in or create an account to post a comment.
Sign up Log in