Pear Mantel Clock
Clean lines and few details make this clock handsome and easy to build
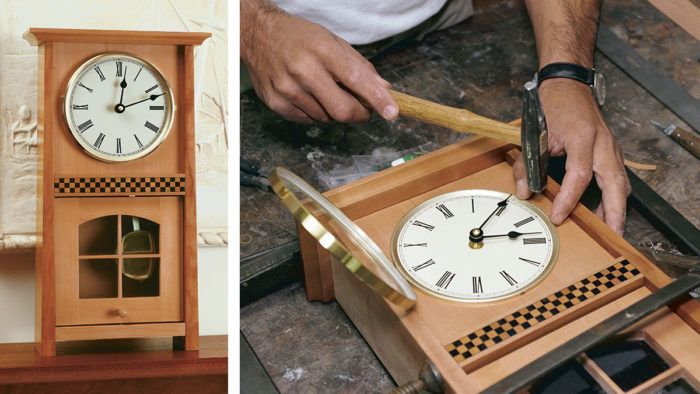
Mario Rodriguez designed an Arts-and-Crafts clock with a contemporary feel for his daughter’s birthday, which didn’t leave him much time. The joinery is simple, just stub tenons and dadoes; the clock has just eight parts, and since it’s small, finishing goes quickly. He used a router table and tablesaw for the joinery, and he veneered the face and back panel. The glazed door swings up on dowel hinges for access to the pendulum. He advises that you assemble the case on its side, and he explains how he snapped the pendulum rod to size and attached the hands. Detailed project plans show how all eight parts come together and how to assemble the door. Side information explains how to make checkered inlay.
My daughter Isabel’s seventh birthday was fast approaching, and I wanted to build her something special. She had recently learned to tell time, so a clock seemed like the perfect way to mark the occasion. I designed the clock in the Arts-and-Crafts style; it looks somewhat contemporary but still has a traditional feel. The joinery is simple, just stub tenons and dadoes, most of which can be cut quickly on a router table and tablesaw.
The clock consists of eight parts: the top, bottom and two sides, the middle shelf assembly, veneered panels for the face and back of the clock, and a door below the middle shelf. The clock is just a bit taller than 16 in. As a result, not a lot of wood is required to build it, and the planing, sanding and finishing don’t take very long.
This clock is made of pear, which has a very mild grain that lets the clock’s design dominate. A coarsely grained or heavily figured wood could overpower a clock of this size.
Use router table and tablesaw for joinery
The two sides of the clock are dadoed into the top, and the lower and middle shelves are dadoed to the sides. I routed these stopped dadoes as well as the grooves for the back panel and face panel on the router table. The dadoes are all 1⁄4 in. deep by 1⁄4 in. wide. I moved the router-table fence over a hair for the grooves, which are just slightly wider to accommodate the face and back panels. I made these from 1⁄4-in. birch plywood, veneering one side with quartersawn pear veneer. To ensure accurate, square cuts on the router table, I used a right-angle jig and cut no more than 1⁄8 in. deep per pass. With the tablesaw, I cut the corresponding stub tenons at the top of the case sides and on the ends of the lower and middle shelves. They were cut just a little wide and then fitted by hand.
I tapered the outside faces of the clock sides using a jack plane, taking the sides from 3⁄4 in. at the bottom to just under 1⁄2 in. at the top. This gives the clock a lighter feel and is a detail found on many Arts-andCrafts clocks made earlier this century. A 1⁄2-in. cove routed around the underside of the clock’s top gives it a visual lift.
With the top, bottom and sides made and fitted, I planed and scraped the pieces. They were sprayed inside and out with two very thin coats of aerosol nitrocellulose sanding sealer followed by one coat of semigloss lacquer. To keep the joints free of lacquer, I taped the stub tenons and temporarily fit 1⁄4-in. strips into all the dadoes. I scuff-sanded with 320-grit sandpaper between coats. Spraying before assembly allowed easy access into corners, eliminated drips and reduced overspray.
From Fine Woodworking #123
For the full article, download the PDF below:
Fine Woodworking Recommended Products

Suizan Japanese Pull Saw

Drafting Tools


Log in or create an account to post a comment.
Sign up Log in