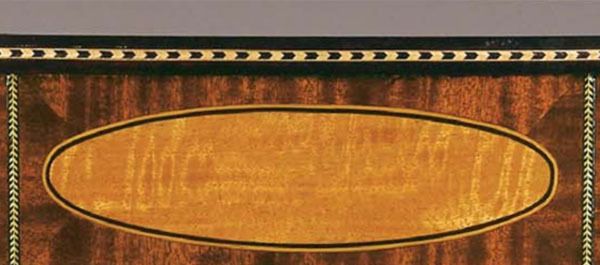
Synopsis: Veneering the oval in the center of the serpentine apron on Sheraton-style tables that John M. Van Buren was building created a technical challenge. He explains here how to do it with simple equipment and a little practice. Van Buren starts with a master pattern cut on the bandsaw. He details how heat and moisture do the job of bending the veneer. Exactly when you bend the inlay after heating it is critical, and you may need some practice to get it right. Detailed photographs show his steps, from template to clamping and background.
Much of the fun and challenge of woodworking, for me, comes from copying fine examples of 18th- and early 19th-century cabinetwork. Creative purists may malign this process of imitation, but these labors have provided furnishings of incomparable design for my home, without the financial outlay that purchasing antiques would have required.
The Sheraton-style card table is a case in point. I reproduced a pair of these tables from a photograph of one in The Metropolitan Museum of Art in New York City. I wanted to use mine as side tables—not game tables—so I made them without a second hinged leaf.
The oval in the center of the serpentine apron presented a technical challenge. After some experimentation, I discovered that veneering the oval with a border of black and satinwood inlays could be done with simple equipment and a little practice.
You need to start with a master pattern: a full-scale ellipse made with 1⁄4-in. plywood cut out on the bandsaw and then sanded smooth around the edges. This master serves as a pattern to cut out the elliptical veneer field and as a bending form for the inlay borders.
Draw an ellipse to the required dimensions. In this case, the satinwood oval has major and minor axes of 9 in. and 21⁄2 in. With the 1⁄16-in. inlay borders, or stringing, it is possible to bend to curves with as little as a 1⁄2 in. radius, like the ends of the one on the table shown above. The pattern is mounted on a second piece of 1⁄4-in. plywood, about 3⁄8 in. larger all around, to serve as a clamping surface. Both pieces are, in turn, screwed to the edge of a block of 3⁄4-in. wood that’s wide enough to be held in a vise.
Heat and moisture do the job
Dampen the borders by leaving them rolled in a wet towel for several hours. The dye in ebonized stringing leeches out with soaking, so it’s important to keep it separated from the satinwood because it will stain the lighter veneer.
From Fine Woodworking #124
For the full article, download the PDF below:
Fine Woodworking Recommended Products

Bahco 6-Inch Card Scraper

Sketchup Class

Stanley Powerlock 16-ft. tape measure


Log in or create an account to post a comment.
Sign up Log in