Build a Bookcase with Doors
Structure and details make the difference in this Shaker-style case
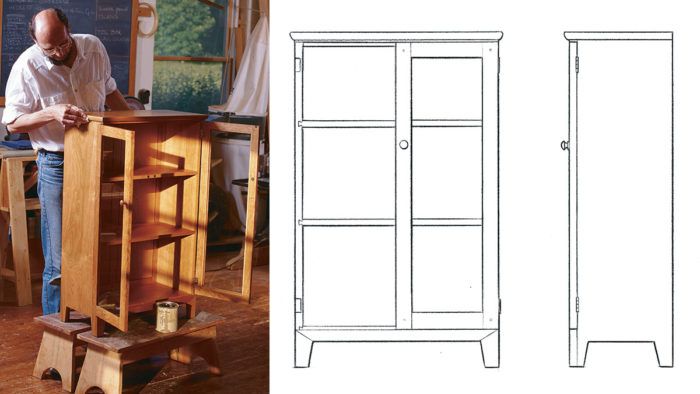
Synopsis: Christian Becksvoort designed this small bookcase to carry just a few details — a dovetailed molding at the top of the case, a mitered base and strip of wood just above the doors. Detailed drawings illustrate those key design details as well as his explanations of how dovetails hold the case together and how miters solve aesthetic problems. The door-frame joinery looks trickier than it is. The article includes tips on smoother dovetailing, mitering stock of different widths, measure-free frame joinery, and a trick for hanging doors.
The essence of good design is a piece of furniture that seems right just the way it is. There should be nothing to add and nothing to take away to improve it. That’s what I aimed for with this cherry bookcase. It was to be Shaker inspired, quiet and unpretentious, but not boring.
The bookcase needed to fit beneath a window sill, so it is relatively small, about 24 in. wide and 40 in. high. Its appearance and size are not overpowering, sp I relied on careful workmanship and just a few details to carry the design. Each of these construction details—a dovetailed molding at the top of the case, a mitered base and a strip of wood whose end grain doesn’t show just above the doors—required a fair amount of extra work. The details don’t jump out at you, but together they give the bookcase an appeal that it wouldn’t otherwise have.
The basic structure of this bookcase is quite simple: Two sides dovetailed to the top and three shelves connected to the sides with sliding dovetails. A frame-and-panel back is set into a rabbet at the case’s back.
To begin, I milled, crosscut and ripped to width the top and two sides from a single wide cherry board. I cut the rabbet for the back panel in the rear inside edge of each piece, and then I laid out and cut the dovetailed slots in the top. Because the top overhangs the sides by in. at the front of the case, the half-slot there is set back in. from the edge. To lay out the pins on the top of the sides, I used a picture-frame clamp, which holds the top and a side at precisely 90° to each other. Then I cut and chopped the pins.
From Fine Woodworking #128
For the full article, download the PDF below.
Fine Woodworking Recommended Products

Compass


Drafting Tools


Log in or create an account to post a comment.
Sign up Log in