Joint-Quality Edges Cut on a Table Saw
The trick is learning the steps in the dance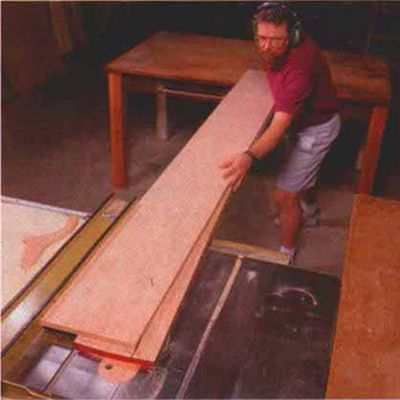
Synopsis: A common assumption is that the smoother surface a jointer gives is better for glue, but Lon Schleining says that the table saw can also yield excellent results. In this detailed article, Schleining demonstrates how to use your whole body when trimming wood on the table saw to ensure safe, smooth cuts that will allow for better glue penetration. He shows how you should move as you move the board across the table saw and a better way to feed it with your hands. He explains why he prefers a triple-chip blade and how to joint on a table saw. And he suggests practicing with an 8-ft. length of particleboard to get the steps right.
When I tell my students that a lot of professional woodworkers use a table saw to get glue-ready edges, I sometimes hear gasps of disbelief. Most woodworkers think the table saw cuts crude, uneven edges, which must be cleaned up on a jointer. The assumption is that the smoother surface a jointer gives is better for glue, but this isn’t always true, Glue must penetrate below the surface of the wood to do its job, so it needs open pores to seep in and grab hold. Jointer knives can compress the wood as they cut, glazing the surface and preventing maximum glue penetration—especially if the knives are dull or if the board is run over the jointer too slowly. However, running an edge over a jointer too fast cuts a pronounced wave pattern. If severe enough, only the tips will touch when two boards are put together, creating a wider glueline than is desirable.
The right technique on a table saw creates a straight, square and slightly abraded surface, which is ideal for glue joints. And a properly sawn edge, if it’s to be left exposed, needs only light sanding to be finished. The trick is mostly in the way in which you feed the board through the cut. It has to move through the blade at a constant speed without wavering. All you need is a table saw with a powerful motor (3 hp or more), a good quality triple-chip blade and an outfeed table. The rewards are great—less milling time for stronger glue joints and finished edges.
Two-step at the table saw
To cut a clean edge on a table saw, you’ll need to rethink how you move the board over the saw, as well as how you move. The commonly accepted technique of standing next to the saw and feeding boards hand over hand ensures an uneven edge and, frankly, is a dangerous habit. There is a total reliance on friction between the hands and the top face of the board to feed it forward, hold it down on the table and press it against the rip fence. The body is out of balance, and the hands (especially the left) move very close to the blade. One slip and the unthinkable might happen.
From Fine Woodworking #129
For the full article, download the PDF below:
Fine Woodworking Recommended Products
Shop Fox W1826
Dubuque Clamp Works Bar Clamps - 4 pack
Bosch 12V Trim Router




Log in or create an account to post a comment.
Sign up Log in