Putting a Finish on Small Objects Is No Little Task
Tips and tricks that make finishing small projects this task easy
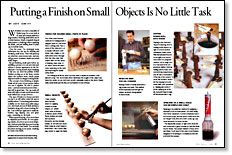
Synopsis: Small, irregularly shaped parts present a challenge when applying a finish, and just holding them in place can be half the battle, writes finisher Jeff Jewitt. In this article, he shares some techniques, such as tricks for holding small parts in place, using a small brush, what to apply gel finishes with, and dipping pieces into stains. By pre-finishing small parts before assembling a project, you can save time and achieve a cleaner appearance and avoid pooling at sharp corners. Jewitt also explains how spraying on a small scale can be simple and cheap.
Whether you have a handful of Shaker pegs for a coat rack or 60 door and drawer pulls for a large kitchen, finishing small items can be a tricky business. Small, irregularly shaped parts present a challenge when applying the finish, and just holding them in place can be half the battle.
Over the years, I’ve developed some techniques you can use for holding and finishing small items. They will speed up an otherwise monotonous task, and you will get more consistent results and avoid sticky fingers.
By pre-finishing small parts before assembling a project, you can save time and achieve a cleaner appearance in the finished job. One big benefit of pre-finishing is that you can avoid the problem of film finishes pooling up at the sharp corners where two surfaces meet, which causes drips and results in a sloppy-looking finish.
The concept of pre-finishing is simple; Finish all the parts of your project before you put it together. Be sure to protect areas—such as tenons and open mortises— that will be glued later. You can mask off areas with tape or insert round tenons into holes drilled into a scrap of wood.
The type of finish you choose and how you lay it on will either make life easy or terribly tedious. Try brushing polyurethane or shellac on two dozen door pulls using a 4-in. trim brash and you’ll likely develop a headache along with a lousy-looking finish. I use different application methodsbrushes, rags dipping cans and spray guns—depending on the finish.
When spray finishing, if you don’t have an explosion-proof booth, do your spraying outside, away from any sources of ignition. And one great little rig to use is a scrap of plywood on a lazy Susan. You can keep the pieces moving as you spray, resulting in a more even finish.
From Fine Woodworking #131
For the full article, download the PDF below:
Fine Woodworking Recommended Products

Starrett 12-in. combination square


Veritas Wheel Marking Gauge


Log in or create an account to post a comment.
Sign up Log in