Bench-Mounted Router Table
A three-part table clamps to a workbench, and it hangs from the ceiling when not in use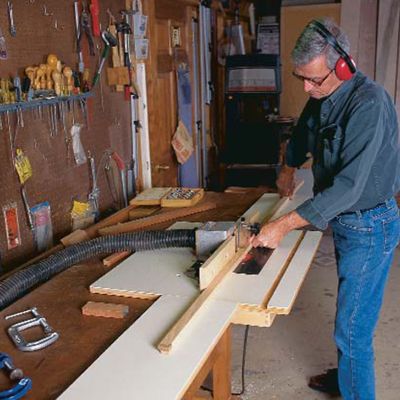
Synopsis: Paul Manning designed a router table that clamps to his workbench. He explains how to buy a phenolic-resin base insert and a cast-aluminum fence and build the table from scraps. He says the most important dimension is the location of the router itself, which should be mounted as close as possible to the front edge of the workbench. He offers assembly suggestions, and the article includes a drawing of the router table and a benchdog block detail.
I was getting ready to make grandfather clocks—one for each of my three childrenand I needed a router table. The clocks entailed routing lots of curved moldings, raised panels and long boards, and their imminence finally forced me to think about designing a router table that would suit my needs. Because of the limited floor space in my basement shop, I hesitated to build a freestanding unit. And I discarded the idea of building a table where the router would sit on my workbench because it would make the work surface too high to work at comfortably.
It occurred to me that I could make a suitable router table that took advantage of the features of my very sturdy 8-ft.-long cabinetmaker’s workbench, if I could design the table so that the router hung below the workbench surface. In effect, my router table is really only a router tabletop in that it has no legs and gets its sturdiness from being clamped to the bench. The table has three parts: the main table, which is the center section that holds the router and fence, and infeed and outfeed extension wings, which are clamped in the tails and side vises, respectively. Best yet, when I’m not using the table, the whole thing hangs on hook eyes from my basement ceiling joists, freeing up valuable floor space.
Buy the fence and build the table from scraps
I bought a phenolic-resin router-base insert and a cast-aluminum router fence from Trendlines for about $120. I had been thinking about building a fence, and while toying around with a design idea, I came across what I thought was a perfectly adequate system from Trendlines. The system has 14-in.-long adjustable fences and a dust-collection port that plugs right into my shop vacuum.
My bench is very heavy. Even with the weight of the router and the 13-in. cantilever of the router table, the bench is sturdy enough that it won’t tip forward, and thus no supporting legs are needed under the front edge of the table.
My main table is 30 in. wide and 24 in. deep, but obviously you’ll have to size your table to fit the size and shape of your workbench. The most important dimension is the location of the router itself. It should be mounted as close as possible to the front edge of the workbench. The extension wings can be of any length and width, but I made mine 6 in. narrower than the front edge of the main table so that I can stand close to the working router bit.
The tabletop extends beyond the Uframe, permitting the use of clamps for featherboards and hold-downs and making room for a miter-gauge slot. The extensions have short pieces of hardwood underneath for insertion into the bench vises.
For the full article, download the PDF below:
Fine Woodworking Recommended Products
Compass
Tite-Mark Marking Gauge

Double Sided Tape




Log in or create an account to post a comment.
Sign up Log in