A Classic Bookcase in the Craftsman Style
Wedged tenons and clean lines dignify this oak original
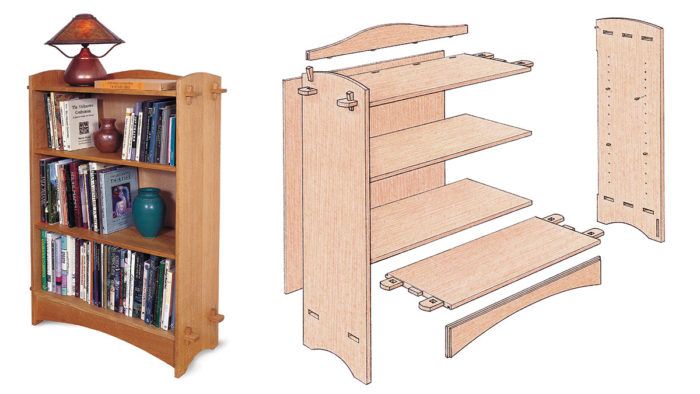
Synopsis: The bookcase that Gary Rogowski explains how to make in this article is just 50 in. high and 31 in. wide, and it represents Arts-and-Crafts style in its joinery and wood. He shows techniques for cutting mortises with a plunge router and template, and cutting through, wedged tenons with great holding power. Rogowski offers additional details on profiles, toe kicks, and wedges, and a detailed project plan shows all the required parts and dimensions. You also get advice on assembly and glue-up.
Of the many qualities that help define the Arts-and-Crafts style, perhaps the most apparent is straightforward and honest joinery. Wedged joints and through-tenons show the world how a piece was made. Open-grained woods like white oak give a piece an unabashed look, perhaps even a rustic quality that says, “Here’s what I am—sturdy, well made furniture.” No abstractions get in the way, no conceptualizing need be done. This frank simplicity is just the style the progenitors of the Arts-and-Crafts movement in England hoped for—a style in direct counterpoint to the machines and machined look of the Industrial Age and its products— and it’s just the style for the bookcase I made to fit in my bungalow.
The bookcase is just 50 in. high and 31 in. wide. Quartersawn white oak, the quintessential Arts-and-Crafts material, was clearly the wood of choice. For the sides and shelves, I glued two boards together, then scraped and sanded them. Wedges made of the same oak secure the through-tenons to the mortised sides and give the bookcase its strength and honest face.
Mortise-and-tenon joinery usually requires precise fitting; however, these long through-tenons need to be a bit loose to fit easily through the mortises. The wedges provide holding power at three locations. The back of the wedge pushes against the outside face of the side. This does nothing until the angled front of the wedge starts to press against the angled slot cut into the tenon. Then the wedge pulls the tenon through the joint until the tenon shoulders lock against the inside face of the case side.
Cut mortises with a plunge router and template
I cut the mortises using a plunge router, a -in. straight bit, a -in. template guide and a mortising template (see the top photos on p. 49). The template, made of -in. medium-density fiberboard (MDF), is milled as wide as my case side and with perfectly square ends. First mark the centerline of the template. On this centerline, lay out the mortises. Cut the mortises with a -in. straight bit on the router table, using a fence with stops clamped onto it, Cut the two outer mortises using the same stops and fence setting; flip the board over to cut the second one. For the center mortise, simply move the stops over to the proper position. If the template is square, the mortises will locate properly and be the same size. Finally, glue and screw a fence onto one end of the template.
From Fine Woodworking #136
For the full article, download the PDF below:
Fine Woodworking Recommended Products

Sketchup Class

Compass

Drafting Tools


Comments
Anybody make this? I was wondering how long it took. I've made two now out of walnut and they took about 40hrs each which includes everything from lumber select and prep to finishing. I feel this is a lot of time and I've nothing to compare to. Interested in getting feed back.
Log in or create an account to post a comment.
Sign up Log in