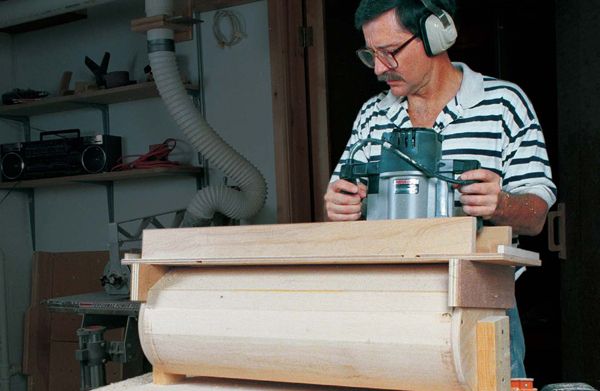
Router-Cut Columns
With two simple jigs, you can make large, wood cylinders without a lathe
Synopsis: Cabinetmaker Bill Ewing figured out how to make a round cylinder with a router rather than a lathe and share his techniques in this article. His columns are made up of eight pieces with beveled edge, and he offers direction on how to alter the angles of the bevel to adjust the final diameter. Ewing explains how to make the router jig, how to use a holding fixture to ensure precise alignment during glue-up, and the best methods for rounding the column with a router. Side information addresses making tapered columns.
A customer recently asked me to build a round column to support a peninsula countertop that he was adding to his kitchen. The 10-in.-dia., 30-in.-high column would be capped on each end. I knew there would be some difficulty building a round column out of wood, but as I do so often, I took the job with only a general idea of how to proceed. A round wood column is typically made by joining several straight boards together in a circle, creating a multisided column. The outside of this column is then shaped into a cylinder. I could see two problems with this project: How would I glue all of the sides together? And I do not own a lathe, so how would I turn a multisided column into a smooth cylinder?
Laying out the column
My first steps were to determine the number of sides required and to check the stock thickness. Eight sides seemed about right, and I had 3⁄4-in.-thick maple. I have learned that time spent at the drawing board pays huge rewards in the shop, so I begin by making a scale drawing of the column cross section.
The edge bevel angle needed to join the eight sides is 221⁄2°, and the side width measured about 41⁄8 in. I took special notice of the remaining stock thickness at the completed column joints (about 3⁄8 in.). This seemed a little thin, but with tight-fitting joints, I felt that it would be strong enough. For a larger column, you would need either thicker wood or more sides.
Make test cuts to get the right bevel angle
Once the scale drawing is complete, it’s time to make some sawdust. When bevel-ripping both sides of a board, I like to leave the edges blunt. A narrow, flat edge registers against the rip fence better than a feathery thin one. Rip nine boards: eight pieces for the column and one piece to cut up for test-fitting. Crosscut the test board into thirds, which gives you three chances to get the fence position and blade angle just right. Tilt the blade to 221⁄2°, set the fence to leave a narrow, 1⁄16-in. blunt edge and rip both edges of one test board. Next, crosscut this test board into eight pieces. Test-fit these pieces, then adjust the blade angle and fence position as necessary. By the third try, I had an octagon slightly more than 10 in. across with tight-fitting joints. Once you have the settings right, rip bevel edges in the remaining eight pieces. Because crosscutting the finished column would be difficult, I cut the sides to length at this point.
From Fine Woodworking #136
For the full article, download the PDF below:
Fine Woodworking Recommended Products

Festool DF 500 Q-Set Domino Joiner

Jorgensen 6 inch Bar Clamp Set, 4 Pack

Milescraft 4007 6in Bench Clamp


Log in or create an account to post a comment.
Sign up Log in