Hefty Sofa Table with a Delicate Touch
Understand the quirks of large timber before cutting the first board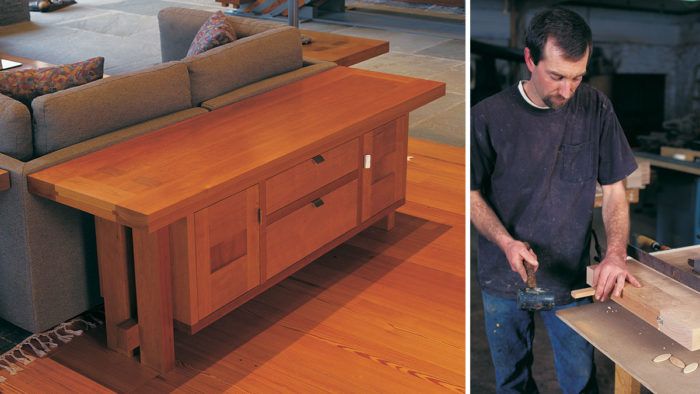
Synopsis: This exposed-joinery sofa table is at once traditional and contemporary, as are the processes used to build it. Eric Keil and the architect who designed the piece compromised on several design issues to improve the joinery. The tabletop is made of layers of MDF and veneer, and the carcase is finger-jointed. End-grain inserts in the tabletop mimic through-tenons. Two frame-and-panel doors and dovetailed maple drawers finish the piece. A detailed project plan helps take the difficulty out of working with heavy stock, and the architect offers a note on how he arrived at the design to begin with.
Of the 23 pieces of furniture I made for a house in the Pennsylvania Poconos, this sofa table was the most gratifying to build and the best designed. Large members make up the tabletop and legs, and a 5/4 cabinet rests below. It’s a hefty design built in a light, natural cherry, with unique exposed joinery that complements other furniture I installed in the home. The table’s effect is at once traditional and contemporary, as are the processes used to build it.
The sofa table is my favorite piece in the house, but I did have a few concerns with the initial design. I spoke with Robert McLaughlin, the architect who designed the table, and it was apparent that he had a lot of woodworking savvy. He anticipated many of my concerns and accepted some compromises to improve the joinery and chances that the table age gracefully.
Design compromises
As I looked at the preliminary drawings, there were three unconventional design elements that seemed troublesome. The configuration of the boards that made up the top was specific and unusual: two 2-in. by 5-in. pieces surrounded by a butt-jointed frame. Instead of a traditional breadboard design, the long outermost side boards sandwiched the end boards. This kind of joinery with solid lumber would have caused the joints between the end boards and the center of the table to fail over time. The architect had no problem with my solution to replace the center pieces with a stable substrate and veneer.
Another concern was that the design called for the legs to come through the top in a full through-tenon. Even if I consistently and accurately cut the mortises and through-tenons on the legs, I couldn’t comfortably glue and clamp the top to the assembled cabinet and legs below. And housing the solid legs in a veneered substrate wouldn’t allow for seasonal wood movement. We decided to make the tenons false. The legs would butt the bottom of the tabletop, and corresponding end-grain inserts could be carefully fit to shallow mortises on the top of the table.
The carcase of the cabinet itself was to be made of 5/4 solid cherry boards. The design called for the cabinet to be joined at the corners with an oversized finger or box joint. The fingers were 4 in. wide, corresponding with the seams between each 4-in.-wide board and its neighbor. The problem with this design was that the only long-grain-to-long grain glue bond occurs every 4 in., which simply isn’t sufficient. I added two biscuits to each finger (dowels or splines could have been used instead), which solved the problem of insufficient bonding surface but created another dilemma that I will address later.
From Fine Woodworking #137
For the full article, download the PDF below:
Fine Woodworking Recommended Products
Circle Guide

Drafting Tools
Compass




Log in or create an account to post a comment.
Sign up Log in