Joinery for Curved Work
Full-scale drawings and custom-made hold-down jigs are the keys to cutting accurate joints in curved parts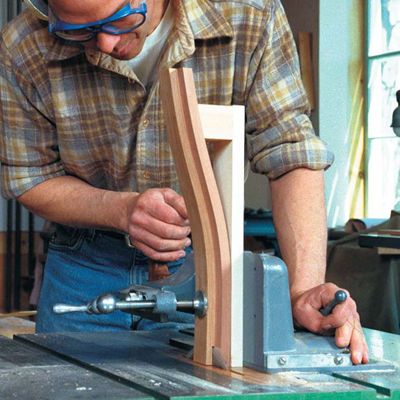
Synopsis: Curved parts can add physical strength to a design while preserving its visual lightness, according to Garrett Hack who details in this article how to use drawings and custom-made jigs to cut angled joinery with machine and hand tools. He starts with quarter-scale drawings but says that full-scale drawings are crucial, in several views. He uses thin, flexible wood battens to lay out the curves, and cuts the mortises first using shims to hold parts at the correct angle. Parts to be tenoned also require hold-down devices. Included are construction plans for useful jigs, as well as tips for working curved parts safely.
Many of us began our woodworking journey by building Shaker and Craftsman furniture. The predominantly square edges and flat surfaces common to these styles are ideal for laying out and cutting accurate joinery. But as you mature as a woodworker, you may wish to make curves a part of your repertoire, too.
The slightest curve adds elegance to any furniture design. To my eye, straight lines are nowhere as interesting as curved lines, which capture the imagination. Curved parts can add physical strength to a design while preserving its visual lightness.
Curved surfaces open a whole new realm of furniture styles: Chippendale, Federal and Hepplewhite, for starters. Yes, curves add complexity, especially when it comes to joinery. But with full scale drawings and custom-made jigs, you can work out the problems of angled joints and cut them using machines and hand tools.
Full-scale drawings are crucial
It is difficult to visualize the joinery of curved parts without making drawings. I often start with quarter-scale drawings to work out the overall design, then move on to full-scale drawings to figure out the particulars, which includes joinery.
A project may require one or more views. Two-dimensional curves, such as the edge of a tabletop or the rails of a chair, can be fully rendered in a top (plan) view. The curving back leg of a chair, a common three-dimensional shape, usually requires both front and side views to be fully visualized.
For laying out curves I use thin, flexible wood battens. A typical batten is about 3⁄4 in. wide and 3⁄16 in. thick and is made of a good bending wood such as oak or ash. A steel ruler also works, but it’s not very flexible for tight curves. Besides, I prefer the natural curve of a wooden batten. Perhaps I get a slightly less precise curve than I would with a steel ruler, but that is, after all, the way the wooden parts themselves behave when steam-bending or laminating.
The dilemma of working with curved parts is that they often end up meeting at odd angles. Try to make all of your joinery decisions during the drawing stage, including whether you wish to angle mortises, tenons or both. As a rule, I prefer to angle the mortise and keep the tenon at right angles to its shoulders. That rule is based on the fact that it’s easy to get an angled mortise using a horizontal mortiser or a hollow-chisel mortiser. But if I were to cut mortises by hand, I’d lean toward keeping the mortises square because it’s tough to chop at a consistent angle using chisels.
During the design stage it’s important to visualize how the piece will be assembled. Can you get all of those angled joints together in an orderly progression without stressing some part? And is there a way to jig a part to make the necessary cuts?
From Fine Woodworking #137
For the full article, download the PDF below:
Fine Woodworking Recommended Products
Freud Super Dado Saw Blade Set 8" x 5/8" Bore
Pfiel Chip Carving Knife

Olfa Knife





Log in or create an account to post a comment.
Sign up Log in