Make a Pembroke Table
Drop-leaf rule joints and wood-hinged leaf supports are fussy but fun
Synopsis: Pembroke tables have been around for a long time; small and graceful, they may be simple or elaborate. Jefferson Kolle shows how to make a simple one with tapered legs and a curved top. There are hinged drop leaves with rule joints and short, wood-hinged arms that support the leaves. Detailed project plans offer dimensions for the table, and they can be adjusted to fit your needs. Kolle uses a two-piece jig to taper legs on the tablesaw, explaining in detail how to follow suit. The hinge installation is exacting for several reasons; Kolle details how to install the hinges and how to use trammels to lay out the top.
Divorce is a nasty thing. Aside from the obvious casualty of the demise of my family, I regret the fact that Eddie will no longer be my father-in-law. Over the course of nearly 20 years, he has become one of my best friends. He always admired a Pembroke table I’d made years ago, and in fact, he commented on it almost every time he came to our house. In appreciation for all that I’ve learned from him—he’d been more than a surrogate father since my dad died—I wanted to make another one of the tables for him.
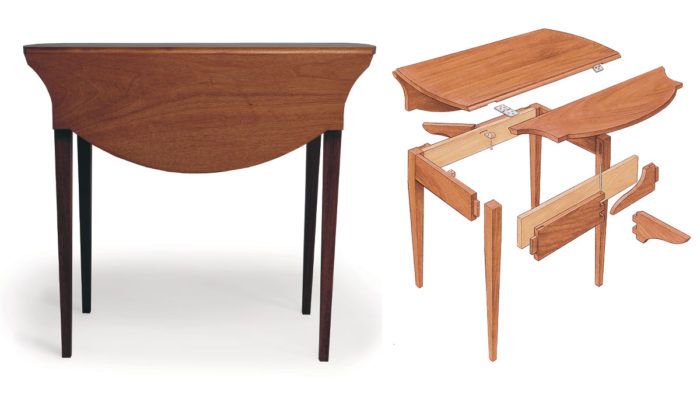
Pembroke tables have been around for centuries. Small and graceful, they have been made in forms simple to elaborate. The one I made is on the simple side—the only adornments being the tapered legs and the curved top. What makes the table fun to build are the moving parts: the hinged drop leaves with their attendant rule joints and the short, wood-hinged arms that support the leaves. In the drawings, I’ve included the dimensions for my table, which is in. long at the center of the top. You can adjust the dimensions of the table to suit your needs. Most often, Pembroke tables are small side tables, but they were built in all sizes. I once measured an antique Pembroke table with a 48-in.-long top.
Two-piece jig is used to taper legs on the tablesaw
I can’t claim ever to have had an original thought, and I certainly can’t claim to have invented anything as far as woodworking is concerned. The tapering jig I used for the table’s legs is no exception. I borrowed the idea from Charles Grivas of West Cornwall, Conn. I’m not sure he invented it, either, but it sure works well. (For a look at Grivas’ work, see FWW #131 pp. 40-44.)
The tapered legs are cut from 1 -in. square billets, 29 in. long (see the photos at right). The taper starts 6 in. down from the top of each leg. The legs taper on all sides to in. at the floor. It’s a good idea to cut the mortises in the legs before you start tapering.
Set your tablesaw fence for about 5 in. and rip two 35-in.-long medium-density fiberboard (MDF) or plywood scraps. After ripping, don’t touch that tablesaw. You’re going to taper the billets by setting them proud of the edge of the ripped strips and sending them through the tablesaw at the same fence setting, once for each tapered leg side, for a total of four cuts.
Lay out a -in. square centered on the bottom end of one of the billets and square around the billet 6 in.
From Fine Woodworking #138
For the full article, download the PDF below:
Fine Woodworking Recommended Products

Stanley Powerlock 16-ft. tape measure

Sketchup Class

Bessey K-Body Parallel-Jaw Clamp


Log in or create an account to post a comment.
Sign up Log in