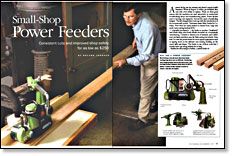
Small-Shop Power Feeders
Consistent cuts and improved shop safety for as low as $250
Synopsis: Roland Johnson offers three reasons to use power feeders: they allow your hands to stay far from the blade doing the cutting, they run nonstop, and parts are inexpensive to replace. In this article, Johnson explains how to install a power feeder by bolting it directly to your cutting machine, and how to align and adjust it properly. You’ll learn how to match the feeder to your machine and how to keep tabletops and fences slippery in order to reduce friction. If you’re doing work that requires tedious runs, such as cutting molding, power feeders are hard to beat.
A power feeder can run nonstop and doesn’t require health insurance. When its fingers, or rollers, get shredded, they cost only a few dollars to replace. Those are three good reasons why the machines are used extensively in commercial woodworking shops and manufacturing plants. Power feeders used to be large and expensive, beyond the reach of small-shop budgets. That all changed three years ago with the introduction of the economically priced, Taiwanese-made Baby Feeder by CoMatic. Now there are many feeders to choose from, large and small, some costing less than $250.
I originally purchased a -hp feeder to produce “weathered” oak boards using wire-brush wheels mounted on a homemade motorized jig. I needed to distress a lot of material, and I didn’t want my hands anywhere near the flesh-eating wire wheels. Since then I’ve used the power feeder for more typical applications such as ripping stock on the tablesaw and running molding on the router table and shaper. The feeder is one of those tools that I wonder how I got along without for so long.
Besides the extra margin of safety, a power feeder allows you to adjust the feed rate for optimum results. Scorching, from moving material too slowly, or chattering, when material isn’t held down firmly, can be eliminated with a feeder. When feeding stock by hand, especially long pieces, it’s difficult to maintain a constant feed rate.
Feeders bolt directly to cutting machines
To work most efficiently and safely, a power feeder needs to be mounted securely to a machine. The most secure way to attach a feeder is to bolt it to the machine (see the photos below).
I drilled and tapped my tablesaw top, on the right outfeed side, to mount a feeder. I imagine many woodworkers don’t fancy the thought of drilling holes in a pristine tablesaw top. But cast iron is quite soft and easy to work. Set the feeder base where you wish to mount it, and use a center punch to mark the locations for the holes. Choose bolts slightly narrower than the holes in the feeder’s mounting flange to give yourself a little margin of error. Then drill the holes and tap them.
Because my router tabletop is made of particleboard, I used through-bolts and nuts to attach the feeder. For extra insurance, I added an aluminum backer plate underneath to help distribute the stress. A power feeder that uproots itself from a tabletop can cause all sorts of havoc.
From Fine Woodworking #139
For the full article, download the PDF below:
Fine Woodworking Recommended Products

Starrett 12-in. combination square

Dividers

Tite-Mark Marking Gauge


Log in or create an account to post a comment.
Sign up Log in