Craftsman Wall Cabinet
A simple construction with a refined door and a tilting drawer
Synopsis: Get plans and instructions to build a hanging wall cabinet with a glazed door, shelves, and a clever tilting drawer. Techniques covered in this article include constructing the tilting drawer, cutting bridle joints, and constructing a door with glass panels and muntins. Detailed project plans with dimensions will show you how to build this small cabinet.
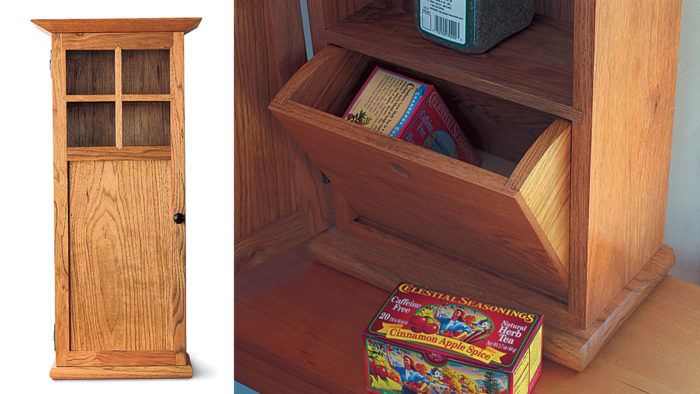
There is always a spot for a wall cabinet, especially a small one. This Craftsman-style piece is modeled after a clock, and at a little more than a foot wide it fits well in almost any tight, vertical space. I made it out of butternut, an underused, medium-toned wood that works easily. Because this cabinet was destined for a kitchen, I outfitted the inside to accommodate spices, but the same-sized cabinet could hold anything from pottery to small books. The shelves, in this case, are spaced to fit offthe-rack spice bottles, with the bottom shelf roomy enough for larger, bulk-sized decanters. The tilting drawer at the bottom is made to fit large packages of tea.
When it comes to construction, the simplest answers are often best. On this small, vertical cabinet, I could have dovetailed the case, but I saw no need to spend the time when countersunk and plugged screws would do. And on such a simple piece, I didn’t want anything to detract attention from the door, where I spent most of the design and construction energy. I used a flat panel at the bottom of the door to cover the drawer and bulk items, but at the top I installed glass to show off the nicer-looking spice bottles and to make the piece a bit more interesting. Over the single piece of glass, I installed muntins, giving the appearance of twoover-two panes of glass.
Begin by milling up the lumber: The top and bottom are 1 in. thick; the sides, door rails and stiles are 3 ⁄4 in. thick; the drawer parts are 5 ⁄8 in. thick; the back and shelves are 1 ⁄2 in. thick; the muntins and door panel are 1 ⁄4 in. thick.
Building the basic case
Don’t waste energy with overly complex methods of building the case. Use 3 ⁄4-in.- and 1 ⁄2-in.-thick stock and trim everything to width and length on the tablesaw. Set up the tablesaw to cut 1 ⁄2-in. dadoes for the shelves. Use a stop on your miter gauge to ensure that the dadoes in the back and sides will line up. It’s not really necessary to dado the back panel for the shelves, but doing so eases glue-up.
The first step in the process is rabbeting the top and bottom because the same stop location can be used for each—on all three pieces. Then locate each shelf and set the stop on your miter gauge. When the dadoes have been cut on each of the three pieces, they should all line up perfectly. On the two sides, use the same setup to cut another 1 ⁄2-in. dado, inset 1 ⁄2 in. and 1 ⁄4 in. deep, to house the back panel.
From Fine Woodworking #140
For the full article, download the PDF below:
Fine Woodworking Recommended Products

Circle Guide

Drafting Tools

Dividers


Log in or create an account to post a comment.
Sign up Log in