Trestle Table with Breadboard Ends
Cut all of the joints for this classic cherry dining table before cutting any of the shapes.
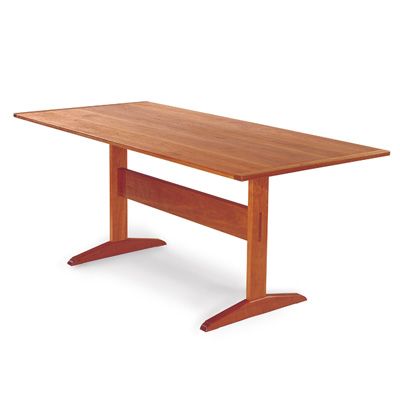
Synopsis: Charles Durfee shares techniques and project plans for a classic trestle dining table that will seat up to eight. Techniques covered in this article include hand-cut through mortise-and-tenon joints, and machine-cut breadboard ends. Durfee demonstrates how to size tenons, and offers tips for choosing lumber for the tabletop. The article walks readers through the construction of the piece from lumber milling to final finish. He also explains how to modify the design to change the dimensions of the table to seat more or fewer people. The article includes a three-view exploded drawing with dimensions.
The neo-Sears & Roebuck table that you have been dining at since your student days is getting tiresome. And now a big party, months in the planning, is tangibly close. It’s time to unveil your woodworking skills for a large and appreciative audience. It’s time to build that trestle table you have thought about for years. First, settle on the size. A dining table for the average family, 3 ft. by 6 ft., will seat six comfortably—seven or eight in a pinch. An 8-ft. model will give you more space. Be sure to allow about 3 ft. all around the table for seating. Trestle-table widths are limited to 3 ft. for structural reasons (more on that later). Next, decide on the type of wood you want. Domestic hardwoods, especially cherry, walnut, birch and maple, work well for this project. If the R.S.V.P.s are coming back, there’s no time to lose.
Build the Base First
It doesn’t really matter whether you build the top or the base first. Starting with the base is a good idea because it takes the bulk of the work (generally true for tables). And if that’s all you have done by the day of the party, at least you can slap a piece of plywood down, put a tablecloth over it and still hear plenty of praise. But you should at least skim-plane the top boards at this time to be sure that you will have sufficient stock to make it wide enough. Allow in. per piece, after trimming off sap and bad edges, for jointing. Tops have a way of getting narrower as you work them up.
Stop caressing that lovely, thick, cherry stock for which you just liquidated your retirement portfolio, and pick up some cardboard, thin wood or plywood to make patterns. The latter two are better choices because they can be used for pattern-shaping parts on a router table, if you are so inclined.
Make patterns for the feet and cleats, as well as for the posts. Although the posts are straight and square, having a pattern for them makes it easier to lay out your rough stock to get the best yield. Make the patterns carefully and accurately. I write construction notes on them also. After seeing the table, your next-door neighbors will want you to build one for them, and the notes will help you remember how you did it.
For the beam, find a nice piece of or stock, 6 in. wide. The feet and cleats will come out of stock, while the posts can be from or stock. Bear in mind that most of the base assembly will be exposed on all sides, so there is no chance to hide knots, sapwood or other imperfections. (Unless, of course, you choose to make them a design element, which I don’t advocate.) You can tuck small flaws up on the inside of the cleats, if necessary.
I have two general rules for ease and efficiency in construction: 1) complete the joinery on each part before cutting out the shapes; and 2) chop the mortises before cutting the tenons. Thus, after jointing and planing the stock to thickness, rough out the feet and cleats on a bandsaw. Joint the flats on the bottoms of the feet and tops of Patterns make perfect. Usepatterns for the trestle table’s foot and cleat Construction reminders written on the patterns help you avoid mistakes and remember salient details. After tracing the patterns on the stock, joint the top and bottom of each piece and then lay out the mortises. the cleats. Rip these parts to their overall heights on the tablesaw, but don’t cut the tapers yet—joinery before shape, remember? Because the posts and beam have no particular shape, the four sides can be cut to size at this time.
Now, lay out the mortises, making sure that they are centered in their respective pieces, then chop them. For chopping I use a vintage, floor-model hollow-chisel mortising machine that crunches out the slots with authority. But in my earlier days, I would have drilled out the waste and pared the sides with a sharp chisel—an inexpensive method that works very well. Indeed, this latter method is preferred for the post-to-beam through-mortises because hand tools will provide the crisp outline you want. For these mortises, mark out on one side and transfer the marks to the other side. Waste and pare halfway in from each face. Slightly lengthen the ends of the slots on the outside faces by in. top and bottom, which creates a dovetail effect when the beams are wedged.
 |
 |
| 1. Cutting through-mortises requires extra precision. Instead of using his mortising machine for the beam-to-post mortises, the author uses a in. bit to rough out the in.-wide mortise from both sides, which he then finishes with chisels. |
 |
 |
| 2. Marking with a razor knife makes for a crisp edge. The through-mortises are in. longer on the outside faces of the posts. Prior to assembly the tenons will be kerfed on the bandsaw, and during assembly, wedges driven into the kerfs will close the gaps at the top and bottom of the elongated mortises. |
For the layout, mark from the mortised piece onto the to-be tenoned piece. Tenons can be cut with a handsaw and chisel or by machine. I prefer to cut them laid flat on a tablesaw fitted with a dado head. Use the miter gauge to push the piece across, and the fence as a stop. A sharp dado blade will cut the shoulder and cheeks cleanly in a few passes, with one setup. I don’t like standing a piece on end to cut tenons. The thought of a long piece of wood waving about above the sawblade doesn’t inspire confidence. And even with a jig to hold the piece, getting the sawcut plumb into the cheeks can be difficult. It’s a good idea to make test cuts in some scrap that’s the same thickness as the posts and beams. Set the blade a bit shy of the correct height, and raise it in increments, as needed. Flipping the piece over and cutting off the same amount from both sides will automatically center the tenon.
 |
1. Mortises first, then tenons. After all of the mortises have been cut, hold a scrap of stock to the mortise and mark the tenon width. |
 |
2. Made in the shade with a dado blade. Centered tenons are easy to cut with a dado blade because the blade will cut the same amount of wood from both sides of the stock. The author makes a test cut and then raises or lowers the blade to the premarked pencil line on the scrap stock. |
 |
3. Test fit. After cutting the scrap to the marked lines, the author tests the fit in the mortise. When the fit is right-it may take several tries—he cuts tenons on the real stock. |
Test the fit, and if necessary, use a rabbet plane to trim the tenon just right. I often have to do this, no matter how carefully I had done the machine work. You should be able to push the tenon into the mortise simply using hand pressure. If you feel like you have to hammer the tenon into the mortise, don’t. Stop, and pare the cheek more. If it drops in with its own weight, it’s too loose. In that case, glue a shim of veneer to one cheek and try again. The shoulders can be back-cut slightly to improve their fit.
Test-fit the mortise-and-tenon joints, including the beam-topost ones. Take your time, and have patience to make them right: snug fits for the cheeks, no daylight under the shoulders and everything square. Give yourself a chance to feel the pride in a job well done it’s worth it.
Shape the Feet and Cleats with a Bandsaw; Finish with Hand Tools
Now shape the feet and cleats. Mark the areas where the post shoulders will land so that you don’t cut into these areas. The tapers can be roughed out on the bandsaw and easily finished up using a handplane, rasp and scraper and, if necessary, doing some light sanding. If you’re dying to use the router table, attach the pattern to the stock with double-stick tape and trim away using a flush-trimming bit.
| Patterns make perfect. Use patterns for the trestle table’s foot and cleat Construction reminders written on the patterns help you avoid mistakes and remember salient details. After tracing the patterns on the stock, joint the top and bottom of each piece and then lay out the mortises. |  |
| Handsaw to shape; finish by hand. Feet and cleats, the only curved parts of the table, are cut on a bandsaw and then finished with a plane and scraper. The ends of the feet are adorned with a thumbnail, which the author shapes with a rasp and file. |  |
It is helpful to clean up the surface on each piece before assembly. Use a handplane or cabinet scraper—both are efficient to use and crisply focus the grain patterns. As a bonus, you can listen to music instead of the loud whine of a power sander. But sand, if you must. Whichever method you use, go lightly in areas where tenon shoulders touch down, so you do not ruin the careful joinery work. (I must confess that I do sand on occasion, but only lightly and after assembly to prepare the surface for finishing. I also sand spots where the grain stubbornly resists being cut cleanly.)
Now use a router to knock off a moderate in. chamfer on all of the edges. Just how much you trim from the edges depends on the look you want: Trim more for the antique effect, less for the contemporary. Begin assembly by putting together each foot-post-cleat unit.
 |
Clamp and measure. After a dry run with clamps, the author spreads glue on the tenon faces and on the mouths of the mortises and clamps together the leg assemblies. Before the glue has time to set, he measures from the tips of the feet to the tips of the cleats, making sure the distances are the same. |
 |
Put clamps near the through-mortises. Protect the posts from clamp tracks with blocks of wood held by smaller clamps. Do not put the long clamps too high on the posts or on the feet or cleats; there’s a danger of bending the posts or, worse yet, splitting the mortises with too much pressure. |
After brushing glue on the tenon cheeks and in the mouth of the mortise, press the parts together. Usually, a clamp or two from top to bottom will close the joints nicely. Check that the cleat and foot are square to the post and that the measurements from the cleat tips to feet tips are equal. It’s easier to clean up glue now than it is to chisel it out later. Of course, the real trick is to use only enough glue to have a tiny bit of squeeze-out. I have some high-tech tools I use for glue cleanup: an old toothbrush, a corner of a plastic credit card and a sharpened stick wrapped with a damp rag.
After the post assemblies are dry, they can be joined to the beam. Make the wedges and cut the kerfs for them. I use my bandsaw to cut both the wedges and the kerfs in the beams for the wedges.
Now you are ready for the final assembly of the base. Being too impatient to wait for my wife or the UPS man to be on hand, I usually do this step alone. But it’s tricky and goes more smoothly with some help. Maybe a dinner guest can come early to help out?
Make a dry run, but don’t drive the wedges. Once you’re sure everything fits, brush glue around the joinery, assemble the pieces and pull tight. Don’t muscle down on the clamps too much, or you risk cracking the posts across the beam. It’s best to have one clamp on each side of the beam.
Once the joints have been pulled tight, you can begin to drive the wedges. Dip the tip of the wedge into the glue and, working quickly before the glue sets, place it into the kerf.
Drive the top and bottom wedges at the same time with the hammer, giving them alternate taps. When the sound of the hammer blows changes from ringing to dull, you know the wedges are home.
Again, clean up glue squeezeout before it sets in the inside corners. Leave the outside of the wedged mortise and tenon until later; you’ll be able to attack it easily. When you do, cut off the protruding wedges, and flush off the whole end with a sharp handplane. A low-angle one works well here. The base is now done and can be pressed into use for your dinner party.
A Good-Looking Top Begins at the Lumberyard
Look for consistency in grain and color in the wood that will make up the top. Sapwood on one face can be turned under, but you’ll need the outer two edges clear.
Try to have no boards under 6 in. wide; wider boards are preferable. However, it looks awkward to have one very wide, monster board among some narrower ones, so look for consistency here as well. The lumber can’t have much warp or twist, either. Beginning with stock, you won’t have a lot to give while achieving a clean, flat surface that’s in. to in. thick.
Because you are beginning with rough stock, you can keep design options open. Avoid stock that’s already been planed to in., as you are paying for a barrel of chips, which you may have wanted back on the board. The tabletop will look more substantial if it is thicker than in., especially if it is longer than 6 ft. Learn to develop the X-ray vision needed to tell what’s under the surface of rough lumber, or buy lumber that has been only skim-planed. If you can’t thickness the lumber yourself, have the yard take it down to about in., which leaves a whisker for cleanup.
Joint the edges and test clamp. I recommend using biscuits to help align the top boards while gluing. They aren’t needed for strength, so there’s no need to glue them in. But they will help with the dressing process afterward and will maintain the thickness you want. After glueup, it’s a good idea to take the top to a mill shop with a thickness sander wide enough to accommodate the top’s width.
Add Breadboard Ends for Stability and Tradition
Putting breadboard ends, or caps, on a tabletop is time-consuming. At minimum, you should allow a day’s work for them. They can be dispensed with, if you wish. The reasons for having them are both aesthetic and structural.
| 1. A circular saw in a woodworker’s shop? Using a saw guide made from two strips of in. plywood, the author roughs out the breadboard tenons by cutting a series of kerfs on both sides of the top. |  |
| 2. Slick work. A few passes with a wide chisel cleans up the debris between circularsaw kerfs. |  |
| 3. Plunge-router cleanup. After sawing and chiseling the breadboard tenons to their rough thickness, the author uses a plunge router to get the breadboard tenon to the exact thickness of the mortise he’d previously cut in the breadboard end cap. |  |
| 4. Tongues and tenons. A jigsaw quickly cuts the long, single breadboard tenon into a tongue-and-tenon sequence that will fit into mirror-image mortises already cut in the end cap. |  |
| 5. Extralong cap comes off with a tap. It’ll take some fussing and fiddling to get the cap to fit just right. It’s a good idea to leave the cap a few inches long on each end while fitting, and then after everything is fit, drilled, glued and pegged, you can cut the caps flush with a handsaw. |  |
| 6. No glue in the long holes. The center tenon has a round hole, which will get glued and pegged during assembly. The other four tenon holes are elongated to allow for wood movement. When assembled, the long holes are pinned without glue. |  |
Caps give a rectangular shape an ending point, dressing off the ends of a tabletop, dropfront desk lid or, not surprisingly, a breadboard. The caps help keep the top flat, especially at the ends where it is floating freely. For this table, though, the best reason for caps, in my opinion, is tradition. Put them on, and you have a classic Colonial table. Leave them off, and it looks contemporary. Aesthetically and structurally, a top will do just fine without breadboard ends.
The construction process for caps can be as simple or difficult as you wish. On many antique pieces, the caps were simply nailed onto the ends. The next step on the road to fine joinery is to plow a tongueand-groove joint, then nail the caps on. Screwing on the caps gives a bit more longevity to the joint. Although this method doesn’t accommodate seasonal wood movement, I must confess to having done this years ago on some tables. To this date the caps, after almost 20 years, show no signs of loosening.
However, I prefer to join the caps to the top by cutting a series of tenons, connected by a tongue that is stopped at the ends. The tenons fit into a corresponding series of mortises, and the tongue fits into a dado that also stops short of the ends. The center mortise-and-tenon joint is glued and pinned, The others are pinned and left dry, with the holes in the tenons elongated to allow for wood movement. This method makes a firmer connection and allows for the top’s seasonal expansion and contraction. One final touch is to spring the cap-to-tabletop joint by planing the inside edge of the cap slightly concave. When clamped on to the top, the middle of the cap will be sprung in, holding the ends tightly.
Apply the Finish, Then Attach the Top to the Base
Dressing the top and base can also be done by hand with planes, scrapers or sandpaper, which will give you a nice workout in preparing a surface for finishing. I find it difficult to see the difference between one sanded to 180 grit and one done to 400 grit. For some reason, the finer grit equals more boasting rights. Typically, my surfaces are handplaned and scraped, and then, if necessary, gone over with 180 grit before finishing. After all, I’m not looking for guitar-body quality in a tabletop that’s meant to be used. The color will be lovely, with the grain in focus. The smoothness will be in the finish.
Okay, now it’s time for true confessions. How many of you get to this point of a project and go for the quickest, simplest finish available? I’m sure many hands are up. Being one of that group, I use an oil-varnish blend. With a bow to those who use varnish, shellac or lacquer, it’s hard to beat an oil-varnish finish for ease of use and maintenance and for bringing out the wood’s natural tones. Cherry and walnut do especially well with it. The varnish will give some body to the penetrating oil but not any more surface buildup than you want.
Although in the past I’ve mixed my own brews, I now use, with satisfaction, Minwax Antique Oil Finish. Three coats will generally do the trick. The second and third coats are sanded while wet with 320- or 400-grit wet-or-dry sandpaper before wiping off. The finish is smooth and silky. People will invariably walk up to a table and run their hands over it. The look is plain and informal but handsome.
 |
Four buttons in a long slot. Cherry tabletop buttons get screwed to the underside of the tabletop and fit into a slot router-cut into the inside of the cleats. Make sure to stop the slot 1 in. back from the end of the cleat. |
To allow for expansion, fasten the top to the base using wood buttons (my preference) or metal clips from Rockier (800- 279-4441). The slots for these are on the inside edges of each cleat and are easiest to do before assembly with a router or tablesaw. Stop the cuts before each end. Also, to keep the top from slipping sideways, have a short in. dowel protruding about in. from the top center of each cleat. It fits (unglued) into a corresponding hole in the underside of the top.
That does it. Remember to sign your name under the top. It is time to bring the table into the house, just in time to serve dinner to the “oohs” and “aahs” of an impressed audience.
From Fine Woodworking #141
Fine Woodworking Recommended Products
Leigh D4R Pro
Leigh Super 18 Jig
Freud Super Dado Saw Blade Set 8" x 5/8" Bore

Get the Plan
CAD-drawn plans and a cutlist for this project are available in the Fine Woodworking store.




Comments
I like the casual style of the writing and the table.
The web version of this article needs a bit of editing. A lot of numbers in the pdf did not come through on the webpage. Particularly when giving stock sizes and dowel lengths For example, this is a cut and paste from the page "find a nice piece of or stock".
Log in or create an account to post a comment.
Sign up Log in